A buddy of mine was here just a little while ago and we were looking at it. I'm thinking I'll at least put something between the link towers and tie the link towers back to the backbone too.
I know this thing will be pretty light so bending it may not be as much of an issue as on some rigs. But I drive by Braille, and I don't want to ruin a weekend with a destroyed housing either.
I picked up my new to me welder yesterday. It's way more welder than I'll ever need, but it's nice to finally use a real machine. The only problem is now I can't blame the machine for my horrible welds.
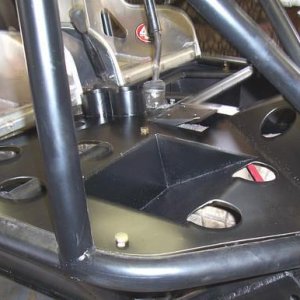
I immediately put it to work welding up the backbone truss on the rear axle. I spread the welding out over two days. I used the lowest settings possible and just made 1-2" welds in different areas, and let it cool. Hopefully I didn't warp the housing too bad. I guess we'll see.
This machine can even make a hack welder like me look halfway decent.
In between welding on the rear axle I started mocking up the Artec ram mount on the front axle.
Tomorrow I'll start trying to hack up the RuffStuff trusses for the top of both axles.
I worked some more today on the rear axle. I got the long side of the truss cut out and about half welded. Tomorrow I'll finish welding the long side and start mocking up the short side.
I finally finished the rear axle today. That was a lot of cutting, grinding and welding! I think I've blown a whole stick of DOM out of my nose the last 4 nights.
That's one RuffStuff Toyota truss hacked into 4 pieces. It's not fancy, but I think it'll get the job done.
I also added RuffStuff weld washers on all the link and shock tabs. I'm not posting pics of those though, the welds are UGLY. LOL
Lots of overtime and the cold weather have kept me out of the shop for a couple weeks, but I finally got a little more done this week. I got the truss and ram mount finished on the front axle. Not a lot of progress, but here's some pics.
I've got the knuckles off now and got the tie-rod hole drilled out for a 3/4" bolt. While they're off I'll mock up the Spidertrax brakes, and make my caliper bracket to bolt to the knuckles. I'm going to run Dynatrac Pro Steer balljoints. They're pricey, but hopefully they'll be worth it. I hope they'll hold up ok to the full hydro and 39s. I've got a set ordered and they should be here by the middle of next week.
I got a little time in the shop this afternoon. While I've got the knuckles off the front axle I figured I'd work on getting the Spidertrax brakes mocked up.
You can see I had to modify the knuckles just a little to make everything fit. The "wings" had to be cut off the knuckle because they interfered with the rotor, and I had to grind down around the original caliper bolt holes to clear the mounting ears on the Wilwood calipers. The original caliper bolts are a funky M11 thread that I couldn't find anywhere so I tapped them out to 7/16"-14.
I just made a simple, ugly, but functional caliper bracket out of some 2"x.25" flat bar and some .5"x.6875" spacers. I drilled and tapped the spacers to 3/8"-24. The caliper bolts to the bracket from the front, and then the bracket bolts to the knuckle from the back.
I didn't have a lot of time in the shop today so there's not a lot of real progress. I did get a few things done though.
I cleaned and spray bombed the wheels. If I get some time tomorrow afternoon I may start mounting the tires.
After that I put the GTO oil pan on the engine, and put on the fittings to adapt the steam ports to -4 AN. And I figured I'd stick the headers on for a test fit. They're OBX LS turbo headers. They're supposed to come up and froward, but it makes them too wide to fit the chassis. This way they're narrow enough, but it's gonna be tight with the steering pump. I've got the engine bracket kit from Wide Open Design that I think will move it up high enough, I just have to get a new water pump before I can put it on. I also put in new spark plugs, and Taylor Thundervolt plug wires with heat shield boots.
When time has allowed over the last week I've been working on installing the WOD LS engine bracket kit. Along with a new water pump, alternator, and PSC CBR pump. It's a very nice kit, and the install was very easy. I only had a couple if minor problems with the power coat being too thick in a few holes. That was easily solved. Also, I bought the belt they recommended for the kit, but it was too long. I stepped down to a slightly shorter belt. Maybe one of my pulleys is a different size than what they spec'd it for. Just something to keep in mind if you're installing this kit.
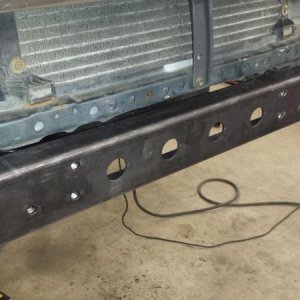
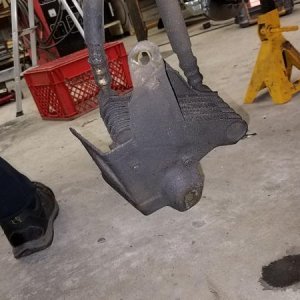
Today I cut a couple of pieces of 1/4" plate and formed them to the bottom of both axle housings to act as a skid plate since the housings are just 1/8" thick. Definitely not fancy, but it will work.
After that I spent the rest of the day mounting the tires on the beadlocks. That's definitely not a job I want to do again any time soon. It about wore me out.
Not a lot of progress, but at least it is moving forward. Friday starts my long weekend though, I'll be off for 9 days, Hopefully I'll make some good progress during that time. My next goal is getting it back to a roller, and the start mocking up the drivetrain.
It may not look like a lot, but by my standards I've gotten quite a bit done the last couple of days.
First off I installed the inner axle seals in both housings. I used the seals Trail-Gear sales for their 9" housings. Mine used the 2.75" I.D. seals. Even though the rear is FF I'm using seals on it too. The center section will have to be over filled for the flipped pinion and I didn't want to have the tubes full too. I didn't get any pics, but they were a pretty simple install.
Then I got the axles and ORI's hung.
Then bolted on the rear brakes and checked the clearance with these wheels. Like I had expected it looks like I will have to run wheel spacers. It's that or new wheels, and I really just don't want to go to all that trouble right now. I already had some spacers, so these pics are with 1.5" spacers installed.
Then I got the Dynatrac ball joints installed and the knuckles back on the axle. The unit bearings and brakes bolted up to check clearance. And mounted the ram and measured for my tie rods. I'll cut them tomorrow. I can't bolt the front wheels on yet because I'm a dummy that didn't order lug nuts when I ordered studs. They'll be here sometime this week though.
I'll be working on it more this week. I may start tomorrow on putting the drivetrain together and getting it ready to set in the chassis. At least it's kinda starting to look like something now.
Really comming together Ben! One question..... looking at your pics with tires installed when it flexes will the tires get into the ori struts? Last one I built I thought I had plenty of clearance between coilover and tire on rear until I put it on the rti ramp and tire got into the coilover so I had to change mounts
I haven't flexed it yet to see. I will as soon as I get the front wheels on though. I'm hoping they don't hit, but I know it will be close. If they do I guess I'll have to get bigger spacers, I can't move the mounts.
I got a little bit of time to work on it today. I got the Poweglide and Atlas mated together.
I also got the tie-rods cut and the inserts welded in. Each insert got two passes with the TIG and two plug welds with the MIG. Then I hooked the tie rods up and used an air hose to cycle the steering. I don't know yet if I can use the full 8" of stroke, or if I will have to limit it.
I know the angle of the tie-rod at full lock is not ideal, but the ram is as close to the axle as I could get it.