• Help Support Hardline Crawlers :

Yellow buggy build

You need a side profile shot to show axle placement compared with chassis
Need to discuss the rear suspension made out of unbraekable unicorn bones.
 
d_daffron said:
The rear axle and transfer case ate up a good sum of the overall budget. But the front axle is where I saved a large sum of money. I scored a +05 super duty 60 with 3.73 gears in it for $350 from LKQ and delivered to a nearby shop.

I wanted to try running a numerically lower ratio in the front than the rear to aid in steering since the SCS case didnt have a 2wd option so I kept the stock 60's front 3.73 gears to go with the 3.90's in the rear.

So for now to keep price down I decided to try these 1550 shafts ford has come out with. $308 shipped!!!! From denny's driveshafts.
10ebffca193869b49b79ab3e8455facd.jpg

febb708b80aa1c7fecaf8f9d7c335ece.jpg
no, thats not a minature pepsi bottle.

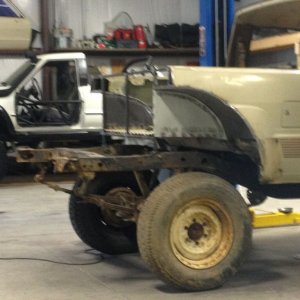
After that it was pretty much just cutting and welding for a while with pretty much no pictures taken. Theres no real tech there anyway, its just cutting and welding.

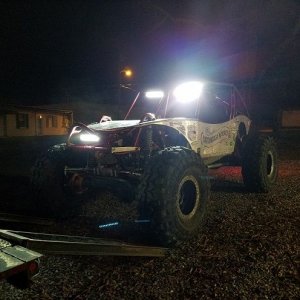
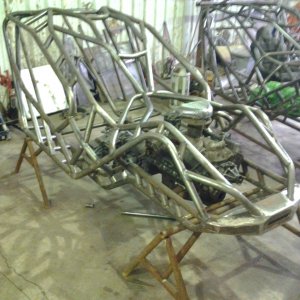
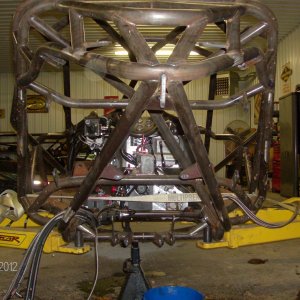
Here are some pics of the pretty much completed chassis.
8e432d19bdc14df47db250adab9968a2.jpg

bd82e434fdb64b12cab8d744a3c94c66.jpg


who the hell drinks pepsi?
 
Awesome. I should have waited till the end before commenting on the northstar... I was expecting stock junkyard takeout, then BAM!


Sent from my iPhone using Tapatalk
 
Well I kinda set yall up for that one by not revealing the conclusion at the beginning, just wanted to get some tech out there first.

Profile shots as requested
eacf35b9165dfdd65fb8166bd74687f5.jpg
8341b4477341fabaa396341eff244bfd.jpg
these pics were from its first trip to stony lonesome, I learned a couple things that didnt work after my first couple trips

First off I had full size mufflers on it and caught crap because they looked bad, so I crushed them beyond repair on "Chainsaw" at Choccolocco
f4a56eda15605f079b1e711b196dd3e9.jpg
solution was to go with some lower profile can mufflers. As a bonus I believe these will gain me some cool points with the rice burner crowd
9c601a27e2d6d609e70aa4303d4a9560.jpg


Second thing I did wrong was I built an ultimate low budget front driveshaft. I used some 2" .120 wall DOM as a front intermediate shaft and turned down a slip yoke to slide inside the DOM. That did not work out at all. In case anyone wonders slip yokes are not always made out of steel, sometimes theyre cast iron for some reason.
dedfde557666398563ef38406a92228d.jpg
4d7084207fa2bd12629ae6ed0d221d68.jpg


I was able to rectify that situation with a $50 spicer weld yoke from Summitracing. But the point is DO NOT turn down a slip yoke to use as a cheap weld yoke until you know what that slip yoke is made out of.
d0ede6497762eb509dd38292e2159407.jpg
new yoke and problem stayin solved.


I still have a good bit of other tech to add to this thread including some budget ideas that did work and some budget ideas that didnt work. I also have some out of the norm stuff going on with the front axle and suspension too.
 
He's leaving all the cool stuff out.
Front suspension link mounts
A photo of front driveshaft in relation to chassis at ride height.
Steering wheel (I want one) probably the coolest wheel next to mine.
Pedal area.
 
Dang I've got a collection of 1410 slip yokes saved just for that. Never thought about them being cast iron vs forged steel


Sent from my iPhone using Tapatalk
 
Lol after the first page I typed the question "so is thing already done?"

I love it. So how much seat time you got on most all of the original tech?
 
LightBnDr said:
I love it. So how much seat time you got on most all of the original tech?

So the original tech stuff is all good, were only 3 rides in on it the biggest failure was that slip yoke driveshaft which only "saved" me $50 originally. I wouldnt say that I wouldnt do it again but I'd certainly do a spark test to make sure it was steel before I tried that again.

I'll try to list things that didnt save me money.

$100 80lb Ebay injectors = fail
They would not operate at low pulse widths which drownded the engine in fuel at idle so I pulled them out and put in a set of quality rebuilt Bosch's

$20 ebay fans = fail
So I bought two 14" electric fans off ebay, complete waste of money. With the fans on high you could barely feel any air moving so I pulled them off and installed a set of stock honda fans now you can feel a breeze standing 5' behind the buggy

Ebay 2 bar map sensor = fail
I dont know what I paid for it but That cheap map sensor worked for about an hour before it got stuck on 100kpa and shut the engine down. I replaced that with a parts store "wells" brand and fixed that.

Corvette internal regulated fuel filter = fail
I'm running a 300lb/hr fuel pump because I thought I'd need E85 to get thing to live at 10:1 compression and boost. So far it seems okay running 93 probably due to the efficient chambers and small bore. You cannot run one of those internal regulated filters with a high flow pump because it cannot regulate the flow. I ended up with 80+ psi fuel pressure so I didnt even get to start it before I took that stuff off and went with a regular style fuel filter and regulator.
 
Badass build and great tech !

d_daffron said:
Corvette internal regulated fuel filter = fail
I'm running a 300lb/hr fuel pump because I thought I'd need E85 to get thing to live at 10:1 compression and boost. So far it seems okay running 93 probably due to the efficient chambers and small bore. You cannot run one of those internal regulated filters with a high flow pump because it cannot regulate the flow. I ended up with 80+ psi fuel pressure so I didnt even get to start it before I took that stuff off and went with a regular style fuel filter and regulator.

I've heard that a walbro 255l/h is the max these can take.
 
I agree that a pump larger than a 255 will not work with the corvette returnless style fuel filter.

So on to the next thing I did thats a little different. issues that I noticed with most buggy builds are
1. the use of flat rectangular fuel cells causes fuel slosh issues and makes it hard to keep a steady supply of fuel to the engine especially when on steep climbs. Easily fixed by keeping the cell full and running something like the holley hydramat.
2. Square fuel cells have a tendancy to crack in the corners due to all the extreme bouncing we subject them to.
3. Directly behind the sears is a great place for radiators to keep rocks and mud off them but if you mount the radiator behind the seats and the fuel cell behind that it causes fuel heating issues. Those issues can be somewhat solved by the use of heat shielding but the cooler you can keep the fuel the better.

So my solution to these problems is I used a vertical spun aluminum tank which has no corners to crack and due to it being tall and skinny its much easier to keep the fuel pickup covered with fuel at all times. Also I decided to run two radiators mounted on either side of the tank with the fans blowing directly to the rear. This keeps the hot air form the cooling fans from blowing on the fuel tank and helps keep the fuel cool.

ca15c0329284000cca7514196c3fe1eb.jpg
round spun aluminum fuel tank from BAM MFG, again a surprisingly inexpensive solution to multiple problems. $225 shipped including mounting straps and 3 npt bungs placed wherever I wanted. I went with two on bottom for feed and return then one on top for the vent.
e4ad1628ff690275fd2a6c4b79291339.jpg
6cb442420689c89d26d334a65464a6f8.jpg
these are Ebay 3 row honda radiators I bought for $60 a piece shipped. Initially I was running some aftermarket 14" fans, but they barely moved any air so I bought factory honda fans from rock auto. The honda fans turned out to be a nicer fit anyway since they used the factory fan mounting bungs that were already welded on the radiators.

This made for a very compact mounting behind the seats and kept me from having hardly any tube work behind the seats. Which of course helps with the weight issue. The completed chassis right after finish welding weighed in at 360lbs. that didnt include the dash bar or the engine cage but did include everything else.
 
That is awesome with the two radiators. I had originally planned to do that in my buggy for more storage area and easier packaging but I was afraid it would be a nightmare to bleed and not cool enough so I didn't try it. I had even bought the same radiators that you have but ended up selling them to some friends in their 4 cyl buggies. I may have to use that when I redesign over this winter.
 
muddinmetal said:
Is anybody else seeing a green buggy?
Well dangit, Yellow was the goal unfortunately youre not the first person to say its green, one of us must be colorblind or something.

Stuntman Autoworks said:
That is awesome with the two radiators. I had originally planned to do that in my buggy for more storage area and easier packaging but I was afraid it would be a nightmare to bleed and not cool enough so I didn't try it. I had even bought the same radiators that you have but ended up selling them to some friends in their 4 cyl buggies. I may have to use that when I redesign over this winter.
This is a good point, I'm glad you brought it up. I gutted the radiator cap on the passenger side radiator then plumbed the overflow fitting from that side into a steam port. Then I left the drivers side radiator cap alone so it works like it was designed to work with a overflow tank. With that setup and the fact that I have no thermostat I was able to completely bleed the cooling system without ever cranking the engine or runnin the water pump. I dont know how it'll work after a rollover but I couldnt be happier with how easy it was to bleed thanks to the steam vents.
 
DAAAANG look at you go. I run a cylindrical tank as well. Mine is poly. I run a 1 quart surge tank that sits under my seat so it will run upside down like an airplane. For the same fuel starvation concerns you mentioned.

I too run my fans pulling cool air across my fuel cell.

Hey, diggin the build man. I hope you get a ton of beat downs with no probs. Post up some vids if you got em.

Fist bump
 
Top