-
Help Support Hardline Crawlers :
You are using an out of date browser. It may not display this or other websites correctly.
You should upgrade or use an alternative browser.
You should upgrade or use an alternative browser.
French Tickler buggy
- Thread starter Bebop
- Start date
clemsonjeep
Well-Known Member
BUT Cleetus McFarland can get them...hellll yeah brother...BALD EAGLES!
clemsonjeep said:BUT Cleetus McFarland can get them...hellll yeah brother...BALD EAGLES!
LMAO.
If I was Holley I know who I'd give one too... And that wouln't be me that's for sure...
87_bigbadzuk
Well-Known Member
- Joined
- Jul 5, 2013
- Messages
- 137
That gas pedal mount wouldn't last long for me. I would put it through the floor unless your gonna have a stop on it.
Lastest progress :
I redid the bypass mounts. We originally made them at 3AM with no sleep and in a hurry so I had to fix the end result. I also plated them.

14 bolt mini shave. 1" 1/4 gained in 1h.


Ram mount.

I made a bunch of trials to find a right length/akerman for the high steer arms. I ended up settilng with a 8.5" lenght with a slightly positive Akerman so the knuckles would turn to the max of the big bells (40 degrees) and miss the bypass tubes by 1/8". I'm waiting on a few spacers and then I'm burning it all.

Little TIG action to weld the bungs.

Then the fill plug on the diff cover.

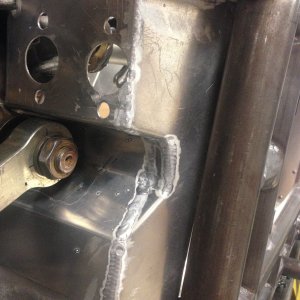
Added a cover pass on the trailing arms.


I ended up receiving my Holley Terminator X setup last week, and after unpacking it and staring at it for 5mn, I started modifying it. I moved a few sensors, changed the way the power is delivered in the harness and added the alternator excitation plug (I still don't understand why the harness isn't supplied with it).

I had to crimp some tiny OEM connectors for the sensors (Delphi GT150 serie). First time using these, they are very cool.

Finished engine harness. In theory I could start it with this but I'm going to build the chassis harness now and drop everything at once.

I redid the bypass mounts. We originally made them at 3AM with no sleep and in a hurry so I had to fix the end result. I also plated them.

14 bolt mini shave. 1" 1/4 gained in 1h.


Ram mount.

I made a bunch of trials to find a right length/akerman for the high steer arms. I ended up settilng with a 8.5" lenght with a slightly positive Akerman so the knuckles would turn to the max of the big bells (40 degrees) and miss the bypass tubes by 1/8". I'm waiting on a few spacers and then I'm burning it all.

Little TIG action to weld the bungs.

Then the fill plug on the diff cover.

Added a cover pass on the trailing arms.


I ended up receiving my Holley Terminator X setup last week, and after unpacking it and staring at it for 5mn, I started modifying it. I moved a few sensors, changed the way the power is delivered in the harness and added the alternator excitation plug (I still don't understand why the harness isn't supplied with it).

I had to crimp some tiny OEM connectors for the sensors (Delphi GT150 serie). First time using these, they are very cool.

Finished engine harness. In theory I could start it with this but I'm going to build the chassis harness now and drop everything at once.

P
If its free, its P
Stay at it man, she is coming along nicely 

ridered3
Not Rigless
Bebop said:Trying to. Still want to burn it down on a daily basis.
Hopefully the engine starts this weekend.
Isn't that half the "fun" though???
ridered3 said:Isn't that half the "fun" though???
Wiring stuff now...
onetoncrawler
Well-Known Member
???????????? that's awesome
Sent from my SM-G950U using Tapatalk
Sent from my SM-G950U using Tapatalk
Electrical blahblah
I've always wanted to keep the Holley ECU in a waterproof enclosure. I heard they weren't very pressure washer friendly. I had an old ammo can laying around and thought it would be perfect for this. ECU and PDM are in it. The chassis harness goes through a Deutsh HPD20 1/4 turn waterproof plug, so I can pull the chassis harness in a few minutes if needed. I wanted to do the same for the ECU harness, but I chickened out when it was the moment to cut the 50+ wire engine harness in half. I still used a Seal-it neoprene "waterproof" firewall grommet.

Took my time and tried to keep the inside of the box clean.

In the vehicle. Nice armrest.

For the engine harness, I started with the Holley harness and I modified it a little. Changed all the power wires to go to the PDM, moved a few sensors and added some (trans temp and NOS circuit pressure). Gauges will be on a small digital screen before I can afford a big Holley dash.
I used a double circuit kill switch so I can kill both the positive and negative circuits at the same time.

All the power cables are 2/0. All the positive cables are wrapped in firesleeve, to avoid any issues due to abrasion or heat in the future. All the crimps were done on a hydraulic crimper and doubled with adhesive lined heatshrink.

Not a single solder joint on the whole harness. I hate these.
I'm happy to have spend that much time planning the wiring (about 30h) as everything worked as planned first time I sent power down the system.
I've always wanted to keep the Holley ECU in a waterproof enclosure. I heard they weren't very pressure washer friendly. I had an old ammo can laying around and thought it would be perfect for this. ECU and PDM are in it. The chassis harness goes through a Deutsh HPD20 1/4 turn waterproof plug, so I can pull the chassis harness in a few minutes if needed. I wanted to do the same for the ECU harness, but I chickened out when it was the moment to cut the 50+ wire engine harness in half. I still used a Seal-it neoprene "waterproof" firewall grommet.

Took my time and tried to keep the inside of the box clean.

In the vehicle. Nice armrest.

For the engine harness, I started with the Holley harness and I modified it a little. Changed all the power wires to go to the PDM, moved a few sensors and added some (trans temp and NOS circuit pressure). Gauges will be on a small digital screen before I can afford a big Holley dash.
I used a double circuit kill switch so I can kill both the positive and negative circuits at the same time.

All the power cables are 2/0. All the positive cables are wrapped in firesleeve, to avoid any issues due to abrasion or heat in the future. All the crimps were done on a hydraulic crimper and doubled with adhesive lined heatshrink.

Not a single solder joint on the whole harness. I hate these.
I'm happy to have spend that much time planning the wiring (about 30h) as everything worked as planned first time I sent power down the system.
onetoncrawler
Well-Known Member
What did you use for fire sleeve?
Sent from my SM-G950U using Tapatalk
Sent from my SM-G950U using Tapatalk
That stuff, except I bought it in 100ft rolls.
http://designengineering.com/fire-sleeve-tape-kit/
I liked the fact it was black VS the classic firesleeve orange.
http://designengineering.com/fire-sleeve-tape-kit/
I liked the fact it was black VS the classic firesleeve orange.
Not a lot of traffic here. Let me know if I need to do differently to get people's interest. Latest update:
1 step forward and 3 steps back.
After riding for 24h straight at Windrock with my buddy Marvin (we left at 9AM Saturday and didn't stop wheeling until 9AM Sunday), I dedided I wanted to have a piece of aluminum between my ass and the transmission. It was the perfect moment to move the trans cooler to the front and install a bigger one (I went with the Tru-Cool LPD47391 on JDuck and Waffle advice). I decided to move the battery and the electronics further back and free up some room between the seats for some cup holders. I also had to rebuild the fuel lines and the chassis wiring because of the mods...Yeayyyy

Everything went ok and I fired up the engine "for the first time" for the second time on friday last week.
I also changed the fuel pressure regulator for a WIX unit (PN 33737) since the generic one I got from amazon did a shitty job of keeping a steady pressure in the rail. It was jumping up and down between 45 to 55psi. No problems now, it's a steady 58.
My french buddy Ben (Jeepdedication) came to help this weekend. The goal was to finish the brake circuit, bleed it and do the steering lines. In the end, we ended up rebuilding the hydroboost mount since the one that was there didn't work. Then we realized the booster I had ported isn't the right model and my master didn't fit.

So we called it a day, drank whisky and started making plans on how to solve some of the issues I'm seeing in the suspension right now. It helps having another set of eyes after you've been staring at this pile of metal for too long.
In the end, this is what's probably happening :
- Rebuild all the front shock mounts in order to straighten up the coilovers and move the bypasses to the rear of the axle. This will free room in the front of the axle to install the bumpstops and limit straps. It will also eliminate the packaging issue I had when making the steering linkage and arms.
- Rebuild high steer arms and tie-rods. Now the bypasses are going to be relocated, I'll be able to set the steering with a neutral akerman and more turning radius. The chassis and links will clear 50deg of steering with the 43" SXs on a 4.5" bs wheel and I'd like to use all of that
Since I'll be rebuilding the shock mounts, I think I have the opportunity to add some uptravel and this brings few issues.
- Pass side engine mount hits the upper link
- Pass side exhaust hits the driveshaft
- Radiator support hits the axle (it needed to be redone anyway, and I think that I could fit a bigger radiator by redoing the mounts)
- Front lower link mount on the axle (made a mistake during the build of the axle, this would be the perfect time to fix it)
- Brake lines
I'm fighting this thing at every step, but I guess that's how it is for everyone, so I can't complain too much.
This is my first buggy build and I'm learning a lot. Very frustrating. Mostly because my skills are nowhere near close to the type of work I want to put out.
1 step forward and 3 steps back.
After riding for 24h straight at Windrock with my buddy Marvin (we left at 9AM Saturday and didn't stop wheeling until 9AM Sunday), I dedided I wanted to have a piece of aluminum between my ass and the transmission. It was the perfect moment to move the trans cooler to the front and install a bigger one (I went with the Tru-Cool LPD47391 on JDuck and Waffle advice). I decided to move the battery and the electronics further back and free up some room between the seats for some cup holders. I also had to rebuild the fuel lines and the chassis wiring because of the mods...Yeayyyy

Everything went ok and I fired up the engine "for the first time" for the second time on friday last week.
I also changed the fuel pressure regulator for a WIX unit (PN 33737) since the generic one I got from amazon did a shitty job of keeping a steady pressure in the rail. It was jumping up and down between 45 to 55psi. No problems now, it's a steady 58.
My french buddy Ben (Jeepdedication) came to help this weekend. The goal was to finish the brake circuit, bleed it and do the steering lines. In the end, we ended up rebuilding the hydroboost mount since the one that was there didn't work. Then we realized the booster I had ported isn't the right model and my master didn't fit.

So we called it a day, drank whisky and started making plans on how to solve some of the issues I'm seeing in the suspension right now. It helps having another set of eyes after you've been staring at this pile of metal for too long.
In the end, this is what's probably happening :
- Rebuild all the front shock mounts in order to straighten up the coilovers and move the bypasses to the rear of the axle. This will free room in the front of the axle to install the bumpstops and limit straps. It will also eliminate the packaging issue I had when making the steering linkage and arms.
- Rebuild high steer arms and tie-rods. Now the bypasses are going to be relocated, I'll be able to set the steering with a neutral akerman and more turning radius. The chassis and links will clear 50deg of steering with the 43" SXs on a 4.5" bs wheel and I'd like to use all of that
Since I'll be rebuilding the shock mounts, I think I have the opportunity to add some uptravel and this brings few issues.
- Pass side engine mount hits the upper link
- Pass side exhaust hits the driveshaft
- Radiator support hits the axle (it needed to be redone anyway, and I think that I could fit a bigger radiator by redoing the mounts)
- Front lower link mount on the axle (made a mistake during the build of the axle, this would be the perfect time to fix it)
- Brake lines
I'm fighting this thing at every step, but I guess that's how it is for everyone, so I can't complain too much.
This is my first buggy build and I'm learning a lot. Very frustrating. Mostly because my skills are nowhere near close to the type of work I want to put out.
bad80cj
Well-Known Member
Looking good ya little french tickler!
Thanks Steve-O !
We used the same mount on the left and right side of the axle.
But we ended up installing the right mount on the casting of the 14bolt, while the left side is on the tube. This leads to a difference in link length of about 1" and a slight misalignment to the right when the axle is at full droop. My mind thinks this would create a terrible handling when going through whoops at speed.
I wanted to test it as is, but now I have to shave off a bunch of stuff from the axle, I'm thinking about redoing that mount to make both lower links the same length.
i_sent_it said:What is wrong with the front lower link mount?
Buggy is nice !!!! drool
We used the same mount on the left and right side of the axle.
But we ended up installing the right mount on the casting of the 14bolt, while the left side is on the tube. This leads to a difference in link length of about 1" and a slight misalignment to the right when the axle is at full droop. My mind thinks this would create a terrible handling when going through whoops at speed.
I wanted to test it as is, but now I have to shave off a bunch of stuff from the axle, I'm thinking about redoing that mount to make both lower links the same length.
Jduck
Well-Known Member
Bebop said:Thanks Steve-O !
We used the same mount on the left and right side of the axle.
But we ended up installing the right mount on the casting of the 14bolt, while the left side is on the tube. This leads to a difference in link length of about 1" and a slight misalignment to the right when the axle is at full droop. My mind thinks this would create a terrible handling when going through whoops at speed.
I wanted to test it as is, but now I have to shave off a bunch of stuff from the axle, I'm thinking about redoing that mount to make both lower links the same length.
Would it be easier to redo the one on the left side to match since the right sides already had all the work done to weld it to the cast center section?

