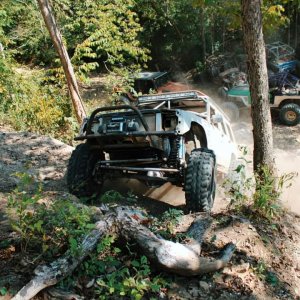
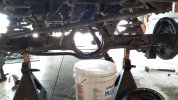
Over the past couple of weeks I have been able to get a few things done on the Land Cruiser. Old shitty seats are gone, replaced with some Corbeau Seats. Ridiculously small center console was removed and a Tuffy universal console was put in...huge difference. Did some cleaning of the dash area and replacing of old tired parts. Also picked up a full float housing and the hubs. Spent a few hours wire wheeling it , checking the factory welds for any cracks and finally threw some paint on it. The spindles had zero rust , pitting or any signs of heat buildup...very stoked about how it turned out. Best part, picked up the housing and hubs for $50. The rear hatch that was on mine when I bought it was from a 94 - 97 as it had the stupid wing on the back and a 3rd brake light. Found a 1991 FJ 80 in a parts yard in Moultrie. Went with a buddy and snagged some parts, one of them being the rear hatch. Cost was a whopping $37.98 for the complete hatch. I was able to get it swapped out this weekend as well. Once my parts arrive from Dubai UAE I will address the leaks and maintenance issues under the hood. A couple of pics....
-
Help Support Hardline Crawlers :
You are using an out of date browser. It may not display this or other websites correctly.
You should upgrade or use an alternative browser.
You should upgrade or use an alternative browser.
New Project... 1991 FJ80
- Thread starter rugger99
- Start date
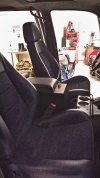
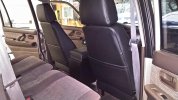
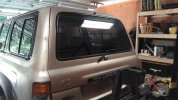
Good score on that hatch actually being the right color!Over the past couple of weeks I have been able to get a few things done on the Land Cruiser. Old shitty seats are gone, replaced with some Corbeau Seats. Ridiculously small center console was removed and a Tuffy universal console was put in...huge difference. Did some cleaning of the dash area and replacing of old tired parts. Also picked up a full float housing and the hubs. Spent a few hours wire wheeling it , checking the factory welds for any cracks and finally threw some paint on it. The spindles had zero rust , pitting or any signs of heat buildup...very stoked about how it turned out. Best part, picked up the housing and hubs for $50. The rear hatch that was on mine when I bought it was from a 94 - 97 as it had the stupid wing on the back and a 3rd brake light. Found a 1991 FJ 80 in a parts yard in Moultrie. Went with a buddy and snagged some parts, one of them being the rear hatch. Cost was a whopping $37.98 for the complete hatch. I was able to get it swapped out this weekend as well. Once my parts arrive from Dubai UAE I will address the leaks and maintenance issues under the hood. A couple of pics....
drillsmoke
Member
- Joined
- May 9, 2023
- Messages
- 6
You are gonna like how the 80 wheels. I have a triple locked 80 w/ case gears, 5.29s and hydro assist on 37s. It is objectively more capable than my v8 cj7 on tons and 40" stickies. Might want to look into fabbing up a simple gas tank skid, they are a big target to hit under there!
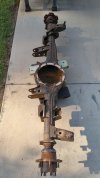
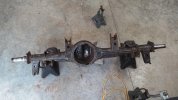
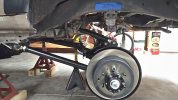
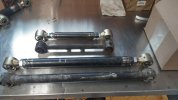
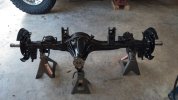
Pulled the rear third the other day, just need to box it up and send it off to get gears and the ARB installed. Front third has been built and is currently enroute. I was also reminded why I despise drum brakes...took longer to get the damn drums off than to do the rest of the work and that included cleaning up the garage when I was done.
Attachments
baldduck74
Well-Known Member
- Joined
- Oct 19, 2013
- Messages
- 348
Pulled the rear third the other day, just need to box it up and send it off to get gears and the ARB installed. Front third has been built and is currently enroute. I was also reminded why I despise drum brakes...took longer to get the damn drums off than to do the rest of the work and that included cleaning up the garage when I was done.
Pulled the rear third the other day, just need to box it up and send it off to get gears and the ARB installed. Front third has been built and is currently enroute. I was also reminded why I despise drum brakes...took longer to get the damn drums off than to do the rest of the work and that included cleaning up the garage when I was done.I'd love to be able find one of these cheap, and just build it as a daily driverPulled the rear third the other day, just need to box it up and send it off to get gears and the ARB installed. Front third has been built and is currently enroute. I was also reminded why I despise drum brakes...took longer to get the damn drums off than to do the rest of the work and that included cleaning up the garage when I was done.
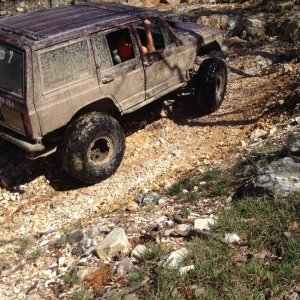
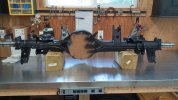
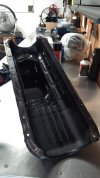
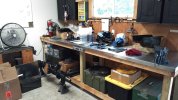
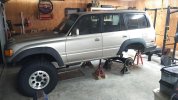
Been working on the Land Cruiser here and there when I have had the time. Found out that the valve cover I had on the motor, which was there when I bought it, was the wrong one. It seems someone ghetto fab'd a 2F valve cover to work on a 3FE motor. Tracked down the correct one and got that sorted out. Pulled the oil pan to replace the gasket, that only took five hours to get the pan off...yes, you read that correctly! I have gotten both of my thirds back from Marlin Crawler and my box of parts (random seals, gaskets, rubber hoses ,etc...) from Dubai,UAE arrived. Never thought I would ever order parts from the middle east. Overall it's been fun and I am re-learning patience, which isn't a bad thing. Goal is to have this thing ready to go by the middle of November. A few pics cause everyone likes photos.
Attachments
ridered3
Not Rigless
drillsmoke
Member
- Joined
- May 9, 2023
- Messages
- 6
You have plans to sleeve your rear control arms? The factory ones like to bend. Mine are sleeved in .250 wall and still managed to get a little curve to them.
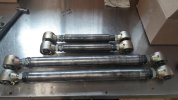
The oil pan was a bitch to remove. There are 22 bolts holding it on, but those were easy. The OEM cork gasket was the culprit. Toyota must use a special kind of cork that seems to turn into JB Weld like properties. I had to use a piece of 2x4 on the pan and a small bottle jack against the frame rail and apply pressure while working a couple of small screwdrivers between the bottom of the block and the pan. Also had to give it a few whacks with a dead blow as well. There's no telling how old the gasket was, hell it could have been the original one for all I know. The good thing is that there was no metal bits or shavings in the pan or the magnetic plug and when I pulled the inspection plate, the flywheel was dry so the rear main is not leaking. So the source of my oil leaks was the valve cover and the oil pan. Everything I have read regarding pulling the oil pan on a 3FE motor states it is a "super fun" job...and after doing it I would agree. As far as the rear control arms, I am going to make adjustable uppers and lowers out of 2" .250 DOM with Johnny Joints at both ends. Also going to make them 1.5" longer than stock so I can re-center the rear axle in the wheel well. You can see with the current stock arms the rear axle needs to go back a little.
Attachments
ridered3
Not Rigless
That sounds super unfun!The oil pan was a bitch to remove. There are 22 bolts holding it on, but those were easy. The OEM cork gasket was the culprit. Toyota must use a special kind of cork that seems to turn into JB Weld like properties. I had to use a piece of 2x4 on the pan and a small bottle jack against the frame rail and apply pressure while working a couple of small screwdrivers between the bottom of the block and the pan. Also had to give it a few whacks with a dead blow as well. There's no telling how old the gasket was, hell it could have been the original one for all I know. The good thing is that there was no metal bits or shavings in the pan or the magnetic plug and when I pulled the inspection plate, the flywheel was dry so the rear main is not leaking. So the source of my oil leaks was the valve cover and the oil pan. Everything I have read regarding pulling the oil pan on a 3FE motor states it is a "super fun" job...and after doing it I would agree. As far as the rear control arms, I am going to make adjustable uppers and lowers out of 2" .250 DOM with Johnny Joints at both ends. Also going to make them 1.5" longer than stock so I can re-center the rear axle in the wheel well. You can see with the current stock arms the rear axle needs to go back a little.
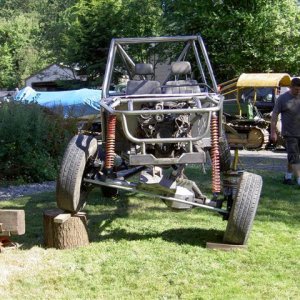
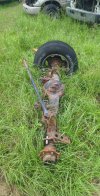
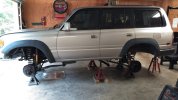
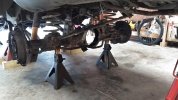
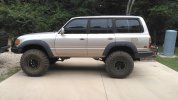
Been a minute since I have updated this build thread. Rear axle finished and now under the Cruiser. I built new control arms for the rear as the stock ones are fairly flimsy and not adjustable...and the new rear arms are 1.25" longer than stock, which re-centered the axle in the wheel well. Sold the SX / Allied combo and went with 37" Toyo MT's and a set of beadlocks from Sidetracked Offroad. Pics for your viewing pleasure.
Attachments

ridered3
Not Rigless
Glad to see an update.