• Help Support Hardline Crawlers :

Hot rod action.

CHOP SHOP

Well-Known Member
Joined
Sep 13, 2007
Messages
11,498
Location
pierce county
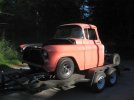
So my nephew has a 55 chev truck that him and my dad have putting together on the cheap, like old real hot rods were. Not to be confused with a "ratty rod", this truck is nice with no big dollar parts either. He has been working on it since he was 16 and hes now 18 and graduated this year. He has been at my dads shop every free day he has bustin on the truck and working for my dad on days in between.

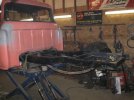
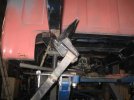
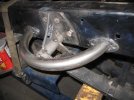
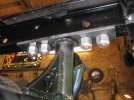
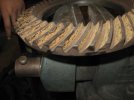
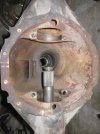
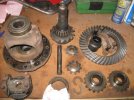
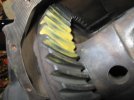
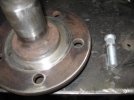
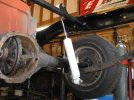
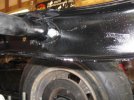
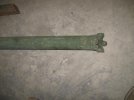
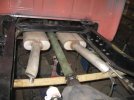
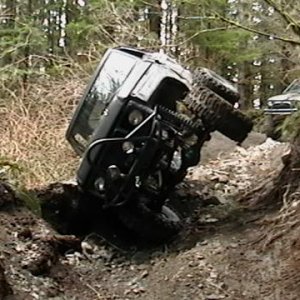
They found the truck on CL and it was in pieces, like in boxes completly tore apart. The front camaro clip had been done years ago and was very nicely grafted and perfecty square too (I checked to be sure) but they had BUTCHERED the rear axle/suspension.

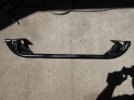
He and my dad got the engine and tranny in and started running lines and wiring. The kid has done the headliner and seats himself in black with red piping like old school. He learned to weld by filling the dash and my dad taught him to run a paint gun by spraying the interior. Then a big surprise. My dad had his good buddy Bob Davidson (famous striper) to come over and lay some sweet lines all over the dash while the kid was at school.

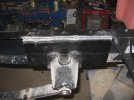
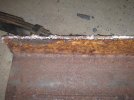
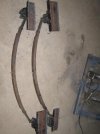
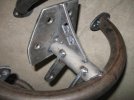
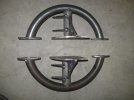
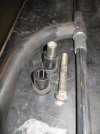
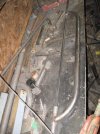
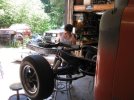
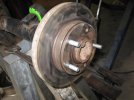
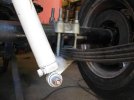
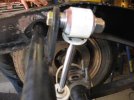
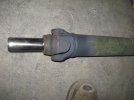
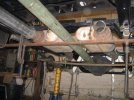
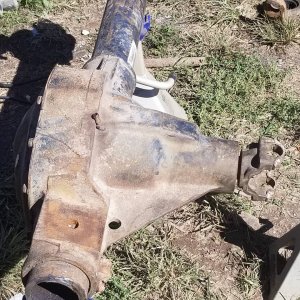
The previous owner had wanted to tub the truck cheaply so he moved the leaf springs inboard to make more room for tires. Well that made for horrible body roll and the springs were only two feet from each other.

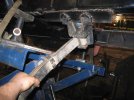
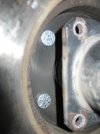
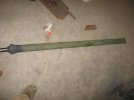
I told him for graduation I would help him get the springs mounted properly.

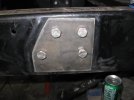
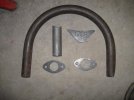
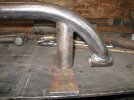
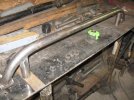
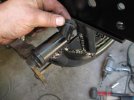
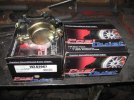
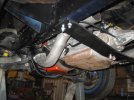
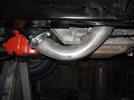
A couple years ago for his birthday, I give him a three inch dual exhaust I had from one of my old chev trucks with flowmasters. The kid wanted flowmasters badly and my dad wanted him to get some crackers, (glasspacks :puke:) so I was happy to help keep the kid from sounding like an old guy. Anyways I volunteered to get the pipes hung too.
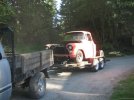
Anyways here it is.
 

Attachments

  • IMG_1135.JPG
    IMG_1135.JPG
    42.4 KB · Views: 436
So after torchin off three of the old spring/shackle hangers I ran out of torch gas. So i grabbed the last one and ripped it off by hand. The old welds were worse than using hot glue.
 

Attachments

  • IMG_0920.JPG
    IMG_0920.JPG
    51.3 KB · Views: 434
  • IMG_0923.JPG
    IMG_0923.JPG
    53 KB · Views: 426
  • IMG_0924.JPG
    IMG_0924.JPG
    45.9 KB · Views: 428
  • IMG_0925.JPG
    IMG_0925.JPG
    54.7 KB · Views: 426
  • IMG_0928.JPG
    IMG_0928.JPG
    33.9 KB · Views: 426
So it was time to hang the springs. So the kid learned to use the bender and we tacked up a couple hangers.
 

Attachments

  • IMG_0936.JPG
    IMG_0936.JPG
    41.7 KB · Views: 427
  • IMG_0937.JPG
    IMG_0937.JPG
    43.6 KB · Views: 428
  • IMG_0938.JPG
    IMG_0938.JPG
    52.5 KB · Views: 432
  • IMG_0943.JPG
    IMG_0943.JPG
    47.3 KB · Views: 426
  • IMG_0944.JPG
    IMG_0944.JPG
    43.8 KB · Views: 424
So we started on the rear shackle hangers. Little tube, little bend, little weld, presto hangero.
 

Attachments

  • IMG_0948.JPG
    IMG_0948.JPG
    47.6 KB · Views: 429
  • IMG_0945.JPG
    IMG_0945.JPG
    54.5 KB · Views: 435
  • IMG_0958.JPG
    IMG_0958.JPG
    53.6 KB · Views: 426
  • IMG_0959.JPG
    IMG_0959.JPG
    63 KB · Views: 425
  • IMG_0968.JPG
    IMG_0968.JPG
    48.2 KB · Views: 423
Hers the hanger on the framerails. We used stainless hardware everywhere except where grade 8 was needed.
 

Attachments

  • IMG_0974.JPG
    IMG_0974.JPG
    44.5 KB · Views: 421
  • IMG_0975.JPG
    IMG_0975.JPG
    57 KB · Views: 429
After we got the rear springs mounted and done we looked at the rear axle.

It was pretty bad, it needed a rebuild at least. My dad wanted to just throw an old 100 dollar whatever rearend in. I decided to look at what was under it first. After looking at it we determined it was a 68 camaro 12 bolt 30 spline axle.

Big score. I knew we had to rebuild it. The gears ended up cleaning up great. I threw a yukon timken bearing set in and set up the gears then realized yukon packed 2 crush sleeves and NO pinion seal.:mad: Anyways we threw in some new wheel bearings and seals too while we were in there.
 

Attachments

  • IMG_0915.JPG
    IMG_0915.JPG
    42.6 KB · Views: 317
  • IMG_0917.JPG
    IMG_0917.JPG
    48.8 KB · Views: 312
  • IMG_0921.JPG
    IMG_0921.JPG
    62.3 KB · Views: 319
  • IMG_0977.JPG
    IMG_0977.JPG
    50.4 KB · Views: 317
  • IMG_0978.JPG
    IMG_0978.JPG
    42.7 KB · Views: 323
Tackled the brakes next. Took the axles over to Bobby and had him turn/clean up the back of the axle flange so we could mount up some old 4x4 s10 rotors on it. Then we drilled out the holes and put some 1/2 inch studs that were the right length. Then we got a pair of new 80 up metric car/s10 calipers for it too.
 

Attachments

  • IMG_0932.JPG
    IMG_0932.JPG
    45.2 KB · Views: 323
  • IMG_0934.JPG
    IMG_0934.JPG
    45.9 KB · Views: 316
  • IMG_0935.JPG
    IMG_0935.JPG
    26.7 KB · Views: 316
  • IMG_0930.JPG
    IMG_0930.JPG
    64.5 KB · Views: 312
Next we decided that some offroad shocks would suit the job well. So I dug up and old pair of RS9000s for the kid to paint up.

We built a crossmember to mount them too and reused the existing lower mounts and ubolt hardware.
 

Attachments

  • IMG_0976.JPG
    IMG_0976.JPG
    57.7 KB · Views: 313
  • IMG_0973.JPG
    IMG_0973.JPG
    40.5 KB · Views: 315
  • IMG_0972.JPG
    IMG_0972.JPG
    47.2 KB · Views: 311
  • IMG_0979.JPG
    IMG_0979.JPG
    59 KB · Views: 310
  • IMG_0971.JPG
    IMG_0971.JPG
    56 KB · Views: 310
Time for a drive line. We needed a gm metric joint at the tranny and a 1310 down low. I found a th350 yoke and a metric joint and tube stump on it. Then found a 5 ton PTO driveline that was longer than needed and had a new 1310 at both ends.

So I cut one end off and turned the stump to fit and made him a shaft. He and my dad are hustling to make GOODGUYS this weekend so if it is a shaker thats OK, it will come out and get recut and balanced next week. I purposely made the shaft 1/2 inch too long so Dave out at Advanced Drivelines in Yelm could cut it loose and reweld it straight and balance it too.

My nephew likes the authentic tactical army shaft!:D
 

Attachments

  • IMG_1125.JPG
    IMG_1125.JPG
    42.7 KB · Views: 254
  • IMG_1124.JPG
    IMG_1124.JPG
    48.3 KB · Views: 257
  • IMG_1126.JPG
    IMG_1126.JPG
    47.4 KB · Views: 251
  • IMG_1127.JPG
    IMG_1127.JPG
    39.5 KB · Views: 251
Then we tackled the exhaust. 3 inch tube with flowmasters.
 

Attachments

  • IMG_1128.JPG
    IMG_1128.JPG
    52.5 KB · Views: 248
  • IMG_1129.JPG
    IMG_1129.JPG
    58.5 KB · Views: 247
  • IMG_1131.JPG
    IMG_1131.JPG
    41.8 KB · Views: 248
  • IMG_1133.JPG
    IMG_1133.JPG
    49.1 KB · Views: 254
Then it went home and Im off the hook.

The kid worked his ass off, whether it was drilling and grinding or brush clearing and yard work while I was doing things he couldnt, he busted his ass and is going to have a nice truck cuz of it.

Ill update it as he and my dad get it finished up. They had a sanding party this weekend and get it all in black sealer and ready for more pinstriping.

Until then, later!:beer:
 

Attachments

  • IMG_1134.JPG
    IMG_1134.JPG
    55.5 KB · Views: 252
Have to applaud the recycling of classic American metal. Also, it's nice to know there are still young people out there who are willing to work for a goal.
 
Good looking old truck Chop. Nephew has an eye for good things. Wish I had an uncle like you when I tried to "build" my first rig.

Charlie
 
Top