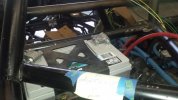
• Help Support Hardline Crawlers :

Another lil something.....

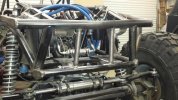
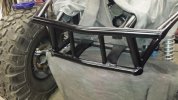
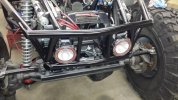
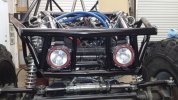
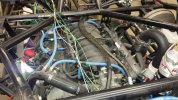
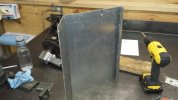
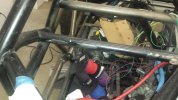
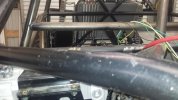
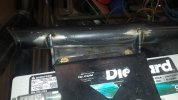
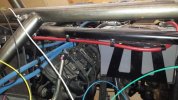
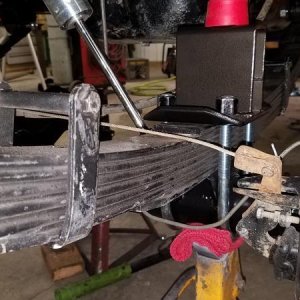
Got the center bars cut and burned in. This will protect the lights from the rope and keep the rope also protected from sharp stuff that could possibly damage it. I also made the light mounts and burned them in.

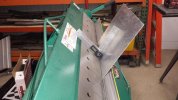
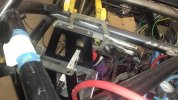
I originally wanted the tube to follow the slope of the outer tubes but found it was causing the winch line window to be too narrow.
 

Attachments

  • 20160228_124826.jpg
    20160228_124826.jpg
    67.2 KB · Views: 187
A little paint to cover those bare areas :redneck:
 

Attachments

  • 20160228_154520.jpg
    20160228_154520.jpg
    51.4 KB · Views: 180
I think that turned out pretty good....
 

Attachments

  • 20160228_194535.jpg
    20160228_194535.jpg
    62.8 KB · Views: 175
  • 20160228_194542.jpg
    20160228_194542.jpg
    69.8 KB · Views: 183
So again 2 steps forward one step back :mad:

So I was unable to get the drivers seat in due to the tcase shifter linkage hitting the seat--badly. Seat still had to move 1/4" to reach the mounting holes.
 

Attachments

  • 20160228_131935.jpg
    20160228_131935.jpg
    29.3 KB · Views: 180
So time to remove that part and rebuild....
 

Attachments

  • 20160228_132031.jpg
    20160228_132031.jpg
    57.5 KB · Views: 183
  • 20160228_144328.jpg
    20160228_144328.jpg
    58.6 KB · Views: 191
So I made new linkage and made it totally hug the pivot point (like 1/16"). So now the seat goes in and the linkage just rubs the cover. I was hoping to keep it from rubbing anything seat wise but thats just not going to happen...
 

Attachments

  • 20160228_174125.jpg
    20160228_174125.jpg
    33 KB · Views: 180
  • 20160228_173719.jpg
    20160228_173719.jpg
    53.3 KB · Views: 182
  • 20160228_173713.jpg
    20160228_173713.jpg
    55.2 KB · Views: 185
So with the linkage done it was time to get the 4th mount made for the seat mount..
 

Attachments

  • 20160228_180847.jpg
    20160228_180847.jpg
    52 KB · Views: 180
  • 20160228_180852.jpg
    20160228_180852.jpg
    54.1 KB · Views: 180
  • 20160228_194822.jpg
    20160228_194822.jpg
    59.8 KB · Views: 179
Will be kinda jumping around but next I ripped the engine harness off to get it fixed up.
 

Attachments

  • 20160302_205515.jpg
    20160302_205515.jpg
    79.7 KB · Views: 138
  • 20160302_205520.jpg
    20160302_205520.jpg
    50.1 KB · Views: 135
So I have no idea who did this harness--but it is an utter pile of ****--worse craftsmanship I have seen from a "ready to run setup"--just awful.

First no solder--just crimped connections.
There was a **** ton of dead circuits still in the loom.
A bunch of wires had been smacked causing the insulation to be either torn off of ripped open with noticeable corrosion starting to form on the wires.
 

Attachments

  • 20160303_191710.jpg
    20160303_191710.jpg
    76.6 KB · Views: 137
  • 20160302_210101.jpg
    20160302_210101.jpg
    57.2 KB · Views: 131
  • 20160302_202243.jpg
    20160302_202243.jpg
    61 KB · Views: 129
  • 20160302_201810.jpg
    20160302_201810.jpg
    50.1 KB · Views: 135
Pile of dead wire. There will be another pile about the same size from all the extra length that will be removed.
 

Attachments

  • 20160303_212552.jpg
    20160303_212552.jpg
    48.8 KB · Views: 136
Time to play with my newest toy :cheer:

First thing I am making is the new electrical center. There is a sweet spot for the center that will be well protected.
 

Attachments

  • 20160305_094307.jpg
    20160305_094307.jpg
    67.8 KB · Views: 231
  • 20160305_093912.jpg
    20160305_093912.jpg
    43.2 KB · Views: 229
  • 20160304_203640.jpg
    20160304_203640.jpg
    49.2 KB · Views: 228
Took some time to figure out how I wanted to lay it all out but got most everything loaded onto it.
 

Attachments

  • 20160305_233112.jpg
    20160305_233112.jpg
    42.3 KB · Views: 226
So since I had the electrical center in I wanted to start with the main power feeds. I threw the battery in and saw something I did not like. You can see the positive battery post "above" the tube line. If I turn the battery around the positive post is 1/4" away from the tube work. I had thought about when the hood gets built bump the sheet metal up.

Even that idea did not sound remotely safe---so poorly setup.
 

Attachments

  • 20160306_163001.jpg
    20160306_163001.jpg
    39 KB · Views: 226
  • 20160306_163005.jpg
    20160306_163005.jpg
    48 KB · Views: 230
So I decided to just cut it off and redo it--2 steps forward one step back....
 

Attachments

  • 20160306_173248.jpg
    20160306_173248.jpg
    54.6 KB · Views: 232
I am glad I lopped it off---there were only 2 small 1/8" tabs holding it at the dashbar.

So I moved it 1/2" forward and 3/4" deeper.
 

Attachments

  • 20160306_181046.jpg
    20160306_181046.jpg
    55.9 KB · Views: 239
So the mount at the dashbar is MUCH beefier now. My intention with setting the battery tray up like I did was to also rotate the battery to make sure that positive post is well protected. As you can see everything is well below the tube line now.

The end of the tray was also lopped off so the battery was not totally encased and could slide towards the motor. So I fixed that by adding some material...
 

Attachments

  • 20160306_204904.jpg
    20160306_204904.jpg
    46.7 KB · Views: 229
  • 20160306_204914.jpg
    20160306_204914.jpg
    47.6 KB · Views: 225
  • 20160306_204922.jpg
    20160306_204922.jpg
    45.8 KB · Views: 230
  • 20160306_221037.jpg
    20160306_221037.jpg
    48.3 KB · Views: 225
Pile of dead wire. There will be another pile about the same size from all the extra length that will be removed.

when you are shortening up wire are cutting a section out and then splicing? Or redoing the connection at a pin or device?
 
So with the battery mount done it was time to get the battery thrown in and some cables made up.
 

Attachments

  • 20160309_073839.jpg
    20160309_073839.jpg
    60.7 KB · Views: 129
  • 20160309_073855.jpg
    20160309_073855.jpg
    58.4 KB · Views: 130
So this took some guess work and measuring to find a suitable location for the arb compressor. I had the mini and the normal to choose from and with lack of room I choose the smaller unit. After allot of thought I found the sweet spot for it down between the center chassis bars above the atlas. I had to redo a couple of the fuel line mounts and make a mount for the compressor and got it wired up.
 

Attachments

  • 20160309_073914.jpg
    20160309_073914.jpg
    56.7 KB · Views: 132
  • 20160309_073927.jpg
    20160309_073927.jpg
    53.8 KB · Views: 131
  • 20160309_233107.jpg
    20160309_233107.jpg
    59.2 KB · Views: 133
Top