• Help Support Hardline Crawlers :

My first LS build

mna0121

Well-Known Member
Joined
Jul 21, 2011
Messages
397
Location
Between Geneva AL and Bonifay FL
Bought a 99 LQ4 about five years ago, been sitting in the garage since. Engine was from a HD 2500 with around 70,000 miles and from the north. The block looked like it had been under water, salt. The insides were in perfect condition but going to build a 421 out of it. Big block Chevy's are the only engines I have any experience building so if there is any interest in this I will post up the progress.
 

Attachments

  • IMG_2274.JPG
    IMG_2274.JPG
    100.1 KB · Views: 204
  • IMG_2279.JPG
    IMG_2279.JPG
    78.2 KB · Views: 195
  • IMG_2280.JPG
    IMG_2280.JPG
    94.4 KB · Views: 192
  • IMG_2281.JPG
    IMG_2281.JPG
    123 KB · Views: 191
I will add a parts list over the next couple of days and should get some pictures of block work tomorrow. Stretched out engine builds are boring, probably why there isn't many on here but will keep it updated as I progress.
Learn from my first mistake. I purchased this engine for $650, block work was around $700. Sumitt Racing offers a 6.0 for $799 or there abouts. Before throwing stones about the $700 block work I Will just say Piltcher Automotive anybody knows their work, enough said, but I would go with the Sumitt piece if I hadn't already had this engine.
 
Don't look like much progress but got a lot of block prep done, takes a lot of time to do it right. Used close to two cans of brake cleaner and a lot of WD 40. First pic will be upside down, don't know why I think I took it just like I took the rest.
 

Attachments

  • IMG_3061.JPG
    IMG_3061.JPG
    107.1 KB · Views: 176
  • IMG_3062.JPG
    IMG_3062.JPG
    111.7 KB · Views: 169
  • IMG_3063.JPG
    IMG_3063.JPG
    105.6 KB · Views: 170
You might have already but check your main cap clearances. When installing studs it's know to make the clearance tight since the studs hold more when torqued down
 
Going to be some uh-oos along the way and beings this is a tec. article I am going to share the experiences of my buddies that help me with this rig. First up is Mr. LS, JR Gortemolier. The first thing he does with a block that has new cam bearings is fit the cam. Cam bearings are a press fit, usually with a hammer and cam installation tool beginning with the rear most bearings working out to the front. Sometimes the faces of the bearings get smashed enough to make the shaft hang or worst case not let the shaft slide in without tapping it home. We don't tap and just my luck the cam would not slide past the next to the rear bearing. Once we cleared that one up it would not slide into the rear most bearing. We tried a stock shaft and it hung in the same places so we knew it was the bearings. We used a brake piston hone on a drill to clearance the bearings a little at the time. Rear bearing was worse. Took most of the morning to do this. I special ordered Dura-Bond cam and mail bearings, the clearance destroyed the coating and hurt my feelings in the process. If low or no oil pressure occurs at start up this will be a good place to suspect.
 

Attachments

  • IMG_3064.JPG
    IMG_3064.JPG
    118.4 KB · Views: 164
  • IMG_3066.JPG
    IMG_3066.JPG
    108.9 KB · Views: 169
  • IMG_3065.JPG
    IMG_3065.JPG
    105.9 KB · Views: 176
Yes, check, check and check again. Look close at the mains. A good machine shop writes the clearances on each cap and I have a paper with weights and other blue printing info on it. Any time a block receives studs it should be line honed. Back when I built my last engine in the early 90's it was $100 now it will destroy a $150 bill, but the clamping force is so much grater than bolts it will load the mains to the point of binding the crank shaft. You may get away with it but it will surly shorten the life of the bearings. Maybe another buddy on hand today will post a video to how freely the shaft turned once we get it in.

More tech, the machine shop checked the clearances and was in the .027 range but plastic gauge said .015. .015 is the tightest you can get away with. JR was not happy and suggested two options, polish the crank or get new bearings. I opted for polishing the crank. We went ahead and installed the crank to 60/50 and found out the crank was perfect, no way was it only .015. Here is what I think happened, new bearings, we failed to seat the shaft into the lower bearings, placed the plastic on top, placed the cap and pulled them down. In the process the caps squished the plastic from the top giving a false reading. What says you, open to all opinions.
 

Attachments

  • IMG_3067.JPG
    IMG_3067.JPG
    99.5 KB · Views: 167
  • IMG_3069.JPG
    IMG_3069.JPG
    119.6 KB · Views: 153
  • IMG_3071.JPG
    IMG_3071.JPG
    121.7 KB · Views: 152
  • IMG_3078.JPG
    IMG_3078.JPG
    100 KB · Views: 159
Major improvement over old school big and small block Chevrolets is moving thrust bearing from the rear of the block to the center of the LS block allowing thrust surfaces on both sides of the main cap. Here we measured .007 to the front and .007 to the rear. Within specs of .0015 and .0078.

Reluctor Ring specs up to .028 of run out, we are at .010 :dblthumb:
 

Attachments

  • IMG_3074.JPG
    IMG_3074.JPG
    116.7 KB · Views: 166
  • IMG_3075.JPG
    IMG_3075.JPG
    113.9 KB · Views: 144
  • IMG_3076.JPG
    IMG_3076.JPG
    111.5 KB · Views: 148
Re:

It was an honor to learn from an old school truth dealer like Jr. I am fortunate to have the opportunity to be a part of this build. Looking forward to seeing it through. And turning that crank was pure sex.

Sent from my XT1080 using Tapatalk
 
I need some information from some of y'all that have built an LS. I need to order a harmonic balancer, easy enough right, but here is the rub. My rig has two power steering pumps and I don't want to slow the pumps down with a 25% under driven pulley. Keep in mind this is a 99 block, if it were newer there are options but only three that I have found that will even work with the 99 and all three are under driven. Had the same issue with the flex plate except none of those would work with the 99 because it has a flat plate. I ordered a Hughes w/th 400 adapter hoping the K1 crank allows me to use that flex plate. One last thing an SFI rating is a must, the stock replacements are not. I can and may have to get larger pulleys for the pumps but seems to be a waste of money to buy one item to slow stuff down and another to speed it back up.

Please post up if you run the under driven balancer with or without issues with your pumps.

Thanks JJ, it didn't work because I ain't good at this computer stuff. Hell half my pictures come out up side down. :)
 
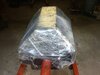
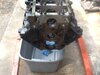
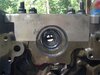
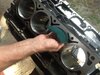
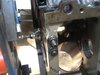
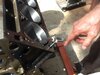
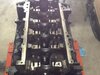
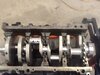
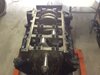
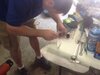
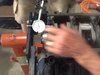
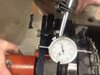
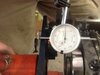
Only getting to work on the LS one day a week. Made a little progress today, it doesn't look like much but six hrs. of work today except for taking a break to hear JR's LS, 900+ hp Vet wake up the neighborhood. The day was dedicated to file fitting rings, checking bearing clearances, rod to rod clearances, piston in block fitment and mating pistons to rods. Patooyee was on hand again today and took on one of the most aggravating task of assembling an LS, inserting the spiral locks in the pistons. Like everything else he does he mastered the process very quickly and assembled seven pistons in less than a half hour, thanks JJ. One piston was left apart to use it to square the rings in the block. While JJ tackled the locks JR and I file fitted the rings all of which except the expander had to be filed. We opened the top ring to .020, 2nd .022 and at least .010 on the scrapers. I can add a little boost with that gap if I ever want to. All the clearance spec's. were all well within allowances and rod bearings were at .0015. I will add pictures in order of our progression. I did not get any of Patooyee wrestling with those locks because JR and I were busy filing the rings so I will get those next time. I have a set of CNC Trick Flow heads for this build. JR is a head porting fool so he worked his magic on the heads even though they are CNC. I really didn't think it would make a difference, boy was I wrong, they are slick. But, two valves did not lap in properly so off to a head shop for suspected bent valves, turns out just a seat issue and are on their way back. Didn't want to put pistons in until piston to valve clearance is checked just in case valve reliefs have to be massaged. If we get the heads back will likely get pistons in the block Thursday.
 

Attachments

  • IMG_3097[1].JPG
    IMG_3097[1].JPG
    125 KB · Views: 123
  • IMG_3099[1].JPG
    IMG_3099[1].JPG
    120.8 KB · Views: 122
  • IMG_3100[1].JPG
    IMG_3100[1].JPG
    122.9 KB · Views: 131
  • IMG_3102[1].JPG
    IMG_3102[1].JPG
    129.2 KB · Views: 127
Those are the prettiest pistons I have ever bought, More pics. from today
 

Attachments

  • IMG_3110[1].JPG
    IMG_3110[1].JPG
    95.9 KB · Views: 135
  • IMG_3107[1].JPG
    IMG_3107[1].JPG
    111.9 KB · Views: 119
  • IMG_3105[1].JPG
    IMG_3105[1].JPG
    118.3 KB · Views: 128
  • IMG_3104[1].JPG
    IMG_3104[1].JPG
    114.7 KB · Views: 127
Last pictures from the day. Last picture is of my neighbors dirt road build. I am standing in the middle of the road, look close you will find a 350 on an engine stand with only a ditch between it and all the dust from the dirt road. The engine also was on the same stand during the six inch rain we had the other day. He put the crank in Sunday. I know this guy well, he can fix anything and I bet this engine will run perfect. It can't live long but it will run. Thanks for checking out my build. See y'all at The Wounded Warriors ride, Morris Mt. this weekend.
 

Attachments

  • IMG_3114[1].JPG
    IMG_3114[1].JPG
    100.2 KB · Views: 114
  • IMG_3115[1].JPG
    IMG_3115[1].JPG
    84.2 KB · Views: 107
I'm learning so much by being a part of this. JR is a great teacher, very patient and analytic. I'm very much enjoying this. :)

And spiral locks aren't that bad once you get them figured out. BUT I will say that there are definitely still places for good old-fashioned snap-rings. :)
 
Top