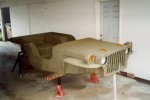
• Help Support Hardline Crawlers :

1943 MB Tube thingy updates...

Blast from the past...

Here are the hard copy images from circa 1999 - back in the day... :redneck:

Matt

Oh yeah! - I forgot it had astroturf glued to what was left of the floor and I believe the clearence for the tranny was done with a 12 gauge... The fuel tank was pretty cool too - it was a box not unlike a shoe box - the lid just sat on there...
 

Attachments

  • jeep_ad.jpg
    jeep_ad.jpg
    29.8 KB · Views: 509
  • cj2_grille.jpg
    cj2_grille.jpg
    54.4 KB · Views: 513
  • mb_grille.jpg
    mb_grille.jpg
    54 KB · Views: 515
  • floor_pan.jpg
    floor_pan.jpg
    52.5 KB · Views: 507
  • floor_trim1.jpg
    floor_trim1.jpg
    48.4 KB · Views: 505
Last edited:
Continued old stuff

More pictures from the early days...
 

Attachments

  • floor_trim2.jpg
    floor_trim2.jpg
    45.6 KB · Views: 502
  • floor_trim3.jpg
    floor_trim3.jpg
    45.5 KB · Views: 494
  • firewall_frame.jpg
    firewall_frame.jpg
    53.7 KB · Views: 492
  • low_tunnel.jpg
    low_tunnel.jpg
    61.2 KB · Views: 487
  • replaced_flooring.jpg
    replaced_flooring.jpg
    47.4 KB · Views: 483
Last one of the oldies

I just kept going with body stuff since it was cheap and labor intensive... paint probably should have waited - but the red really HAD to go! :puke:
 

Attachments

  • bodywork_version1.jpg
    bodywork_version1.jpg
    35.2 KB · Views: 483
That is an amazing build. before i die i would love to come touch it. ahh, maybe thats getting a little deep. still, very cool!!!!!!!! :pray:
 
Doubler Stuff

I am building a low range gear box from a NP242, since I like to be different and not spend much money being different it is all home brew stuff (easier since I work at a machine shop...)

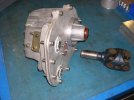
It goes to a NP 202 divorced case so I am using a double cardan "H" block and OEM slip yoke as the worlds shortest driveline..

None the less here is what I have so far:

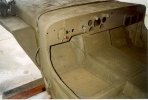
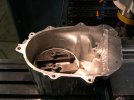
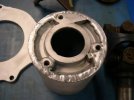
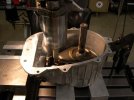
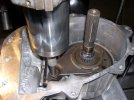
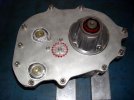
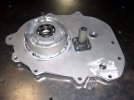
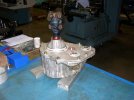
I basically cut the front output off the box and sealed it with a piece of angle, I appologize for some of the goober welds - I had first welded this with a stick welder (weldanator) on the XJ - not a good plan...

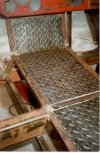
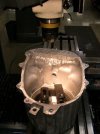
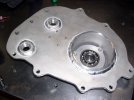
It took a bunch of scary machining to get all the crap weld out of there - including hucking the case out of the vise once (the track marks in the corner :cool: ) Some time with the TIG machine and life got better

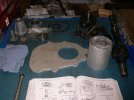
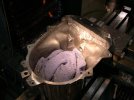
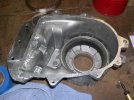
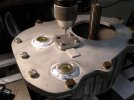
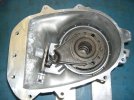
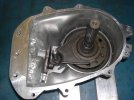
Once that was done the rear bearing retainer had to be modified to fit in a piece of tube that will get welded to the main cover plate...

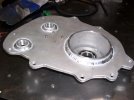
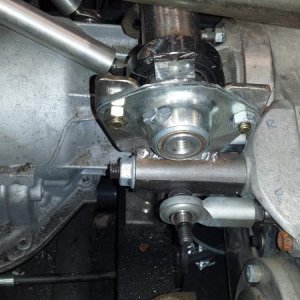
I cut the shifter plate and rail down to just what I needed and made another slider for the rail; which mounts to the main cover plate...

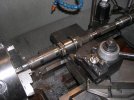
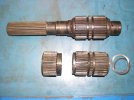
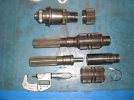
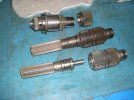
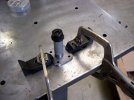
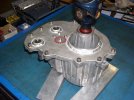
So on to the shaft - I have a while back some one I knew weld up the shaft in the upper half of these pics - unfortunately they did not pay much attention to concentricity or runout - it is OK for mock up but otherwise is scrap...

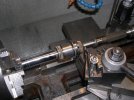
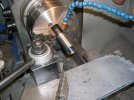
Because the shaft has a slider sleeve I needed to shim it out for welding - I turned the shaft back (the stuff defines hard to machine) and begane turning the locator plug for the slip yoke splines.

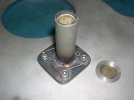
After boring the slider sleeve and shim I heat shrunk the outer ring onto the shaft... I still need to press in the slip yoke spline and weld that stuff up but you get the idea...

A few bearing, seals, and some more 4043 rod and we should have a working box - all for ~150$ total...

Matt
 

Attachments

  • parts1.jpg
    parts1.jpg
    49.8 KB · Views: 444
  • case_mods1.jpg
    case_mods1.jpg
    49.2 KB · Views: 450
  • case_mods2.jpg
    case_mods2.jpg
    47.3 KB · Views: 452
  • decking1.jpg
    decking1.jpg
    52.2 KB · Views: 455
  • decking2.jpg
    decking2.jpg
    54.7 KB · Views: 440
More doubler box pics

Just more pictures :rolleyes:
 

Attachments

  • case_mods3.jpg
    case_mods3.jpg
    40.1 KB · Views: 434
  • case_mods4.jpg
    case_mods4.jpg
    30 KB · Views: 435
  • shaft_uncut.jpg
    shaft_uncut.jpg
    56.6 KB · Views: 429
  • shaft_sleeve_cut.jpg
    shaft_sleeve_cut.jpg
    51.8 KB · Views: 433
  • shaft_cut1.jpg
    shaft_cut1.jpg
    59.1 KB · Views: 429
And yet some more...

bored yet :looser:
 

Attachments

  • shaft_parts1.jpg
    shaft_parts1.jpg
    52.1 KB · Views: 517
  • shaft_sleeve_shim.jpg
    shaft_sleeve_shim.jpg
    55.3 KB · Views: 514
  • shaft_assembly1.jpg
    shaft_assembly1.jpg
    54.4 KB · Views: 511
Weekend progess

Well - got the doubler shaft welded up and the shift rail/fork tuned up for the box... I need to weld in the alum output bearing retainer and then I will get some more pictures...

I also took apart the np202 - the gears in that thing are on par with the rockwell top loader stuff - I guess IH used that case in the travelall's all the way up to the 2.5 ton 4wd telephone trucks they made... Seriously stout piece :cool:

Matt
 
Doubler is finished...

I got the thing put together with the old shift bushing I had made with the bent mock up shaft and it was binding - so I went brack in and trepaned the plate off the tube and located the bushing centerline with the mill...
 

Attachments

  • shift_bushing1.jpg
    shift_bushing1.jpg
    47.4 KB · Views: 446
  • shift_bushing2.jpg
    shift_bushing2.jpg
    55.7 KB · Views: 435
  • shift_bushing3.jpg
    shift_bushing3.jpg
    44.7 KB · Views: 432
  • shift_bushing4.jpg
    shift_bushing4.jpg
    52.3 KB · Views: 430
  • shift_bushing5.jpg
    shift_bushing5.jpg
    43.5 KB · Views: 426
Binding solved.... for now

So I got the case so it shifts very freely - if you leave the detent pin out it will fall out of low range past neutral and back into direct drive...

It was now time to weld in the output bearing retainer... the hole is not a great fitup so I took some weld rod and beat the ends to a taper and drove them in to wedge the two against each other...

Ran some 4043 on both sides and only had to put the plate in the press for a little bit of warpage...
 

Attachments

  • case_assembly3.jpg
    case_assembly3.jpg
    46.1 KB · Views: 422
  • case_assembly4.jpg
    case_assembly4.jpg
    45 KB · Views: 420
  • cover_welds2.jpg
    cover_welds2.jpg
    48.7 KB · Views: 420
  • cover_welds3.jpg
    cover_welds3.jpg
    46.4 KB · Views: 418
  • cover_welds4.jpg
    cover_welds4.jpg
    51.5 KB · Views: 426
Now it was time to put it all back together...

So I had this thing apart about 5 billion times attempting to get back to the free shifting I had before I layed the fat weld on both sides of that plate - I got pretty close to what I had before - so I figure it will be fine for now - once things get oiled and up to temp it will be a non-issue...
 

Attachments

  • case_assembly1.jpg
    case_assembly1.jpg
    56.4 KB · Views: 410
  • case_assembly2.jpg
    case_assembly2.jpg
    52.3 KB · Views: 411
  • case_assembly5.jpg
    case_assembly5.jpg
    54.9 KB · Views: 409
  • case_assembly6.jpg
    case_assembly6.jpg
    49.5 KB · Views: 408
Top