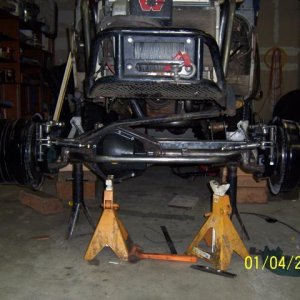
New build, I used the Goatbuilt subframe. 3 upperlink bolt holes front and rear at frame side. Buggy is to the point of riding around neighborhood, testing all systems. I'm getting the traditional torque over to the right under hard acceleration in 2wd. Been trying to google set ups and not finding what I want. Called Goatbuilt and got some insight but unsure if it is correct.
If you increase separation at frame side, you gain anti squat?
If you drop driver side link at frame mount more than passenger side you can counter torque?
I run a TK1 rear swaybar but don't have any bias set in it.
I also might be a touch light on springs, dual rates not tuned as of yet. I'm 150 over 150 in rear with 1/2" preload and right height is perfect. I'm running Radflows and he valved them based on corner weights. I know proper shock tuning is next step but thought I could play with link placement first.
Any info appreciated!! Tried link calculators and just got confused.