• Help Support Hardline Crawlers :

Cheerleader Jeep... 1 ton edition

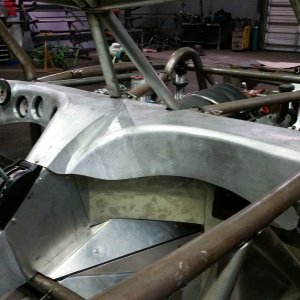
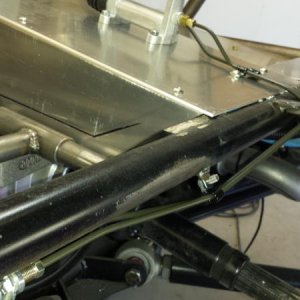
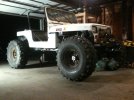
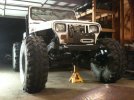
I have the bottom supported and then 2 straps going all the way up and over the tank.

the reweldes seem to be holding good it's just the factory welds that blow out.

That's how I was figuring on mounting mine... I guess time will tell if I end up having the same issues.
 
That's how I was figuring on mounting mine... I guess time will tell if I end up having the same issues.


I think my issue was the side walls flexing when articutating from side to side it just stress cracked the welds... with such a narrow tank may be you will not have the same issue but if you could keep the large sheets from flexing to much maybe you will not have an issue?
 
for racing you have to had a plastic bladder encased in metal


http://www.summitracing.com/parts/SUM-290112/

sum-290112.jpg

Yep, A true fuel cell is a tank within a tank. The bladder is there to contain the fuel if the tank (outer) is ruptured.
 
If you use the mounting tabs just use a rubber mount under each tab. Build a little flexability right into the mount

That was the idea... nice big rubber grommets under and above the mount tabs, with large washers on the through-bolts... sort of a floating rubber mount like a body mount. Then some ratchet straps over the top "snug" but not insanely tight.
 
I would cut all those tabs OFF,top and bottom, and make an "angle iron" (I'd use aluminum) frame for it to sit down into then run "bands" up and over to hold it in place. You could isolate the tank from the frame/bands,to avoid chaeffing, with rubber or weather stripping.
 
I would cut all those tabs OFF,top and bottom, and make an "angle iron" (I'd use aluminum) frame for it to sit down into then run "bands" up and over to hold it in place. You could isolate the tank from the frame/bands,to avoid chaeffing, with rubber or weather stripping.

X2. Ive heard those tabs are only for mock up. Think about it, a 1/8th thick tab thats gona hold 100 lbs of moving weight?
 
I would cut all those tabs OFF,top and bottom, and make an "angle iron" (I'd use aluminum) frame for it to sit down into then run "bands" up and over to hold it in place. You could isolate the tank from the frame/bands,to avoid chaeffing, with rubber or weather stripping.

also a very good idea.
 
I had a bad experience with that style cell. The welds will crack no matter how you mount it in a rough wheelin environment. Mine cracked in 3 places, I said eff it and got a plastic cell. much better.
 
I think my issue was the side walls flexing when articutating from side to side it just stress cracked the welds... with such a narrow tank may be you will not have the same issue but if you could keep the large sheets from flexing to much maybe you will not have an issue?

This sounds like a convo we had while you were leaking up on funny rocks. This was a contributing factor my my TANK's failure as well.
 
Interesting.... I'll come up with a good mounting system and we'll have to see how long this tank lasts. I really want to keep the back seat for my dog and because it's nice to have space for one more person to go wheeling sometimes (yeah... I said one... ever try to fit two adults in the back seat of a wrangler? ha!), so my options are limited with the space I have to work with behind the seat.
 
Interesting.... I'll come up with a good mounting system and we'll have to see how long this tank lasts. I really want to keep the back seat for my dog and because it's nice to have space for one more person to go wheeling sometimes (yeah... I said one... ever try to fit two adults in the back seat of a wrangler? ha!), so my options are limited with the space I have to work with behind the seat.

get a 3/16 one sheared up and ill weld that bitch for a price :cool:
 
I moved the spring mounts forward an inch up front, it lowered it about half inch up front... I'm happy with the front now. Will see how much it levels out when I add fuel and tube in the rear, then play with the rear packs to get it more level.

The 42's are on some plain jane steel wheels they came with until I can get ahold of some 12 bolt H1's. Bought them from a guy in town who's steppin it up to 47 LTB's on his BIG truck. 95% tread and a hell of a deal. :awesomework:

Anybody need some 16.5" 12" wide wheels? Anybody got some D60 dually hubs they wanna let go of? :D
 

Attachments

  • 31240_437091876653_657761653_5737541_4630121_n.jpg
    31240_437091876653_657761653_5737541_4630121_n.jpg
    46.7 KB · Views: 358
  • 31240_437092056653_657761653_5737542_1585062_n.jpg
    31240_437092056653_657761653_5737542_1585062_n.jpg
    51.5 KB · Views: 368
Moved the radiator up an inch tonight, had to trim some of the ribbing under the hood to make room for the rad cap and upper tank. This should give me a little extra room and a little less bumpstop to add for the up travel on the driver's side, since the diff is right under the lower outlet on the rad. I have 1" lift motor mounts too, so the whole drivetrain will be moved up once I get the flat belly done.

My fuel "tank" :flipoff: arrived too. My tentative idea for mounting is this: cut a hole in the floor and build a recessed box to drop it down a couple of inches. Line it with some kind of rubber weather stripping on the bottom and sides, then build a frame from the angle to fit around the top, with more rubber weather stripping, and some long all thread or possibly some small ratchet straps to hold the upper frame to the floor.
 
Here re some tricks I have used matt..

First innertube works great.

My other method is a little different but I get a formed rubber barrier with it.

I take gms (gm OEM sealant, like rtv) and run it where I want it. Make sure when its layed down you figure out how much "squish" you will get when the tank is layed into place. Once layed lit it sit for about 15 minutes. Once that time has passed you want to (this sounds odd) wash the sealant with water. What this does is rapidly pull the compound within the GMS and causes it to cure fast. Let it sit for a few minutes and touch it and it should not be tacky. Lay the tank into place and the gms will form itself without sticking to the tank.


I have used that process a few times and it works great. Oh and I have a couple tubes you can have if ya want to try it.
 
It's 12:30 in the morning and I probably just woke up everyone within a 1-block radius... I don't care. The fuel lines are done, it RUNS.

I ran -8 AN 90 degree fittings off the tank straight into 3/8" rubber high pressure "fuel injection" hose. They seem to work this way, the guy at the parts store said he's done it this way before rather than use fancy steel braided stuff or AN to pipe adapters. I put a small inline filter on the pickup line right at the tank. The fuel pump is an Airtex E8248 with barbed fittings on both ends. I ran it right into the stock wrangler fuel filter and into the stock fuel lines.

For the return I did the same thing, but hacked the factory metal return line off a little shorter and just hooked the 3/8" hose right to it with a hose clamp. I had it set up this way before when I had moved my tank up, and had no problems with not having a flare or barbed end on this, so I'm gonna stick with it.

Here's the trick part... the lines had the perfect bend in them already to clear my new spring mount.

[YT]http://www.youtube.com/watch?v=e0RRJWDrBQk[/YT]
 

Attachments

  • IMG_0425[1].jpg
    IMG_0425[1].jpg
    65.9 KB · Views: 219
Top