• Help Support Hardline Crawlers :

"Half an inch off" (budget) rockwell build

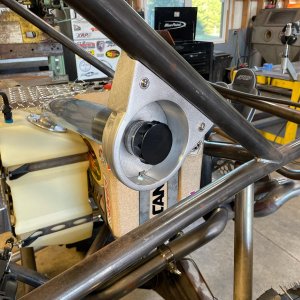
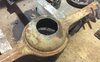
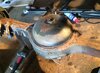
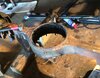
I really want rear steer but really enjoy feeding my children so... I guess I'll make due with what I've got. The largest piece of plate 3/8 steel I had I could only make about a 6.5 inch circle. So the shave wasn't extreme it did give a nice smooth thicker bottom. I have a blue torch fab pan for the front.
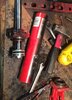
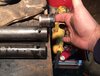
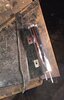
The plate kept falling through so I had to make a handle holder out is angle
 

Attachments

  • image.jpg
    image.jpg
    477.6 KB · Views: 145
  • image.jpg
    image.jpg
    474.6 KB · Views: 150
The rockwell with stock steering and tie rod has approximately 9 inch stroke when using a single ended hydraulic ram mounted to the housing and tie rod. I had to do an internal stop to limit the stroke of my 10 inch ram to 9.
First I attached the ram and fully extended it. I the. Moved it back about a 1/4 inch. I prefer the ram being the stop not the stops on the knuckles. That way your ram is not pushing against your tie for and heims. Then I marked the shaft with a sharpie.

The ram I used was an inexpensive ag ram from tsc. It is easily disassembled by removing the four long rods holding the ends on.

The ends are removed with a small hamer as they are just held in with O rings.

Putting the mark back I the same position it was made. You can measure from the piston to the end cap. Cut a piece of piece of tube that length. (See pic)

Then remove the piston fron the rod. • Do not remove the clevis from the end of rod and pull it through the seal• this wil damage the seal. Place tube over shaft and replace piston. Reassemble ram.

As always it is important to do this in a clean area, as to not get any debris in the cylinder.
 

Attachments

  • image.jpg
    image.jpg
    519.2 KB · Views: 154
  • image.jpg
    image.jpg
    539.4 KB · Views: 159
  • image.jpg
    image.jpg
    533.2 KB · Views: 148
It was 2am and about 27 degrees and I can't stand a red ram on my front axle. It just looks tacky so while it was off I figured I would spray it black. I wasn't paying attention to the temp. So I made a costom heated spray booth. 8)
 

Attachments

  • image.jpg
    image.jpg
    392.7 KB · Views: 144
My "custom" double power steering resivoir. Looks slightly better painted.
 

Attachments

  • image.jpg
    image.jpg
    447.9 KB · Views: 160
Looks good but you better go back and weld the spiders more solidly by putting steel in the gaps and weld it all solid or you'll be sorry. The chunks are a bitch to get out after they are under a rig. :****:
 
Rohlingoffroad said:
Looking good I know u are ready to do some :driving:

I would say you have no ideal how bad I want to beat on this, but I followed your build. So you know exactly how it feels to be so close to done.
Mine is like a slightly retarded, ghetto version of yours. drool :woot:
 
So in all my awesomeness and expert measuring ( see thread title ) my upper front links hit the frame at full twist. Just slightly with the mock up links. Which were 1.75 x .120 tube. So my outside diameter could be no larger then that. My bungs for the heims are 1.5 so I couldn't go any thicker tube. So I decided to get 1.75x.120 Dom and sleeve it with 1.5x.120 Dom but I wanted the bungs to be attached to both pieces of tube. So I made three holes on the outside tube directly above were the bung hits the inner tube. That way I could weld all three together. A good whack from a BFH should clearance the frame.
 

Attachments

  • image.jpg
    image.jpg
    360.1 KB · Views: 154
Im late getting caught up with your build Eddy J , sorry . Looks good ,I really like it.From the looks of things , it shouldn't be much longer ?
 
Got the pan weldered up and front diff put back together.
 

Attachments

  • image.jpg
    image.jpg
    689.5 KB · Views: 140
  • image.jpg
    image.jpg
    550.8 KB · Views: 143
Dude, I like this build looks good. Be happy your daughter picked sparkly blue and not sparkly purple. I think you 3/4 inch radiator piping is going to be way restrictive. You need to be able to move a lot of fluid at a slower pace so the radiator can have time to remove heat. Small diameter lines will move same amount of fluid but at a greater velocity.
 
I hear you. You have all these 400-500 hp ls equipped rigs running -16 an lines for coolant which is 1 inch, I'm probably only making 225 -250 hp.
I will run it through some sort of hard line when I get the chance. I like the ideal of the hard line dissipating the heat.
Bottom line is I'm out of money to throw at this right now and im probably 6 hours of work away from driving it for the first time, to be honest I would have used water hose at this point just to see it move.
Thanks for looking. Appreciate the interest.
 
I am probably a year away from a running rig at my current pace and I have to agree I would settle for a running rig with problems at this point of the build. Regardless it looks good. Top Ramen and P&J for ever and you will finish it.
 
Working on the front axle. I'm surprised by how little ground clearance you get by doing a pan. I'll measure it when it's done but just from eyeballing it I would say 1 inch to 1.5 in the center.
 

Attachments

  • image.jpg
    image.jpg
    425.6 KB · Views: 137
  • image.jpg
    image.jpg
    400.1 KB · Views: 139
:flipper: those center chuncks. I am not even trying to lift one by myself again. :****:
 

Attachments

  • image.jpg
    image.jpg
    736.5 KB · Views: 152
Mounted up a radiator reservoir. $25 online can't beat that. To not have hot coolant running down your back in a roll over. ( black horse-racing off of eBay )
 

Attachments

  • image.jpg
    image.jpg
    584.6 KB · Views: 137
  • image.jpg
    image.jpg
    380 KB · Views: 145
Top