• Help Support Hardline Crawlers :

True budget build ZJ buggy

Yeah the 93' did have a full time transfer case. It is a NP249, it's got a center differential with a viscous coupler. Like all the rest of these jeeps the viscous coupler is locked up so it's full time 4wd. It does still have a low range just like all the other aluminum New Process cases. All the shifter does is select between high and low range. This thing isn't gonna see any time on the street and if I need rear wheel drive for any reason I can always unlock the front hubs. So I see no reason to change out the case till it breaks, then I'll probably go to a NP241

.
 
Re: Re: Re: True budget build ZJ buggy

d_daffron said:
What master cylinder are you using?

I was gonna go with the Autozone calipers, but I didnt have anything to turn in for the core. I looked around the junkyard till I found a truck with some freshly remanufactured calipers with clean fluid in them. Ended up costing $20 for both.

Anyone got suggestions for a master cylinder that will fit the ZJ booster and work with 1/2 ton calipers on all four corners

It's out of a dodge 2500, believe it was a 94 I pulled it from. Just had to change the intermediate shaft between the master and booster. Used a piece of 3/8" CRS to make it. Also deleted the ABS and put in a wilwood proportion valve since I have the same brakes front and rear.

Sent from my garage
 
Re: Re: True budget build ZJ buggy

It was a 99' model to be exact. The older 94 model was cast iron, the one I have is aluminum

Sent from my garage
 
Today I fixed my steering problem.

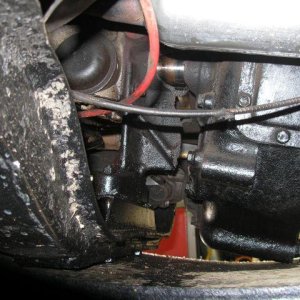
To start off, this definately applies to the astro van steering box. I used an astro van steering box on my ZJ because I stretched the front 7" and the astro box turns the pittman arm around facing forward so the box does not have to hang off the frame in front of the front axle. The Astro Van box bolted directly up to my frame and everything worked perfectly except my turning radius sucked. My axle was no where near turning all the way to the stops when the steering box bottomed out on its internal stops.

I've been researching how to remove the internal stops in a saginaw steering box. I found out that the end cap has the left turn stop, and there is supposably a snap ring somewhere inside the box that makes the right turn stop. This only applies to boxes that dont have 87 degrees of pittman arm rotation. My astro van steering box did not look like it was turning the pittman arm 87 degrees. Out of all the articles I read, noody actually showed where the snap ring actually was or how to remove it. Most articles I read said to replace the box with a different one that didnt have internal stops. That was no help to me because I needed the astro box because of it's reversed turning angle.

Heres a good article from Pirate about dissassembly and reassembly of the steering box

http://www.pirate4x4.com/forum/general-4x4-discussion/570869-saginaw-box-rebuild-how.html

Heres the two different end caps, the cap with the four tabs is the Astro van cap. The other cap is off the factory ZJ steering box. On the Astro box, the four tabs stop the piston preventing it from travelling all the way to the end of the box. As you can see the tabs are about 3/16" tall.

ju5usadu.jpg


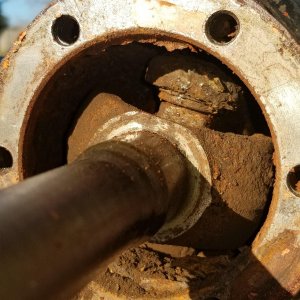
And heres the snap ring, once you remove the pittman shaft, and the piston, you can look down into the box and see this snap ring, a little work with a screw driver and it'll come out. Once the snap ring is removed it's time to reassemble the box and enjoy full steering.

The screw driver is pointing to the snap ring in this pic
7a2ytahu.jpg


Heres the same view with the snap ring removed
a9uranus.jpg


Heres the snap ring as you can see it's also about 3/16" thick
7atavu2y.jpg
 
As you can see, I didn't follow the instructions in the article on Pirate exaxtly. I left the entire spool valve assembly and worm gear in the box. I removed the four bolts holding the top cap and slid the top cap an pittman shaft out as an assembly. Then I removed the end cap. I then turned the box on it's end with the input shaft facing up. I then turned the input shaft clockwise while holding my hand over the end of the box where the end cap used to be. As the piston came out of the box, all the balls fell down inside the piston. Once I removed the piston, i turned the piston over and all 24 balls fell out. Using this method I was able to avoid messing with the valve portion of the box, and I did not have to buy any seals or gaskets for this entire modification.

Total cost 4 hours and $0.00.
 
I have it done and ready to hit some trails, but no trailer to get it out of the yard and into the woods. Cheap trailer build to come...
 
By finished, I mean it's done but still not painted. Gonna get it out a ride or two to see what all I'm gonna have to change before I waste any time painting it. It pretty much looks exaclty like it did in the pics in post #15. Only visible difference is a little more Krylon on it. As soon as I get a chance to borrow a trailer, i'm gonna take it out and I'll have more pics and hopefully a video.
 
Since I dont have any cool jeep pics, how bout some of the K5 and the future jeep testing grounds whenever I get a trailer to take the jeep out there

4yza8e6e.jpg


ragy7e2u.jpg


Anyone got any ideas how to post an Iphone video using tapatalk, without having to upload it to youtube?
 

Latest posts

Top