• Help Support Hardline Crawlers :

Renovation of a YJ

jimpaget

Well-Known Member
Joined
Jun 6, 2006
Messages
829
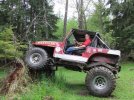
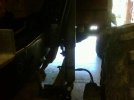
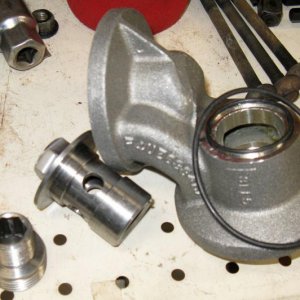
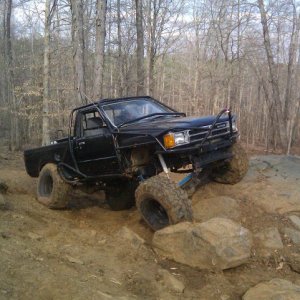
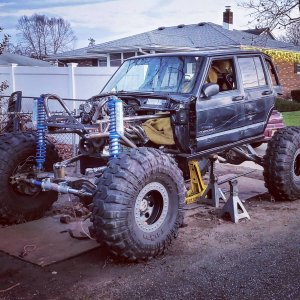
The end of May, I bought a YJ that had nearly everything that I could want. It had Dana 60s at both ends, it had 4.0 crawler gears in the t-case, an ARB in the front and a spool in the back. The engine was a crate later year 4.0 (ODBII). It was running 38.5 Swampers.

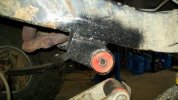
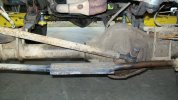
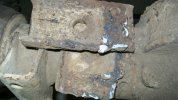
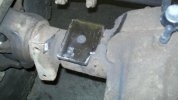
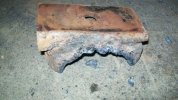
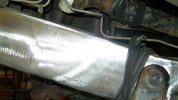
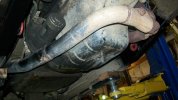
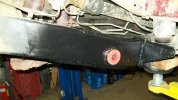
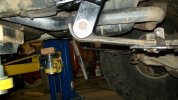
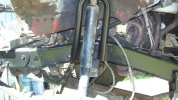
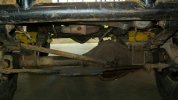
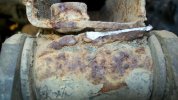
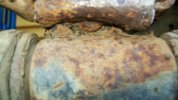
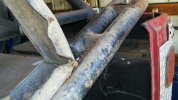
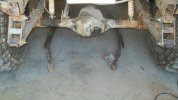
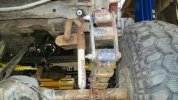
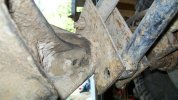
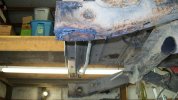
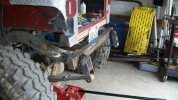
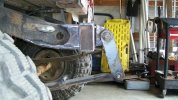
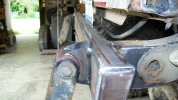
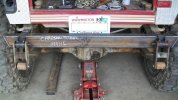
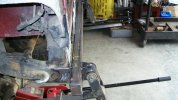
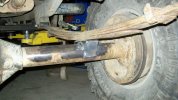
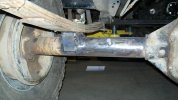
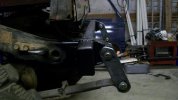
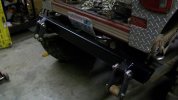
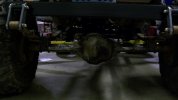
The rig is now at Zukkev's (Kevin) getting some issues worked over. First, the rig was a little too tall, both for the tires and for my garage. Second, there were some geometry issues in the front end and the rear springs were pretty well shot.

Because our club does snow runs and I am a wimp, I also picked up half doors, a tailgate and full canvas. I will also be making new side armor and bumpers.
 

Attachments

  • DSCF1406 cmpr.jpg
    DSCF1406 cmpr.jpg
    122.4 KB · Views: 732
I wouldn't call you a wimp. I love having a top and a heater in the winter. The buggy guys can enjoy wearing there snow gear getting plastered
 
Yup.... Front suspension issues were a bit more than first thought up front, but didn't turn out to be too bad to get things back to relative correctness! :redneck:
The rear however, is another story to come later...:;
Few pics of the front...Old stuff; Someone had put on the homemade shims, to try and correct the pinion/caster for the shackle mounts being under the frame...barely held on! :yikes: Next run of pics will be of the reconfiguration, which settled several geometry issues...
 

Attachments

  • Jim's Jeep Redo... 055.jpg
    Jim's Jeep Redo... 055.jpg
    50.3 KB · Views: 701
  • Jim's Jeep Redo... 064.jpg
    Jim's Jeep Redo... 064.jpg
    58.5 KB · Views: 691
  • Jim's Jeep Redo... 068.jpg
    Jim's Jeep Redo... 068.jpg
    66.6 KB · Views: 711
  • Jim's Jeep Redo... 076.jpg
    Jim's Jeep Redo... 076.jpg
    37.6 KB · Views: 692
  • Jim's Jeep Redo... 074.jpg
    Jim's Jeep Redo... 074.jpg
    70.6 KB · Views: 703
Some of the new configuration...and it's actually got shocks up front now! :awesomework: :redneck:
Ended up with approx 5.5* caster...:awesomework: sits almost 2" lower up front, and the front axle is nearly centered under there now, springs are centered under the frame--- left side used to sit nearly 1.5" to the left with the way the old stuff was set up, moving the axle almost an inch over...all that's fixed now...
 

Attachments

  • Jim's Jeep Redo... 072.jpg
    Jim's Jeep Redo... 072.jpg
    51.2 KB · Views: 689
  • Jim's Jeep Redo... 096.jpg
    Jim's Jeep Redo... 096.jpg
    54.5 KB · Views: 684
  • Jim's Jeep Redo... 091.jpg
    Jim's Jeep Redo... 091.jpg
    58.5 KB · Views: 678
  • Jim's Jeep Redo... 098.jpg
    Jim's Jeep Redo... 098.jpg
    54.3 KB · Views: 672
  • Jim's Jeep Redo... 106.jpg
    Jim's Jeep Redo... 106.jpg
    64.3 KB · Views: 677
The Tie rod and drag link are also getting replaced as soon as parts show up...Anyone need any custom steering parts for spares???:redneck:
One other thing I need to address, Due to the lack of room on the pass side from the axle being narrowed abit too much, the lower shock mounts ended up on top of the spring plates...gonna devise some sort of support for the bottom of the shock mount...Not sure it's totally necessary, but overkill is better that broken....:cool:
 

Attachments

  • Jim's Jeep Redo... 063.jpg
    Jim's Jeep Redo... 063.jpg
    47.4 KB · Views: 680
  • Jim's Jeep Redo... 104.jpg
    Jim's Jeep Redo... 104.jpg
    54.4 KB · Views: 655
  • Cell pic3 jim.jpg
    Cell pic3 jim.jpg
    30 KB · Views: 652
this is cool! I THINK I remember seeing that jeep on CL not too long ago and from the drivetrain specs thats a good grab:awesomework:

4:1 in the case though thats awesome! is it the np231 or a flipped d300?

Makes me happy to see another bootyfabbed heep off the trail and into a good garage to get DONE RIGHT:redneck: I know ill be following this build
 
4:1 in the case though thats awesome! is it the np231 or a flipped d300?

Makes me happy to see another bootyfabbed heep off the trail and into a good garage to get DONE RIGHT:redneck: I know ill be following this build
NP231 w/ SYE....
Oh no way those running board setup u have now is all you really need! They look plenty beefy and look to be holding up great:haha::;
:haha:
:ANYWORD:
Thanks!!! :beer: Not sure about the done right thing, but it's gonna be waaaay less wrong than what it was before....:redneck:
 
The front suspension is done now. The stuff is here for a new drag link and tie-rod. The rear bumper is now in place and the rear shackles hung. The rig should be rolling tomorrow, but perhaps with no rear brakes.

We decided that the front and rear bumper and the side armor will all be air tanks. That will allow us to remove the air tank from the bed. Space there is limited due to the 20 gallon fuel cell.

Right now it appears that we are going with S-10 rear leaves although we may be mixing in some leaves from an XJ.

I will be posting new pictures soon.
 
No u bolt eliminators? Thought that was a Zukkev fab trademark!

Looks good guys.:cool:

:haha:....:redneck: For now, it will get the ubolts for it to make it to the show-n-shine, as a work in progress!:redneck: The thought is not to get too extreme with the rear leaves, as it may see a 4-link at some point...:;
 
Well, first order of the day out back was to get the rear bumper removed. The welds on this weren't much better than the front spring perches were. So, for giggles, I decided to see just how strong they were! Wrapped a strap around a tree, hooked chain to strap and to each end of the bumper...and gave her a tug! :redneck: The welds themselves held ok, but what it was welded to? Let's just say body mount sheetmetal and the stock rear crossmember is not a good place to weld a bumper to! :haha:
The upside is once I got all that crap outta the way & the frame horns cleaned up, it gave me a clean slate to build from! :D
 

Attachments

  • Jim's Jeep Redo... 113.jpg
    Jim's Jeep Redo... 113.jpg
    60.8 KB · Views: 384
  • Jim's Jeep Redo... 114.jpg
    Jim's Jeep Redo... 114.jpg
    52.6 KB · Views: 391
  • Jim's Jeep Redo... 115.jpg
    Jim's Jeep Redo... 115.jpg
    39.2 KB · Views: 386
  • Jim's Jeep Redo... 116.jpg
    Jim's Jeep Redo... 116.jpg
    51.8 KB · Views: 381
  • Jim's Jeep Redo... 119.jpg
    Jim's Jeep Redo... 119.jpg
    50.1 KB · Views: 392
Some pics of the whacked out rear setup...Both rear eyes of the springs were outboard nearly an inch from under the frame. The antiwrap bar had sheared the lower bolt off the axles end some time ago, killing the springs....
 

Attachments

  • Jim's Jeep Redo... 126.jpg
    Jim's Jeep Redo... 126.jpg
    62.9 KB · Views: 386
  • Jim's Jeep Redo... 123.jpg
    Jim's Jeep Redo... 123.jpg
    59.6 KB · Views: 377
  • Jim's Jeep Redo... 129.jpg
    Jim's Jeep Redo... 129.jpg
    53.3 KB · Views: 377
Now, with the dirty work past me, here's a few pics of what's to be the rear setup...Got into a groove, so not many pics during the process...
Slung the new leaves under the rig using the original shackles, tacked up the rear bumper, and made up a set of shackle hangers and got them tacked in place. set the rig down on the axle to get a look at the rear height...a little high yet, and the shackle angle is close but not quite to my liking....easy fix though.:;
 

Attachments

  • Jim's Jeep Redo... 130.jpg
    Jim's Jeep Redo... 130.jpg
    65 KB · Views: 375
  • Jim's Jeep Redo... 131.jpg
    Jim's Jeep Redo... 131.jpg
    61.3 KB · Views: 369
  • Jim's Jeep Redo... 133.jpg
    Jim's Jeep Redo... 133.jpg
    56.2 KB · Views: 361
  • Jim's Jeep Redo... 137.jpg
    Jim's Jeep Redo... 137.jpg
    60.7 KB · Views: 364
  • Jim's Jeep Redo... 136.jpg
    Jim's Jeep Redo... 136.jpg
    60.3 KB · Views: 361
Decided to make up a set of shorter shackles from 1/2" flat stock, and picked up new hardware for mounting them. Also plated the top/bottom of the frame, tying everything together while cleaning up the look at the same time... One other thing I had to address was the right spring perch was welded on crooked, so I cut the not so good welds on one side of the perch (no surprise there), and the damn thing nearly fell of in my hand, so I just popped it off the tube. Cleaned up the tube, re-welded the perch in the proper location, and beefed the perches up a bit...Decided after that incident, I better grind the other side and reweld/beef it up it as well.... Mucho betta all the way around! :awesomework:
With all said and done, sits approx 1.5" lower out back now....:awesomework: might need to add a couple XJ leaves to help compensate for trail gear being loaded in back, but we'll see....I like the nearly level stance as it sits!:cool:
 

Attachments

  • Jim's Jeep Redo... 144.jpg
    Jim's Jeep Redo... 144.jpg
    58.3 KB · Views: 366
  • Jim's Jeep Redo... 143.jpg
    Jim's Jeep Redo... 143.jpg
    55.5 KB · Views: 361
  • Jim's Jeep Redo... 142.jpg
    Jim's Jeep Redo... 142.jpg
    42.5 KB · Views: 364
  • Jim's Jeep Redo... 140.jpg
    Jim's Jeep Redo... 140.jpg
    42 KB · Views: 363
  • Jim's Jeep Redo... 147.jpg
    Jim's Jeep Redo... 147.jpg
    29.9 KB · Views: 355
Still need to get brakes working out back, rear shock mounts figured out, rearmost body mount pads made, and some parts to make up an antiwrap bar...but she's a roller again! :D
 
dang it Kev!!! making me bummed that mine is still in pieces!!! :mad:

good job on teh rebuild... every jeep i ever get, the first thing i replace and/or beef up is that back section...

:awesomework:
 
Took the rig to the Rainier Ridge Rams Show 'n Shine. We still don't have the rear suspension dialed in, but it ramped 960 on a 20* ramp.
 
Top