• Help Support Hardline Crawlers :

Bell crank steering

AEH

Member
Joined
Jan 16, 2014
Messages
14
Location
Arkansas
I've been meaning to post this for a while. There's not a lot of info out there on bell crank steering setups and when I built my buggy I had to figure it all out for myself. I wanted my buggy to be street legal and I wanted to maintain a mechanical link.

There are a few examples out there and you can get a few random pictures of parts and pieces but design criteria is hard to come by. Jessie Haines was nice enough to share his knowledge and experience But you're still pretty much on your own. One thing I'll say at the onset is it would be better to build your buggy around your steering than the other way around. I learned a ton and would do it differently if I was to do it again, but it seems to work fantastically. It hasn't seen any hard use yet but so far so good.

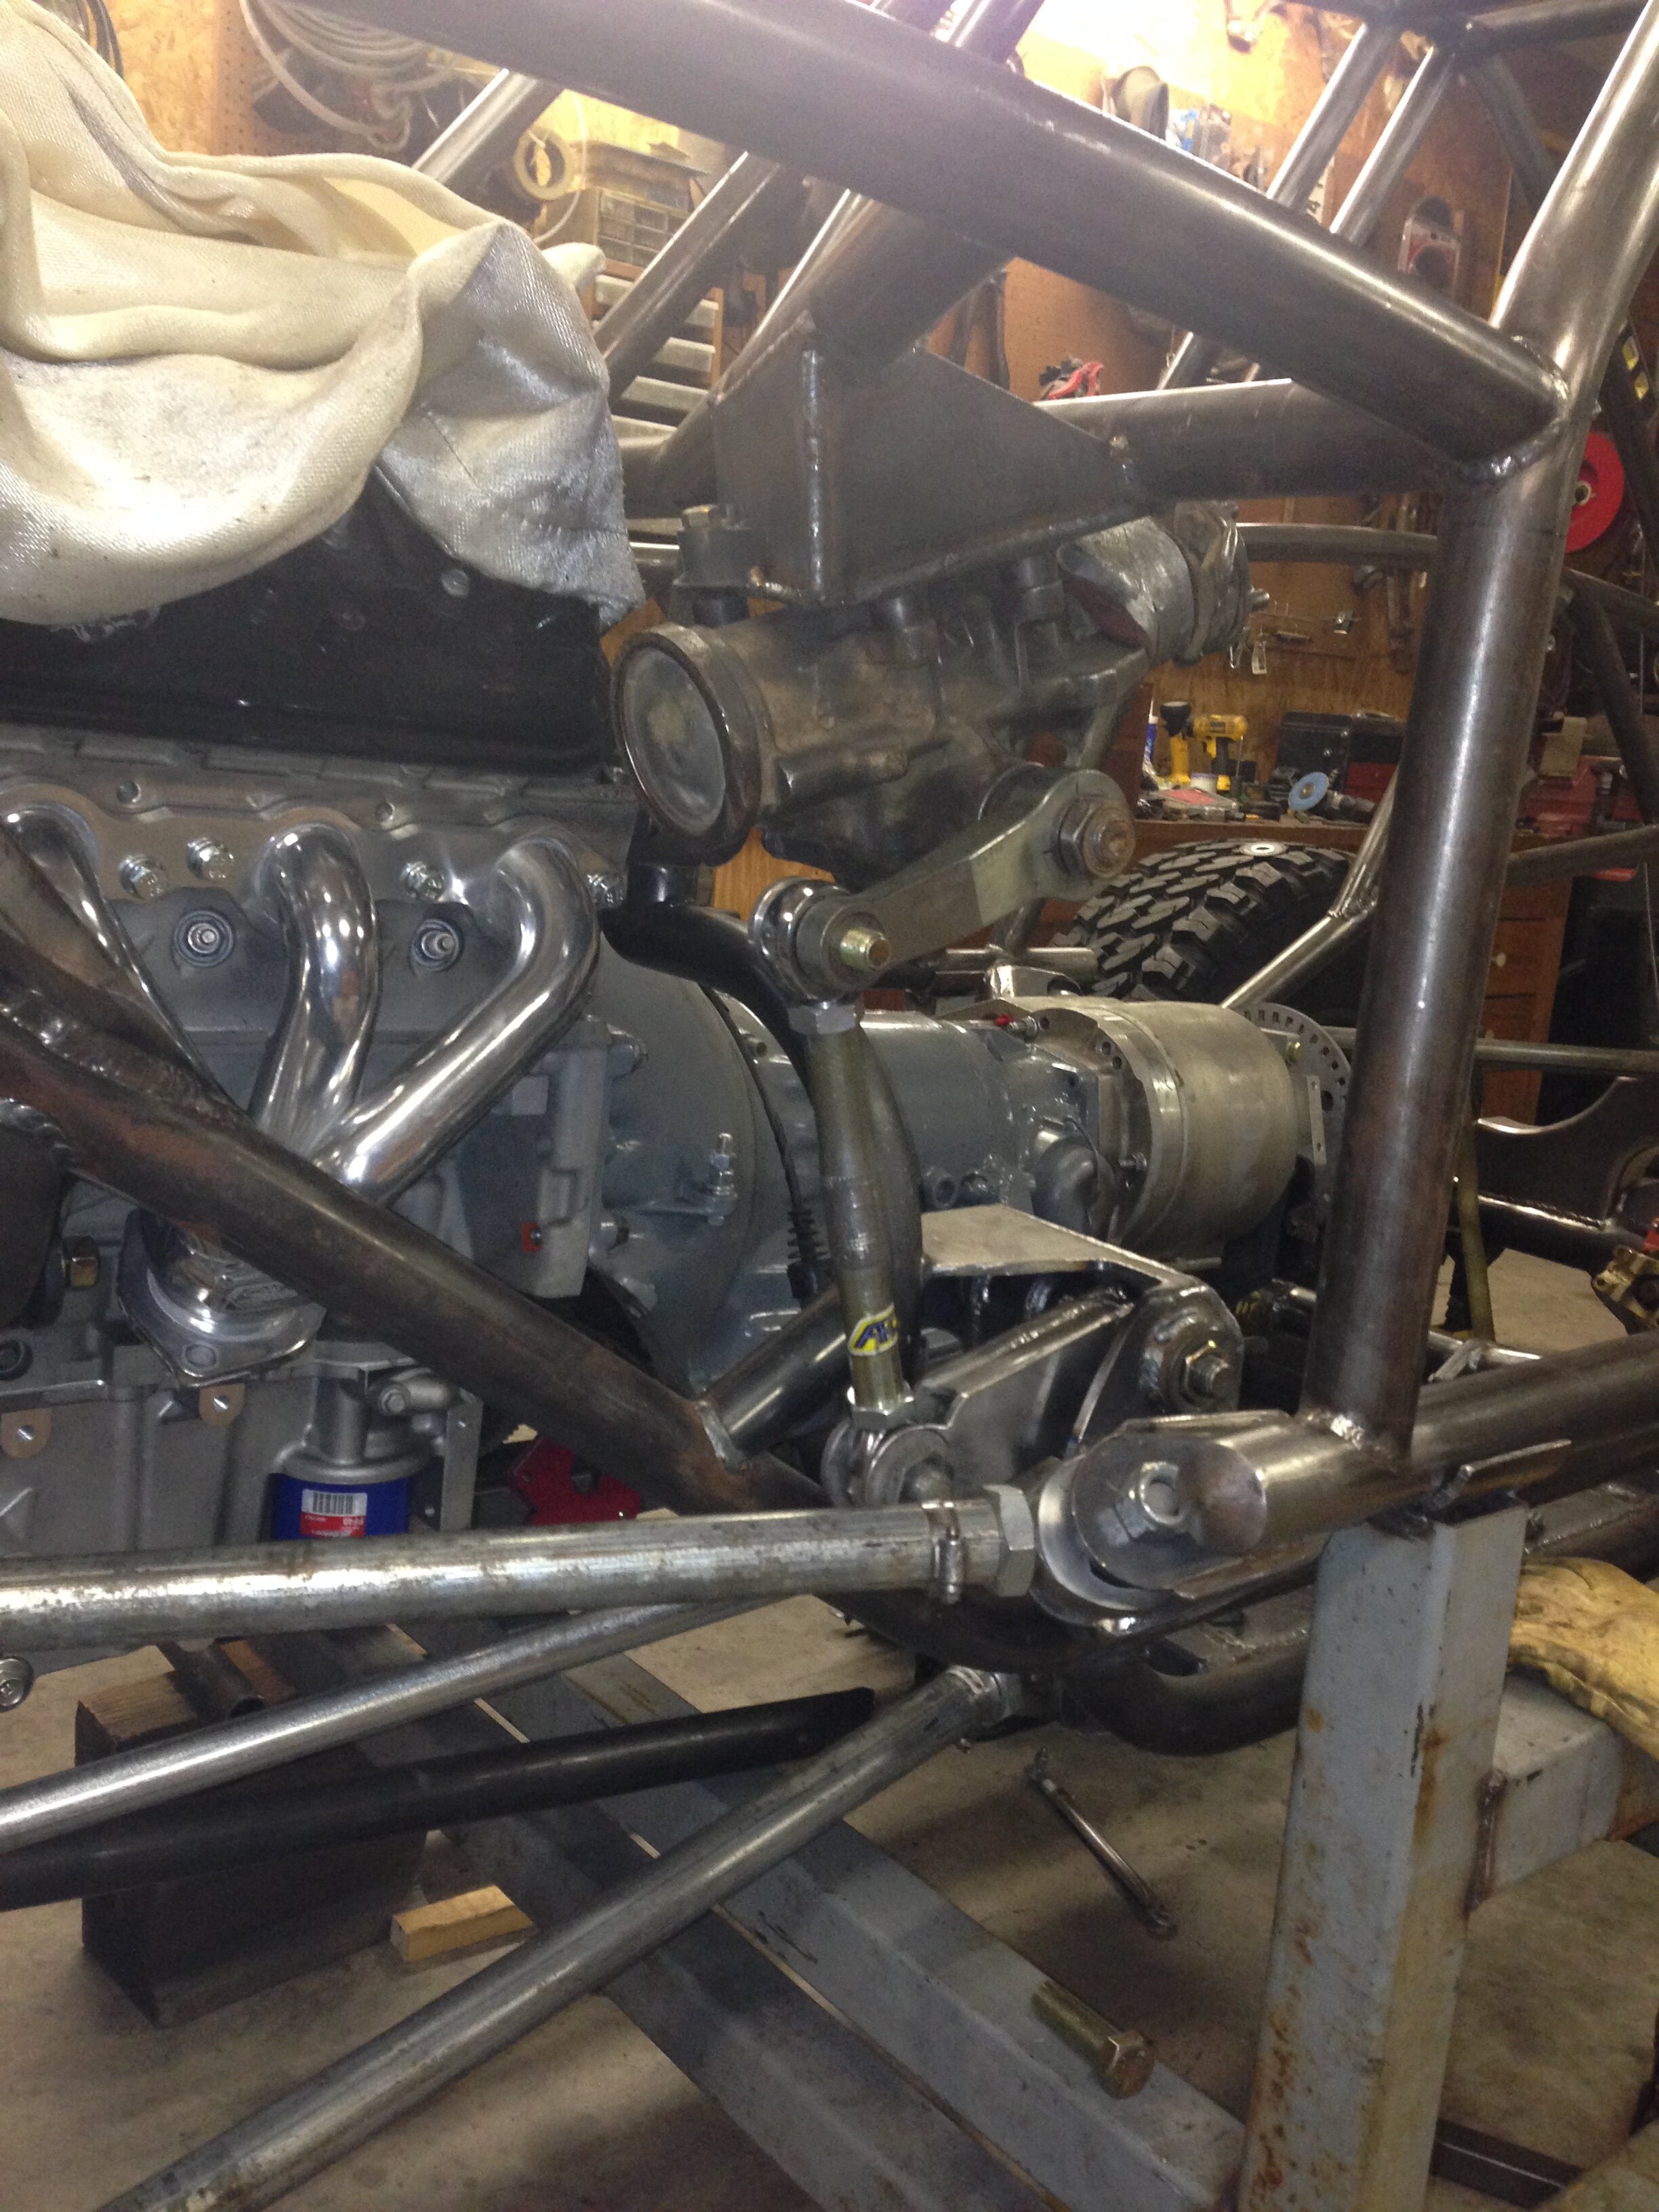
The steering box is mounted in the dash with a link down to a Bell crank under the floor pan. Well actually in the middle of the pan between the peddles. Then a link runs forward to another bell crank located in the front axle truss. The key to making it work without bump steer is to keep the steering link moving in the same arc as the suspension links. In the neutral steering position the steering link heims are inline with a line drawn between the two 4-link Heims on either end. There is undoubtedly some bump-steer but I can't prove it.

So that pretty much dictated where the bell cranks have to be located, the rest was just working out the particulars of bell crank arm lengths and such to make it all work out. The steering box, the wheel stops and the cylinder all have to bottom out at the same time.

I also tried to keep all opposing crank arm close to equal length and parallel. And perpendicular to the connecting rods. Knuckle steering arms same lengths as the associated bell crank arm, front and rear bell crank arms that are attached with the tie rod are equal length and parallel, bell crank arm and Pittman are same and parallel.

I also tried to keep arms and links at 90 degrees of each other in the neutral steering position To keep the arc lengths the same in either direction while turning.

E5C75050-72DF-41C8-A1BD-E92599DE2F97.jpeg

B87DA5C1-A638-4883-B0AA-14EBDAD24FE1.jpeg

FRont Bell Crank
05109BA5-4E8F-4092-AF9F-01AE2E25E0C5.jpeg
F171DA33-D3D8-4FAB-AFE0-50868AC018CA.jpeg

Rear bell crank
6D6FAEE3-BC13-47A5-ADE4-78CA1DA50F2A.jpeg
8F38E25A-9464-4A5B-99BB-1EA261F7EEB4.jpeg

3A8AE47C-C0D3-4190-A9AA-5DDF17FAEA3E.jpeg
E448A0B9-FF0D-406B-BCC0-02B5780E8E92.jpeg
1F4CBA09-1388-484C-B0C0-353A23DC63DB.jpeg
 

Attachments

  • AAD4509C-DCD1-42C8-9941-BED03193FD35.jpeg
    AAD4509C-DCD1-42C8-9941-BED03193FD35.jpeg
    1 MB · Views: 445
Last edited:
I wanted all my pans removable and welded. This was my first aluminum welding so don't trash my welds, just showing the concessions I had to make to work around the steering components.
ED2836D0-7A53-4764-888A-B04A0214CE7C.jpeg
0CFADD43-C0A7-4338-8F2B-81807642D2C1.jpeg
94E9CEBE-9BAD-4A37-9880-A8AC373A2D77.jpeg

Third mock up. First was cardboard. Second was plywood but I don't find the pics.
9CA78DBC-89D5-486B-BA07-7670B8E6F5F2.jpeg
F98BF4D1-BD72-4167-9267-11D89A5B63BA.jpeg

A good look at the front truss.
368AFB83-ADF6-49AE-ABFC-A46CA653CA85.jpeg
FFAE1926-F543-489F-8F75-55217F1E12A6.jpeg
 
Last edited:
A few more pics of the buggy for fun. Hard to believe It'll be 6 Years in November since I started it. Lots of "OH CRAP!"s on the way. Everything we did we did at least twice I think.
0332F264-759D-4D59-96D1-D8D339F97ED3.jpeg


592636AF-EFB1-4330-8FA5-3714A9C5005F.jpeg


Heater under the dash. With defrost for the removable windshield
AB678E00-78BD-4F6C-988C-7E29C9E0550C.jpeg

Frenched in the door latches to keep the gaps even all the way around.
B099EC63-C715-4169-81B7-C6ABC26B4C71.jpeg

12F92F5E-EA05-43EB-84A0-29559C6905C7.jpeg


Split the windshield tubes and made some "D" shaped tube to countersink the windshield.
AABFD2F9-EBD6-44C5-A6C8-8EDB038A9556.jpeg

transmission cooler below the radiator
0D5ADC00-B525-4FFE-A8A9-42F5D6902A8A.jpeg


Gm intank pump with sender. 18 gallon capacity
65DF38FC-754D-494E-9168-1D78C9A9EDDC.jpeg

slight miss calculation on the battery placement. Notched the fender tube for clearance
41CF19EB-8F4D-4562-9DB0-AE6CF0CD3402.jpeg
 
Last edited:
That's pretty cool! I I would think if your geometry is right your bump steer would be almost nonexistent, and the assist cylinder should keep it from jerking the wheel out of your hands.
Very clean looking build!
 
Very well done. It only works for passenger drop front ends though. Of course no reason a buggy cannot be right hand drive. I took seven years to build my buggy and it is not as nice as yours so I think you are doing good at six years.
 
Thanks all, It was a labor of love and hate. Life is hard and it's even harder when your stupid,lol. Everything I did made life harder on the next step. Mount the steering box where you think it needs to be and then the pitman arm hits the master cylinders. Buy the smallest master you can find and then all the good reservoirs stick up too high for the hood panels. Have custom stainless reservoirs made, problem solved!

In Arkansas they don't care about steering, fenders, beadlocks, bumpers etc. So you can tag almost anything. Just so it has the appropriate lights and a horn.
The steering that jr4x worked out is very good , way better than mine but they aren't mutually exclusive. His gutted box and servo is just way better in race situations. I think there's is on a 3 link but the same tech will work on a 4 link as well. I Know a guy that was eating a box every race and went with that setup on a 4 link/bell crank rig and it solved his problems. Raced the whole season last year on the same box. I'm not gonna be hitting rig flipping boulders at speed repeatably so I don't anticipate the same problems.

My front was a HP driver drop from a 78 F250. I still have plans to build a 609 front but it was just too much to get my head around with trying to figure out all the steering issues. I found a deal on that 44 and a 35 spline 9" that I couldn't pass up. All new Hub to hub and I paid less for the pair than I could have built the rear for. So I just re-tubed the front and swapped sides. That sounds good but it moves the pinion over closer to the center and really complicated the drive line. I talked branick into making another run of his carrier bearings to solve that problem.
130FC070-B94E-4E39-9B71-C9AE982E34DB.jpeg
7DCB64FB-7604-437B-877A-91537B439647.jpeg
 
Last edited:
It's not everyday you see a 6-lug tube buggy, or one with a windshield, much less one with bell-crank steering, so very cool and unusual setup you have there. :dblthumb:

What are the overall specs of the buggy?
 
Last edited:
LS1 with a mid range cam
Built turbo 350 transmission
Atlas II transfer case
Radflo 14" remote coilovers and bumps
Raceline wheels with 37's (6 lug Chevy)
35 spline full float 9" w/Detroit locker
Hp Dana 44 chrome Molly, super joints, Reid knuckles w/Detroit locker

I was gonna buy a SxS and just decided to build a small lightweight buggy instead and it just snowballed from there. I bought a WOD evolution frame which I still love but if I was to do it again I'd just build my own. If I knew then what I know now, I'd get a wider cab. 47" between the doors in the cab is just too tight. Everything is shoe horned into it

When I got the seats in it I just couldn't get comfortable with the headroom. I'm an old white guy, my recliner is in the living room, but I want to sit up when I drive, lol. So I chopped the top off and raised it 6". Sleeved and plug welded and several hours later with a draw file and you'd never know it. 26 welds to dress takes a bit and if you want it right, a long file if the only way to get there.

Btw, you can successfully transport a WOD chassis in the back of a pickup!
1CEB262E-1F83-48DB-BB39-BF6E9D0FE83B.jpeg
F29250C3-944F-43A7-8AD3-408A34F31245.jpeg
4D5DF675-C9FA-43B2-9708-19FD47AD7AD4.jpeg

5AB4D7C8-28E8-44F2-936F-834A4D4B1EE5.jpeg

17AF5C2B-332F-440B-AFDA-FA98DC94A969.jpeg
 
I like the doors. I've been thinking of adding doors to mine. It gets old doing the Bo and Luke Duke moves getting in and out.
 
There was no way my wife was ever gonna crawl through a hole (not that she couldn't, she just wouldn't) so doors were a must. The windshield, heated seats and the heater all follow this same logic.

On the doors, I added a couple 1/4" plates. In case I roll it over on a rock, I didn't want the doors to shear off the latch and get pushed in on me. The lower plate does not contact the door but the upper plate keeps the door snug and prevents it from rattling. I added a couple of those little rubber bumpers you find on steel door frames. After welding in place and installing the bumpers, just adjust the plates with a BFH or countersink as required until the door closes Snuggly. Worked out perfect
E9509534-82F3-4862-8F94-AA6A438A79DE.jpeg
3FDD5EDB-CA9E-4D2C-BF78-FE03408A5767.jpeg

I used a Jeep exterior door latch mounted On the inside. Worked out good

C32E2633-863D-4CDE-BEB7-AE11B882FECB.jpeg
 

Latest posts

Top