• Help Support Hardline Crawlers :

My buggy build. Does anyone make build threads anymore?

I also installed the Yukon super joints and the front axle shafts.
 

Attachments

  • B2A326BF-2369-42F0-9B95-04ECA860F776.jpeg
    B2A326BF-2369-42F0-9B95-04ECA860F776.jpeg
    1.4 MB · Views: 427
  • 28B69635-36F8-484A-910A-515F62DED174.jpeg
    28B69635-36F8-484A-910A-515F62DED174.jpeg
    940.6 KB · Views: 446
When I bought the axles second hand they already had chromoly shafts and super joints but they were not installed. I found out that they ordered ford chromoly shafts and super joints and would not work in this axle. It's funny how god works sometimes because I opened the rear diff cover and it did have 5:13 gears with Detroit Lockers. But from the picture you can tell it was setup incorrectly.
 

Attachments

  • 2C4E4464-BD7A-49C8-BD86-24DAC5A82821.jpeg
    2C4E4464-BD7A-49C8-BD86-24DAC5A82821.jpeg
    941.6 KB · Views: 431
I started a build thread last year but haven't posted in quite some time, yours looks killer so far, I'm interested to see how solid works brings all the pieces together. I dig those tube ends!
 
Sorry for the delay in posting, been getting ready for a move.
So I figured out that the 4149 shafts I got with my axle were for actually for a Ford Axle. So I ordered the correct shafts with super joints.

I also started putting all the parts I drew in Solidworks into a chassis design.
 

Attachments

  • A44C4EDC-8B84-4779-8621-0DFBA4477063.jpeg
    A44C4EDC-8B84-4779-8621-0DFBA4477063.jpeg
    5.1 MB · Views: 368
  • A9EFE4DE-FC68-4771-B4C6-CA23AC24445A.jpeg
    A9EFE4DE-FC68-4771-B4C6-CA23AC24445A.jpeg
    1.5 MB · Views: 342
  • 455E4FF9-08F2-4482-B6E8-747D08FF5B92.jpeg
    455E4FF9-08F2-4482-B6E8-747D08FF5B92.jpeg
    1.6 MB · Views: 338
I also started cutting out my sub frame assembly. I chose to make my sub frame in this way because I didn't want to use rectangle tube and have to worry about drilling through both frames to make it even etc. here are a few pictures from me assembling that. It's a tab and slot design so it can only be assembled one way. Also a picture of the pallet of parts I have for this project. The skid plate is a 3 piece design and can be removed. I also choose to make my shock towers adjustable up or down 3 inches.
 

Attachments

  • 8AB4A85E-33AF-44E7-A9E8-01CDC4589A95.jpeg
    8AB4A85E-33AF-44E7-A9E8-01CDC4589A95.jpeg
    2.7 MB · Views: 329
  • 8B9FC219-7399-4B8B-84A5-0A80D5F9FF0E.jpeg
    8B9FC219-7399-4B8B-84A5-0A80D5F9FF0E.jpeg
    1.8 MB · Views: 354
  • BADCBC85-105D-41E0-AF86-D0711F8CAABE.jpeg
    BADCBC85-105D-41E0-AF86-D0711F8CAABE.jpeg
    3.1 MB · Views: 309
  • 881A7795-7E92-47C4-9463-C74806BFB8E4.jpeg
    881A7795-7E92-47C4-9463-C74806BFB8E4.jpeg
    2.5 MB · Views: 326
  • D0D8B4C1-6EB4-45F8-B2DB-6CFABFA2E574.jpeg
    D0D8B4C1-6EB4-45F8-B2DB-6CFABFA2E574.jpeg
    2.9 MB · Views: 315
  • E6C52658-CB41-4B0B-ACCD-69FD6A59447F.jpeg
    E6C52658-CB41-4B0B-ACCD-69FD6A59447F.jpeg
    2.6 MB · Views: 310
  • 4AC030BE-94BD-48B6-ABC8-1D68D0EF9D4E.jpeg
    4AC030BE-94BD-48B6-ABC8-1D68D0EF9D4E.jpeg
    2.3 MB · Views: 292
  • 990BC154-CFBE-4479-A76B-4DFACFE69486.jpeg
    990BC154-CFBE-4479-A76B-4DFACFE69486.jpeg
    1.6 MB · Views: 311
  • 43EE0EFE-CA94-45E0-83A3-241E886656A6.jpeg
    43EE0EFE-CA94-45E0-83A3-241E886656A6.jpeg
    1.6 MB · Views: 314
  • E7CA6CDE-399F-452A-8DC3-3497A0E4E33A.jpeg
    E7CA6CDE-399F-452A-8DC3-3497A0E4E33A.jpeg
    1.7 MB · Views: 380
Dude... wtf. Killer design work. And a hell of a shop. I almost feel like once you have everything drawn up, you could just hit a button and a fully built rig would just pop out of one of those machines.
 
Dude... wtf. Killer design work. And a hell of a shop. I almost feel like once you have everything drawn up, you could just hit a button and a fully built rig would just pop out of one of those machines.
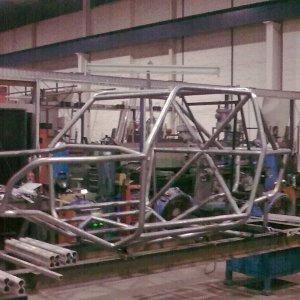
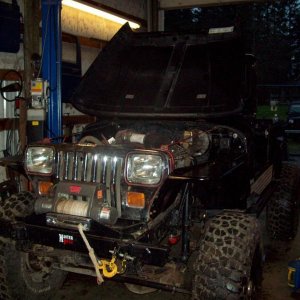
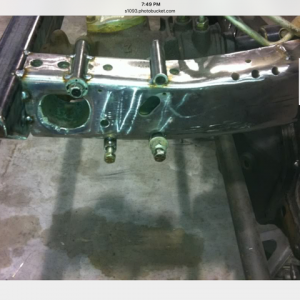
Thanks man, more to come, slowly getting all the pictures off my old phone. Doing all of this and moving and putting in a HAAS ST35Y with a bar feeder and a VF4 all at the same time is kicking my a$$.
 
Last edited:
Haven't gotten all my pictures off my old phone but here is a picture of the chassis with my wife testing out seat position. It's coming along very well so far. I made it the chassis large enough for me because I'm 6'3" and I didn't want to be cramped.
 

Attachments

  • B7D004F5-BF49-4525-A728-0081FDAEDC12.jpeg
    B7D004F5-BF49-4525-A728-0081FDAEDC12.jpeg
    1.4 MB · Views: 841
I am not sure how well the adjustable shock mount will work but once I get everything setup the way I want I may weld them in. Haven't made a decision yet. Here are a couple pictures of cardboard between the mounts and the mounts that weld to the chassis.
 

Attachments

  • 6A8D53E3-4228-4542-B229-676A25CAA913.jpeg
    6A8D53E3-4228-4542-B229-676A25CAA913.jpeg
    1.2 MB · Views: 370
  • 590AFBA6-49DF-4906-A4BE-D7BBEA4F758E.jpeg
    590AFBA6-49DF-4906-A4BE-D7BBEA4F758E.jpeg
    1.2 MB · Views: 305
  • 83747F3F-9BB4-45E0-BE7D-24F56D038559.jpeg
    83747F3F-9BB4-45E0-BE7D-24F56D038559.jpeg
    879.7 KB · Views: 311
New piece of equipment for the shop. Don't have power yet so I can't even plug it in and play with it. This is as bad as being a kid at Christmas.
 

Attachments

  • 1F811376-3DFB-4792-B11B-23CC11280E01.png
    1F811376-3DFB-4792-B11B-23CC11280E01.png
    850.1 KB · Views: 301
  • 5452053B-D123-4016-8BE1-D541456605EF.jpeg
    5452053B-D123-4016-8BE1-D541456605EF.jpeg
    185.9 KB · Views: 327
So I've finally gotten moved into my new building. All equipment was moved without much problems. This week I have been able to get some work done on the buggy. It is sitting on all for with suspension in place. I am at 19" off the group with a 113 wheel base. I made some tie rods for the hydro steering but they are 1 inch to short. I copied the extensions that came with the ram. I have some new tie rods made that I'll throw on tomorrow. In the picture the bottom of the tire is 45" from the ground.

Some new tube ends. Thinking about offering these if anyone is interest along with custom length tie rod extensions.
 
Last edited:
Some of what I'm working on. These tie rod extensions were for a Can-Am defenders but its how I did mine also. I put 7075 inside my lower links after I turned them down a tad to get them to fit ha. That was a bitch.
 

Attachments

  • 5A56BEB2-C21F-4503-BEBB-5F14208F1E2A.jpeg
    5A56BEB2-C21F-4503-BEBB-5F14208F1E2A.jpeg
    109.1 KB · Views: 205
  • E75B95FD-53E2-4911-A6BD-747A167FE9B1.jpeg
    E75B95FD-53E2-4911-A6BD-747A167FE9B1.jpeg
    774.8 KB · Views: 212
  • 6DACCD40-55B5-4B21-8783-D20F77416443.jpeg
    6DACCD40-55B5-4B21-8783-D20F77416443.jpeg
    1 MB · Views: 209
  • 23D955A5-4474-4A5E-9E35-B65BA5134183.jpeg
    23D955A5-4474-4A5E-9E35-B65BA5134183.jpeg
    1 MB · Views: 219
  • 0F2E110E-0CFE-4D16-9A91-69ACD2518216.jpeg
    0F2E110E-0CFE-4D16-9A91-69ACD2518216.jpeg
    1.2 MB · Views: 208
  • 191B13D2-70CF-43AE-B0B2-5395E6C1C8CF.jpeg
    191B13D2-70CF-43AE-B0B2-5395E6C1C8CF.jpeg
    1.3 MB · Views: 224
  • 02771FD9-130A-43B0-AD0E-E185F489B718.jpeg
    02771FD9-130A-43B0-AD0E-E185F489B718.jpeg
    1.3 MB · Views: 215
  • 28BE04BC-D325-44A2-AAD3-A8D485A6E52A.jpeg
    28BE04BC-D325-44A2-AAD3-A8D485A6E52A.jpeg
    1.2 MB · Views: 248
  • 8141A24D-E156-4CBB-9664-DE39F8715096.jpeg
    8141A24D-E156-4CBB-9664-DE39F8715096.jpeg
    1.2 MB · Views: 252
I made some new tie rods to replace the other ends I made. Wanted a bit of "flare" haha

before and after
 

Attachments

  • B77247F6-A2DC-465E-B5D5-2599C4F5DD9C.jpeg
    B77247F6-A2DC-465E-B5D5-2599C4F5DD9C.jpeg
    915.3 KB · Views: 219
  • 660225BA-21AE-476C-A897-9C104B728592.jpeg
    660225BA-21AE-476C-A897-9C104B728592.jpeg
    836.5 KB · Views: 186
The CNC tools and what a good operator can make with them always make me a lil jealous.

Looks bitchin !
 
I guess I forgot to post pictures on my gauges.

Capture.PNG
Capture.PNG
 

Attachments

  • 4 Inch.PNG
    4 Inch.PNG
    28.9 KB · Views: 136
  • 2.5.PNG
    2.5.PNG
    37.2 KB · Views: 125

Latest posts

Top