• Help Support Hardline Crawlers :

My YJ

Pat

Well-Known Member
Joined
Aug 26, 2007
Messages
1,774
This is not a "build" thread. This is a "few upgrades here and there" thread.

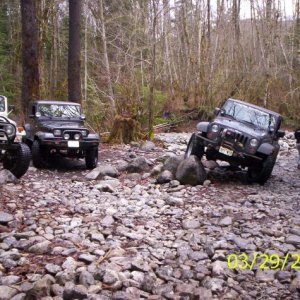
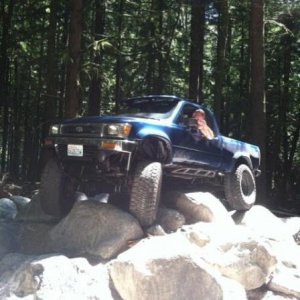
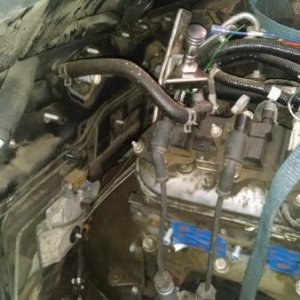
My YJ was a great basic wheeling rig for several years and it never left me stranded. Then one day it started having electrical issues and my wheeling trips ended up like this:


So it got parked for some repairs and upgrades. Here is the plan-

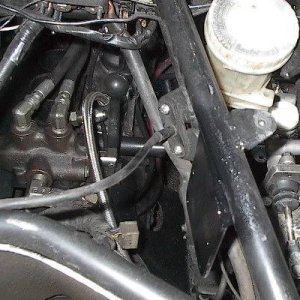
-Rewire/repair electrical gremlins
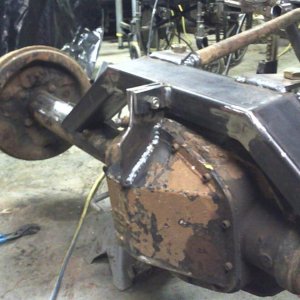
-New crossmember/belly pan
-full rollcage
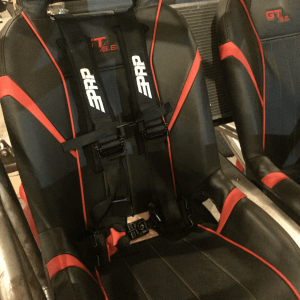
-new seats/ 5 pt harnesses
-relocate, plumb & wire fuel tank
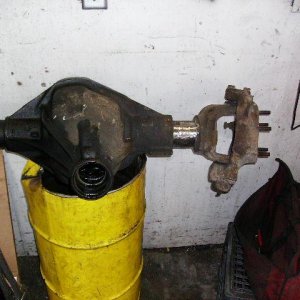
-repair broken center pins, bad main eye bushings

The axles and drivetrain and suspension and tires will all be staying the same for now. Future plans will involve changing all that as well but for now I want to keep wheeling and do things one step at a time.
 
Here is a little background of my jeep and what I have done so far.

I bought it bone stock and shiny clean in 2002. I think it had been in an accident and rebuilt by a body shop. It was my daily driver/ occasional light wheeler for several years.

picture.php


Then I added a 4" lift, SYE, and 33" LTB's and started wheeling it a little more.

picture.php


picture.php


The 33's quickly wore out parts on the dana 30/35 axles so I swapped in waggy dana 44's and upgraded the tires to 36" Iroks.

picture.php


And now on to the current stuff.
 
After pushing it into the garage I started tearing it apart.


picture.php


The wiring work came first because I wanted to figure out why it was not starting. I also eliminated TONS of unnecessary wiring. A/C, wipers, turn signals, rear window defog, etc just to name a few- I pulled several garbage bags worth of wiring and electrical crap out.

With the extra circuits now available I wired my add-ons (currently just a few lights) into the factory wiring harness so it is real clean with no inline fuse holders and no extra wires to the battery terminals.

Pictures of wiring aren't too exciting but here is what it looked like-

picture.php


picture.php


In the last pic there you can see my Haynes repair manual. Take from my learning experience- DO NOT use these wiring diagrams for rewiring a vehicle! You need Factory Service Manual wiring diagrams. The difference is night and day- 190 pages with everything indexed and accurate versus 12 pages of nonsense with nothing accurate.
 
The electrical issues I had been having caused the fuel pump to work sometimes. I always wished for easier access to the in-tank fuel pump and I never liked how low the gas tank hung down in back.

So the next thing was to relocate the fuel tank, something I had been wanting to do for a while.

There is a **** ton more clearance in the back with it gone-

picture.php


I have read and read about different options for fuel cells and different ways to relocate a YJ tank. I didn't want to cut the floor and raise the tank halfway into the floor- too much work for what is gained. Spending money on a fuel cell seemed stupid since the poly tank and in-tank pump I've got work well. So the tank is getting stuck in the back something like this-

picture.php


But it will go further forward than the pic shows. It is plumbed and wired but not mounted yet. The current dilemma is whether the rear of the body will get cut away now or later...
 
I finally bought myself a decent 220V mig welder and my first project with it was the new tcase crossmember.


Here is what the old stock belly pan looked like-

picture.php


It hung down over 4" below the frame and the uneven surface got snagged on everything. Especially with the trans mount nuts dead center to hang up on stuff.


Old clearance-
picture.php


Old trans mount-
picture.php


So I started by making a new trans mount and I tucked the bushing up into this nice little spot just behind the old mount location-
picture.php
 
The crossmember started with 2x2x.250 box tube.

picture.php


picture.php


And then a piece of 4" channel.

picture.php


The skidplate is 3/16 plate.

Many thanks to the generous help of Jeepasaurusrex for turning this-
picture.php

into this-
picture.php

with a 400 ton press brake. It came out perfect.:awesomework:
 
The 6 bolts that fasten the crossmember to the frame I recessed by welding some pieces of 1" pipe into the box tube.

picture.php


Crossmember mounted up

picture.php


And here is the finished product. The skidplate fasteners are countersunk flush and a notch was made for the front driveline. I still need to flex it out to make sure this clears- if I need to trim it a little its no big deal.

picture.php


picture.php


A 1.5" gain in clearance and a smooth snag-free underside

picture.php
 
Last edited:
It is finally time to put a roll cage in this thing. Much needed safety equipment I have wanted for a while so I can challenge my rig on harder stuff without the risk of certain death.

I started with fish plates. They are 3"x6" with rosette welds in the center.
picture.php


Then I fit the rockers in place like so. This is planned for future boatsides. I am still debating if that will happen now or not- but more on the body dilemma later...
picture.php


picture.php


picture.php


picture.php
 
I like the skid plate. My biggest problem with my YJ was I would crush the oil pan. So I had a full body skid made.
 
Stealthrunner and Toyolet helped me out with the tube work.:cool:

Thanks a lot guys:awesomework: next time I will plan better and bring a cooler full of :beer::beer::beer:

Even though I forgot beer the bends came out perfect. Here is the B hoop- it is 53" wide (same as OEM rollbar) and about an inch lower.

picture.php


picture.php


picture.php


And the A pillars. They have a 25 degree bend, 49" wide from floor to cowl and 46" wide at the roof.
picture.php
 
Jeepswag on Pirate had a killer deal on these Empi seats. I got the pair shipped to my door for less than the cost of one Mastercraft or PRP. They aren't as nice but for a trail rig cheap works good for me.

picture.php


Here is how I mounted them to the cage. Showing the sequence is tricky but first there was this-

picture.php


then I wanted to check head clearance when I was fitting the halo into place. I knew I wanted the seat to have about 10* layback so I clamped a piece of steel in to set the seat on. Then I sat in it and made vroom vroom noises. :redneck:

picture.php


Next I needed to get the door bars fit because the crossbar for the front of the seat mounts will attach to them. Here is how that came out, I was happy with the result-

picture.php


picture.php


picture.php


Questions about mounting seats to cages comes up on here from time to time so here are a couple detail shots of how I did mine.

picture.php


picture.php


picture.php


The seats are now lower than stock and each one is 1.25" closer to the center. My center console had to go. The area around the clutch pedal is snug but will work fine until I ditch it for an automatic. When I upgrade to full hydraulic steering I will shift the steering wheel over to center on the seat but that also will be fine for now.
 
Nice Pat!

I thought you just didn't wheel anymore.:fawkdancesmiley: Good to see the upgrades and look forward to seeing you wad your **** up.:redneck:
 
Thanks for the compliments fellas. :cool:

The oil pan is dented but I don't hit it that often. I eventually want to bring the belly up to flat with the frame rails and lower the whole thing 2" but that will be a while yet before I reach that phase.

I have been on hiatus from wheeling for too long now... work has been crazy long hours and what little free time I have I spend working on the jeep. I have not been on here much either lately, I had to prioritize or I would never wheel again or die from exhaustion.

No pics to share for now but I am looking for a couple more sticks of tube to finish the rear portion of the cage and bracing. In the meantime I have replaced the 2 broken center pins in the rear leafs and new main eye bushings. This should help keep the rear driveline attached to the vehicle... another past issue.

I am also debating on removing a bunch (most) of the body behind the B pillars. I will not be backhalving the frame until a future time but I am considering cutting out the rear body mounts, floor and wheelwells, tie the cage into the frame, attach remaining body to cage, fabricate mounts for fuel tank and small storage box, bla bla bla. I spend too long staring at it- any ideas or input is welcome. I'm not sure what happens when you cut a YJ body in half cause I've never done it yet.
 
.....any ideas or input is welcome.

After finishing what issue you deem a priority......just get it wheelable again. Shortest distance (in time and money) to get wheeling, has always been my moto.

There is always time (and reason) to open the 'can-o-worms' down the road.:;
 
Even though I forgot beer the bends came out perfect. Here is the B hoop- it is 53" wide (same as OEM rollbar) and about an inch lower.

]

Probably the reason the bends ARE perfect!!!!:haha::haha: Looks good Pat:awesomework::awesomework:...I'm with $$ on the get it goin, but don't cut corners---you'll be way happier in the end!!!:awesomework::cool:
 
Update

Still busy at work but I have made some progress in my spare time.

I picked up a couple more sticks of tube to finish the rear.

Toyolet did the bends for me and once again it came out perfect. :awesomework::beer:
picture.php


In order to get it wheelable as soon as possible I have decided not to open the can of worms of cutting the rear of the tub. That can wait until the time comes.

For now I am going to weld the tailgate on and brace the rear hoop to the frame. Just simple and temporary solutions. Here is the custom modified tailgate. :redneck:

picture.php


I put the tires back on it but it's still sitting on jackstands until they have air in them. :redneck:
Here is how it looked this morning...

picture.php


...but today I had the day off work and went triangle crazy. :cheer:

The cage now has gussets and "triangulation" galore. I will get more pics soon. The plan is to get it ready for trails in a week or so. Lots of little odds and ends yet to do on top of the obvious stuff. :beer:
 
Top