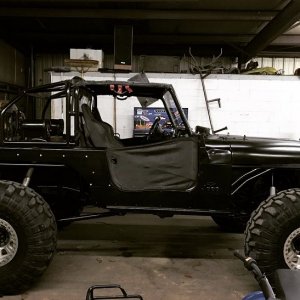
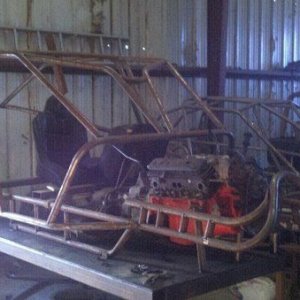
Never ending Samurai build...

Hardline Crawlers - Rock Bouncer Builds, Tech & Off-Road Trail Talk

Help Support Hardline Crawlers:

Nope...you can buy them at industrial pipe and supply places. They're called weld els and tees...these were 1.25" ID and Sch40.
 
Yeah...the automatic robbed a little too much of my "off the line" power range thats used to bump things. It'll still do it, but just not as quickly as it did with the manual transmission. I'm hoping this setup will bring some of that back...and provide some more WEEEEEEPOWWWWW!!!!!
 
Not as much time available to work in the shop tonight, but I made some progress on the charge tubing. Had a buddy thatbowns a muffler shop swedge some tubing to fit the throttle body. Gonna be using 2" pipe to keep things simple. The outlet on the compressor side is also 2" so it all cuts down on extra pieces. The 90* elbows should be here tomorrow or Friday...then i can finish it up. While i was out i also picked up a few brass fittings to set it up to connect the line for the boost gauge.

Coming along...

IMAG4735_zpsd9kbhdnz.jpg


IMAG4734_zps739ic00p.jpg


Gonna be fun shaping this to mate up with the TB hat...
IMAG4730_zpsbusrpydk.jpg
 
Shipping from Summit Racing is f'n awesome. I placed the order for the silicone elbows at 3pm yesterday and they were at my door by 12pm today!

IMAG4738_zpsxb75uryy.jpg


Went ahead and cut the hole in the manifold where the collector tube attaches so i could weld it and the inlet flange on permanently.

IMAG4745_zpsnz2fhebn.jpg
 
Sweet rig man looking forward to the rest still plan on 4 linking the front? And what other plans do you have?
 
kdoss54 said:
Sweet rig man looking forward to the rest still plan on 4 linking the front? And what other plans do you have?

Thanks! Yeah 4 linking the front is next on the list but it's gonna be the really expensive part. Not only is that another pair of shocks, but 8 rod ends, DOM tubing, link mounts, hardware, AND going full hydro. So...it's gonna be a while.

I'd like to pick up a set of 17" wheels at some point too. If a set of stickies just happened to be mounted on them for the right price that'd be good too. However...I will not be buying a set of wheels and sticky tires. The IROKs haven't let me down yet and I like how flexible they are and lightweight...both of which are key ingredients to a light weight rig working well.
 
What kind of carb modifications you plan on doing with the turbo set up? Thought about doing this same thing to mine but didnt know what i would have to do to the carb
 
slikwilly said:
What kind of carb modifications you plan on doing with the turbo set up? Thought about doing this same thing to mine but didnt know what i would have to do to the carb

Its got the 1.6 8v with EFI now. With a stock carb you really don't have the ability to run a airborne. With the Weber...you could do it, but they aren't really known to be great for what we use our rigs for. The best bet is to convert to a CV style carburetor. The tuning options are very easy. With propane...the setup takes a little more work, but from what I understand it's pretty simple as well.
 
Now keep in mind it still needs the FMU hooked up, downpipe built, O2. Sensors installed, etc. Ive been tinkering on it for so long now that i couldnt wait any longer to crank it up so i pulled an all nighter and made it happen. Hopefully i can take it to the exhaust shop tomorrow and get that taken care of. Then over the weekend ill get the FMU hooked up and shiuld be able to get some driving in.
 
The Flats sounds good, but that's a solid 3 hour ride for me...and Gulches is a little less than 2. Familiar territory also helps to see the difference in the setup...so I believe I'll choose Gulches.

It's on the trailer right now with me at work...ready to go to the muffler shop to get a downpipe. That way I can move forward with making sure it's running right this evening.
 
easleycrawler said:
Gulches it is. You should be able to spool your way up 3D no problem. :driving:
Problem is that if I use the spool you're talking about there'll probably be some of this spool being used immediately afterwards...

Winch.jpg
 
Had another full day in the shop. Decided to adjust the valves since it had developed a tick at idle as well as smoking a little at startup. Then I moved on to installing the FMU which needed a simple bracket to the intake manifold. A few hose connections later and it was good to go. One thing to note is that the line between the stock regulator and the FMU is a fuel injection line as it will see high presssres.

IMAG4814_zpsbktahmta.jpg


Id noticed my alternator squealing at different times and finally nailed down that the belt was too long. Found a 1/2" shorter version locally and picked it up. Problem then was that the alalternator fan (plastic) was cominginto contact with the back of the water pump pulley. Decided to make a shim using some thin gauge sheet metal to go between the flange of the water pump and the pulley. It worked out really well but was a pain drilling the holes and cutting it out...oh well.
 
Then I moved on to building a heat shield for the turbo since its in pretty close quarters with the plug wires and the brake master cylinder AND the charge pipe (intake tube). Id seen several others built using sheet metal and then covered with some reflective heat wrap of different sorts, but i was out of sheet steel but found a piece of 1/8" aluminum.

This was fun for me since i got to build a posterboard template, then cut it out with my SWAG band saw setup that has a blade that might not cut butter at this point. After that i clamped it in the vise and used the oxy/acet torch to help make the bends. Where i had to cut for the compound bends i went back and used the torch and some aluminum brazing rods to fill in and followed that up by using a flap disc to clean it up. Ill build the mounts tomorrow...

IMAG4815_zpsdjdzwzgf.jpg


IMAG4816_zpstpy0cucx.jpg
 
I'd been trying to use the wastegate adjustment to get a little more boost but obviously that's not the right way and depending on how far you go you can actually cause problems since the wastegate won't be able to open completely. The stock setup is made for 3-5psi...and I want to be closer to 7 without the wastegate being wife open. So today I built a manual boost controller...sounds fancy right? Here's what I came up with...

IMAG4831_zpsjc28eheb.jpg


It's the diy version of the store bought versions. I used a 1/8" tee, tapped one end for 3/8-24 bolt threads and then picked up a ball bearing and spring. The idea is the bolt will apply pressure to the spring which will hold the ball bearing against the IN port. This will block pressure from the wastegate actuator until the boost level is able to move the ball. Simple enough...true Samurai fashion.

IMAG4832_zpss5gmthvs.jpg
 
Ryan, what is that turbo off of? I'm wanting to start collecting parts to put a turbo on my buggy and wanting a small turbo that will spool quickly.
 
Its off of a 2003 VW Passat 1.8t. You want the one from the Passat because its a longitudinally mounted motor and makes hooking things up easier. It builds 2-3psi before 2k rpm...after that i dunno...need a tach.
 
Well the first outing with the turbo went well. The added power comes in pretty quick and isn't too much either. I'm still tweaking the boost controller setup. Right now the wastegate starts opening gradually just a little too soon. I'd like to hit 4psi before it starts bleeding off. So that's what I'll be looking into this week.

Another area of concern is the cooling system. The stock radiator may have outlived its welcome. Prior to the turbo it had no problem staying cool with the fan not having to run except when I had to work on an obstacle for an extended period. We'll see what I can come up with.

Videos to come...
 
I think my version of the boost controller might be flawed. The spring seems to get caught on the threads inside the Tee. Not sure if that's has any affect on it during operation but its just something I noticed while working on it. I REALLY need to build a setup to be able to apply low pressures to different parts. Finding a decent gauge that reads 1-10psi that doesn't cost much might be difficult...unless I get lucky and find a low pressure tire gauge that has 1/8" npt threads...not to mention a regulator that goes that low reliably. Would a needle valve accomplish the same thing?

I need this not only to test the controller, but I also need to setup a MAP clamp to keep the MAP sensor from seeing boost and in order to do that I need to apply pressure to it until I see the cutout voltage.

Any ideas how to setup a cheap regulator/gauge?
 
Back
Top