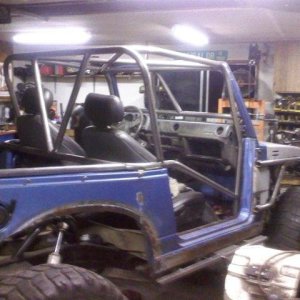
Never ending Samurai build...

Hardline Crawlers - Rock Bouncer Builds, Tech & Off-Road Trail Talk

Help Support Hardline Crawlers:

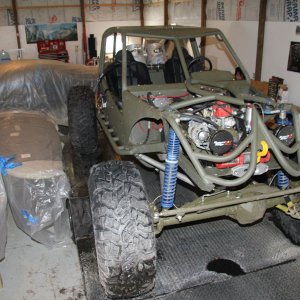
Finished up the shroud and got it mounted to the radiator tonight. Then moved on to working out how I'll route the steering lines between the orbital, pump, and cooler. Looks like the best place for me to mount my dual pass inline cooler is under the battery which is really close to the reservoir. Next up was cutting the coolant tube so the inline filler can be mounted there. I was really hoping I could use some sections of old coolant hose, but nothing fit right so I'll have to go find a straight section tomorrow.

List of things to finish up with the plan being to fire it up before the weekend is over:

1. Mount radiator
2. Mount trans dipstick tube
3. Mount steering cooler
4. Install power steering lines
5. Install torque converter bolts
6. Box engine mounts at chassis
7. Add ground strap between engine and chassis
8. Double check ECU wiring
9. Add fluids (engine oil, coolant, steering fluid)
10. Redo front upper link mounts at the axle...spread them apart to clear oil pan
11. Hook up exhaust
12. Mount fuse panel under dash
13. Clean up wiring
 
Got the radiator mounted tonight after stewing on it for entirely too long.


f0f5dd376e650db134e168a28991bcad.jpg


356d36bcf4a35a14111f3d81205c8346.jpg


5c67071cd29f13fb640b0877380a8303.jpg


481ca5c13f04b6c32fc49cde20ec94bb.jpg


49d26a8fcf39048f0aec1aa371982bf6.jpg


Pic for hose part number reference...
8cc6feda77945c41ba7b3b5d61115ca7.jpg
 
Mmmm...progress!

1. Mount radiator
2. Mount trans dipstick tube
3. Mount steering cooler
4. Install power steering lines
5. Install torque converter bolts
6. Box engine mounts at chassis
7. Add ground strap between engine and chassis
8. Double check ECU wiring
9. Add fluids (engine oil, coolant, steering fluid)
10. Redo front upper link mounts at the axle...spread them apart to clear oil pan
11. Hook up exhaust
12. Mount fuse panel under dash
13. Clean up wiring

I picked up a couple of these cooling fan switches from some Jetta, Cabrio, and Beetle donor cars today. From the specs I can find the low speed side of the switch will turn on my fan at 203F and go off at 183F which should be good. The fitting on the radiator I'm using is made for an older model VW so it also has a M22 bung that came with a plug and an o-ring. Plan on wiring it in tonight and pulling the radiator out so i can paint the shroud and add weatherstripping to it.
 
I'm so glad you did the 2.0 swap. I'll just drop mine off at your house when I'm ready for wiring and all that stuff since you'll have it all figured out.
 
Forbanger said:
The mean Bean............ :rolf:

That's pretty good James. I am gonna miss the sound of that turbo but I may put one of those whistlers in his tail pipe at Harlan when he is not looking. :spin:
 
Took half the day off today and will be off tomorrow to get this thing ready for the trails tomorrow. Started out screwing with the cooling system...was having issues getting coolant to flow. It took pressurizing the system with the hose end sprayer to get things moving. In the process I put a new water pump and thermostat on the motor too.

The VW fan switch works...I think I wish it had a lower cut off temp though. At this point it runs 210 and cools to 195. Plan to hook up the Torque app tomorrow and see what the ECU says the temp is compared to the autometer gauge.

Once that was working I moved on to cut off the upper link mounts on the axle. Got lucky and made a single... albeit very long ...single cut from end to end with the sawzall. The mounts are moving 3 inches outward on each side.

Here's where I stopped tonight...


6982eed559b1bb19e5c4cbb120818186.jpg


Sent from my Pixel 2 using Tapatalk
 
Finished link mounts today...and went back to the fan switch I was using before. The VW switch would work but since I'm running the radiator upside down it's not always in the water like it should be. Now I've got the sender mounted in the back of the head. It maintains 195F now.
6af79617d09c0d0ce8dfb18c268a6a05.jpg
192d09e3ca1d09e1bb48b0424ea5cb03.jpg
 
Well I was hoping some videos would pop up but I haven't seen them yet. Overall the rig worked great. I can tell a subtle difference in the front suspension on climbs since I changed my link placement and decreased the "dive/squat" hoping to encourage the front to settle a little easier. I ended up with the axle end of the uppers an inch lower than before along with one extra hole to move them up an inch if I wanted to go back.

As far as the motor goes...it worked great. The temps stayed in check (195F) and that was my biggest concern going into the day. Bottom line is I hate screwing with cooling systems...its got to do with not being able to see it work. Sure an electrical system is similar, but I can use a meter to test circuits and disconnect wires to diagnose, but a cooling system is a closed circuit and there doesn't seem to be much you can do with them other than just keep messing with them until its right.

I've just got a few small things I'd like to tackle before Harlan, but the rig is ready to go today if I needed to and thats a good feeling.
 
It's nice...no hiccups...just smooth throttle response every time.
[/quote]


One of the most important and overlooked attributes!
 
Losi said:
Did you have to hook up the VSS when you wired it up?

No sir...best I could tell and from people I spoke to the vss is only used for the speedometer and for auto trans.
 
Decided I wasn't a fan of the faded look my racelines were developing so I Plasti Dipped them. I went with their gunmetal grey, metalizer, and glossifier. I think it turned out pretty good.

I also pulled the dual diaphragm brake booster from the donor tracker and swapped it into my rig. I had to make a longer plunger and add roughly .75" to the brake pedal clevis. Brakes are much more powerful now... probably gonna pull it back apart and shorten the plunger a tad to get some more free play in the pedal. Then I'm gonna install an adjustable proportioning valve for the rear now that they definitely lock up before the front.

c43eb8fed3552c0205b3b5def9c6d013.jpg


e200b4731615c395dc50fd55aa44f29b.jpg


148de88bb585e14803d70a05c0bf3ea8.jpg


907aa12a78e6476ebe2fbb0ba4880d87.jpg


Sent from my Pixel 2 using Tapatalk
 
How are you liking the 4 speed trans? Was it worth the upgrade? Pros and Cons of each of the autos?
I'm kind of tired of running 3 pedals so I'm looking for some real world experience.
 
If I'd run the 3spd without boost I may have been ok with it.

The 4spd is nice. Put it in the gear you want and you got it...no questions asked. The extra gearing is also nice. You're gonna do the same amount of work to install either one so I'd go 4spd. It may cost a little more as far as setting up the shifter but its worth it. Not to mention the 4spd is gonna be around 10yrs newer too and more similar to other transmissions out there.
 
That’s kind of what I was hoping for. I’m thinking I want the 2.0 and 4 speed like you have. Is the 2.0 much larger than the 1.6? I’ve tried finding pics of them side by side but had no luck.
 
Yeah it's quite a bit bigger...mostly height. If it's going in a buggy it's not much of a problem, but if you're stuffing it under a stock hood and behind the grill you're gonna be working in confined spaces pretty quick.

The auto trans...either one...will require cutting most of the sides of the trans tunnel out as well.
 
Thanks for the info. It would probably be in a buggy, I'm not really interested in changing the Popsicle up.
 
Back
Top