• Help Support Hardline Crawlers :

SR5runner LOTS OF PICTURES

greyghost1

Member
Joined
Sep 4, 2009
Messages
18
Location
auburn
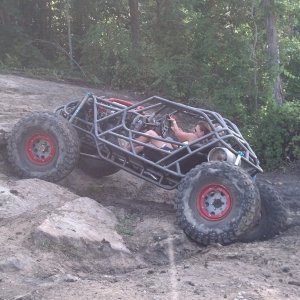
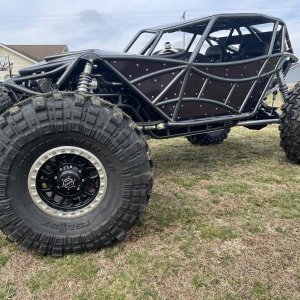
I have been working on this for awhile and finally finished the SAS and got it out on the trails a few times last year

IMAG0481-2.jpg

IMAG0285.jpg

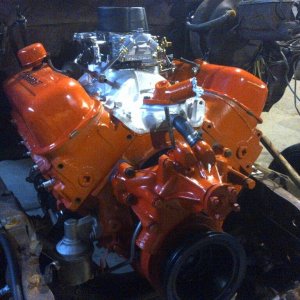
TG springs, duals, 4.7, triple sticks, Longs, locked F&R, onboard air and a bunch of other goodies

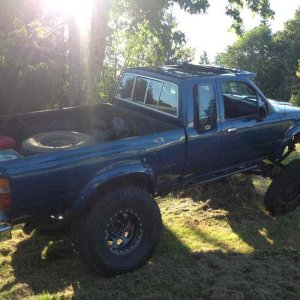
Since I have kids the extra cab was too small and I needed to do something about it
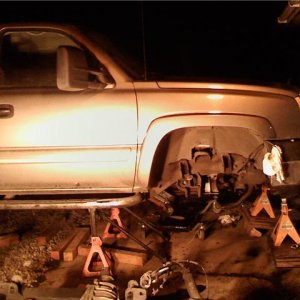
IMAG0573-1.jpg

CHOP 9"
IMAG0576-1.jpg

TEST FIT BEFORE I MOVED THE AXLE UP 10"- STARTING TO GET THE IDEA
IMAG0581-1.jpg

HERE IS THE DONOR BODY FOR THE REAR SEAT, TOP AND FLANGE
IMAG0588.jpg

HERE IS A PEEK AT THE TOP FLANGE INSTALLED AND AXLE MOVED UP 10"
IMAG0606.jpg

REAR SEAT PAN INSTALLED
IMAG0762.jpg

CUT OUT THE ROCKERS
IMAG0789.jpg

3X3 BOX CAPPED READY TO GO
IMAG0791.jpg

NEW ROCKERS INSTALLED
IMAG0793.jpg

SLIDERS INSTALLED THROUGH THE ROCKER
IMAG0799.jpg

SLIDERS FINISHED UP AND FENDER FLAIRS
IMAG0812.jpg

A LITTLE SHEETMETAL WORK
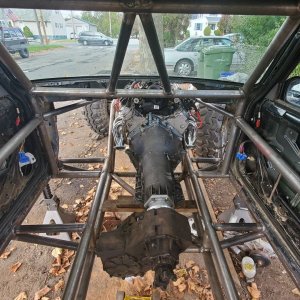
IMAG0769.jpg

EXO HOOP
IMAG0824.jpg

START OF CAGE AND SLIDERS AND TAILGATE INSTALL
IMAG0826-1.jpg

TAILGATE INSTALLED AND WINDOW WORKING
IMAG0836.jpg

INTERIOR INSTALLED AND REAR SEAT FOR THE KIDDOS
IMAG0870-1.jpg

WINDSHIELD BARS AND ROOF BARS
IMAG0862.jpg

HALF OF MY CAGE WELDED UP AND FRONT FENDER NOTCHED
IMAG0865-1.jpg

BOTTOM OF FENDER
 
Last edited:
just picked up my new tires, 37x14x17 bias iroks
IMAG0970.jpg

IMAG0969.jpg

17x9 soft 8s, I had the wheels made with 3.5" BS instead of 4.5" for a little extra width
IMAG0968.jpg


I picked up the rest of my tubing for the cage and rear bumper last weekend and bought my beadlocks from D&J Customs, I chose to clean them up myself so here are the pics

Cleaning up the edges alittle
IMAG1003.jpg


Prep on the wheel
IMAG1005.jpg


IMAG1007.jpg


IMAG1006.jpg


welded in the hole for the valve stem so I can drill in a new one further in away from the beadlock
IMAG1010.jpg


All welded up
IMAG1016.jpg
 
Made some progress with the gas tank, I am going to use a Ford F-series aux tank out of a 92 pickup it is the 18 gallon one the dimensions are 34.5x26.5x8

First things first, pour out as much gas as you can out of both tanks and open up everything that can be opened then toss in some matches until it stops igniting any gas
Please use some commen sence when doing this step.

IMAG1030.jpg


next I cut the flanges out of the toyota tank

IMAG0690.jpg

IMAG1033.jpg


I layed them out on the Ford tank to get an idea of where I wanted them

IMAG0693.jpg


This part I have to do because of my limited space under the truck but I have seen other write ups that the unmodified tank will fit. I cut 4" off of the end of the tank and welded 18 gauge sheet metal to cap it off. I am going to install the filler spout and vent to the front in my new capped end on the upper passenger side so I can route the filler from the stock location.

I mounted the toyota pump and sending unit into the middle of the ford tank, I also welded the toyota baffle to the floor of the ford tank.
There is some light modification needed for the pump and sending unit, the pump needs to be shortened up to fit down into the tank

IMAG1039.jpg

IMAG0699.jpg

IMAG0700.jpg

and the sending unit just needs to be cut and bent so it has full swing inside the tank
IMAG1042.jpg

Here is the baffle from the toyota tank, I drilled out the spotwelds and then attached it to another piece of clean sheet metal and tacked it under the pump in the ford tank
IMAG1035.jpg
 
Make sure you line up your flanges with the pump bolted in them, they are clocked, we welded in the flanges then found out the pump was facing the wrong way and my sending unit was going right through my pump, easy fix if you do the same I just redrilled a couple holes and they fit once again.

I had my buddy weld the tank for me since he has been welding alot longer than I have been, I am glad he did weld it, we only had a handful of leaks when we tested it instead of hundreds of leaks if I would have done it:p:p:p

IMAG0696.jpg


IMAG0703_1330234438215.jpg


IMAG1043.jpg


IMAG0704.jpg


when everything was welded and cooled we pressure tested the tank and sprayed the welds with soapy water, after we got done fixing the leaks we trimmed the extra sheetmetal off, I left the stock filler in the tank for now because someday I might move my filler door over to the drivers side so I can fill my tow rig and wheeler without moving to a new pump, I can just pull foward

IMAG1052-1.jpg

Fixing the leaks
IMAG1051.jpg

One last test
IMAG1053.jpg

All trimmed up
IMAG0707.jpg


I also have the drain bolt out of the toy tank that I think I am going to put it in just incase I need to pull the tank someday
 
Working on the beadlocks tonight, I got a helper too, she is super excited
:p
IMAG1065.jpg


We are working on making a anti cone ring, I am using 3/4"x 1/8" and just tacking it and bending it as I go
IMAG1072.jpg


here is on of the rings set on to show how its going to look

IMAG1069.jpg


My wife blasted all of the outer rings for paint:D:D:D

IMAG1067.jpg

IMAG1068.jpg

here are the rings painted up and drying

IMAG1078.jpg


IMAG1081.jpg


I also got some more tube work tacked up

IMAG1076.jpg


IMAG1077.jpg


IMAG1082.jpg
 
I have done alot to the rig and have not updated NWW, here is the update to current.

Ford tank, we installed a tube crossmember through the end of the frame and welded it inside and out. Next we mocked up the tank to figure out the front crossmember and shock mount.
IMAG1168.jpg


Here is the shock mount/tank mount crossmember
IMAG1171.jpg


IMAG1169.jpg


Next I made some tabs like the TG offroad light ones
IMAG1172.jpg


IMAG1174.jpg

Also added the filler port and vent, I can use my factory filler neck and just add some hose to it to connect the tank back up
IMAG1184.jpg

Front view, I have to flex it out to see if my tabs for the tank straps are going to clear before I burn them in....Tight fit!
IMAG1189.jpg


Side profile
IMAG1180.jpg


Here are all the connections, fit perfect just between the floor braces, I used 1/2" thick rubber that I will glue onto the top of the tank so it doesnt rub anything.

IMAG1181.jpg
 
Mounted the iroks, hooked up the fuel lines and fired it up, patched in the rest of my rear fenders and took it out to my buddies house for alittle body work.

Had a couple of friends help me mount the beadlocks, all those bolts take forever :D
IMAG1227.jpg


IMAG1228.jpg


IMAG1234.jpg


IMAG1230.jpg


Here are the patch panels to finish the rear tube fenders
IMAG1277.jpg


Finally got it outside so I can take a few pictures of the whole rig
IMAG1284.jpg


IMAG1285.jpg


IMAG1286.jpg


I am glad I know someone who can do some body work
If I tried to do this myself it would get all fawked up

IMAG1282.jpg


All I can say is bodywork sucks, my finger tips are raw from sanding
IMAG1329.jpg


IMAG1331.jpg


My buddy sanding the final coat of thin filler
IMAG1333.jpg


And here is the final product in primer, now I just need to finish the exo and paint it
IMAG1336.jpg


I took 10" out of my rear shaft and sleeved it for now just so I can go wheeling this weekend, I am going to retube the driveline and get it balanced soon but until then we used a jig made with some tcase output shafts so we could get it as true as possible
IMAG1374.jpg


I got the rig outside and took some posers

IMAG1380.jpg


IMAG1379.jpg

I only have the rear hoop for my bumper, mounts and braces will be built before friday. The cage is complete minus paint:D
I also have the rear window switch installed in the dash and it is functional
IMAG1383.jpg


IMAG1384.jpg
 
Last edited:
I added a plate under my fenders to tie the front of the cage into the body by the kick panels, I had to pull the fuse panel and computer away to make sure the heat didnt melt any wires
IMAG1393.jpg


Added braces to the rear bumper, I still am going to add a reciever and lower tube to the bumper to finish it off
IMAG1394.jpg


Tape off the tubing and painted it

IMAG1392.jpg


a couple shots next to 87/4play
IMAG1399.jpg


IMAG1403.jpg


IMAG1400.jpg
 
Last edited:
Finally got to go test it out on Sunday, we went to Walker Valley for the day, everything worked just about as good as it could, I have a couple of spots to clearance for the tires but it still worked just fine.

IMAG1405.jpg


IMAG1408.jpg


IMAG1410.jpg


IMAG1406.jpg

87/4play
IMAG1412.jpg


IMAG1413.jpg


2012-05-20_140923.jpg


cant forget the burrito basket

IMAG1404.jpg


The only thing I F'd up was my rear driveline, I got alittle rock rash on it and it wrinkled some.....time to redo it the right way with some thicker tube.

I was pretty excited that everything worked so good and I had all the room for my gear and kiddos.
 
Nice work looks great!You will get the body work part figured out. Its easy all it takes is a few to many beers:beer:
 
Top