• Help Support Hardline Crawlers :

Kid Skid's 42 GPW Modification Start

Zoediak

Well-Known Member
Joined
Feb 10, 2007
Messages
1,160
Location
Web Wheelin'
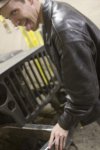
Well, I was asked to help do some work for Kid Skid's flattie...

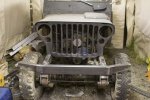
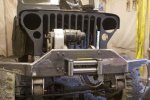
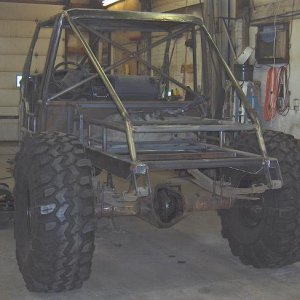
this is what it looked like minutes before the work started:
willys1.jpg

willys2.jpg

willys3.jpg

willys4.jpg


This is his first Jeep and he is happy as hell and eagar as hell to start working on this rig.

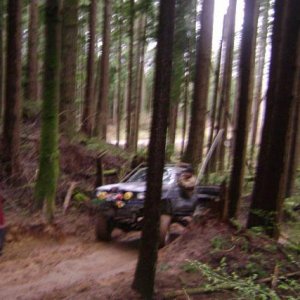
We mocked up a low-budget redneck rti ramp (consisting of foundation blocks and 2x8's) it actually worked out ok, to at least give us an idea of how crappy the current setup was...
willys11.jpg


This was as far it it got up the ramp before it lost traction (the grass didn't help, nor did the open diff's)
LOOK AT THAT BAD ASS MAXED OUT ARTICULATION:haha:

OK, all fun aside, this shows that it really needs help!

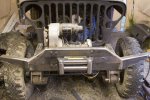
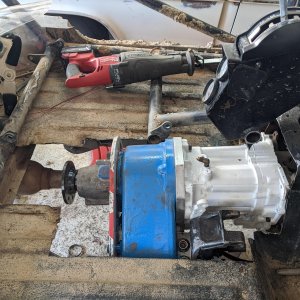
we pull it into the chop shack... and pull it apart (fenders, hood, etc)
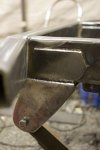
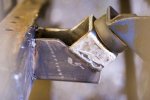
when we see the high quality workmanship of some special person that owned it before Him.
willys5.jpg

nice steering box mounting mod.. love that grill notch job!:wtf:

willys6.jpg

nice 'light mounting' and radiator support area...:awesomework:

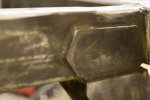
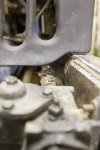
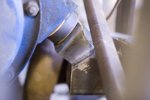
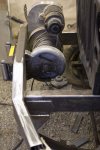
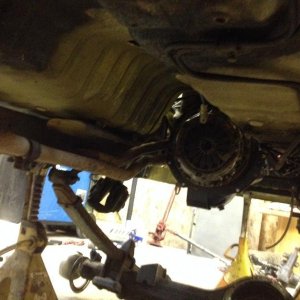
so after we get to work at some of this stuff, and after the good laugh I had at some of the mods/fixes, we found one of the first cracks in the frame... oooo shocking!!
willys7.jpg


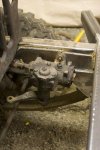
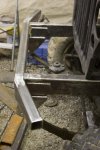
then further sstudy of the project when more if taken off is the broken engine mount...
willys8.jpg

hmmmmm could this cause the clutch pedal binding??:awesomework:

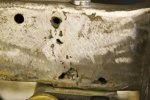
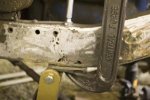
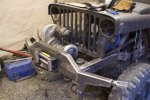
so after finding all the crappy spots, it became obvious to what had to be done.... full reconstruction of a new front part of the frame.

since someone's repair work (or preventative work) looked like they threw hot moulten steel by the teaspoonful at the frame, we had to lose it and start fresh.
willys9.jpg

willys10.jpg


this is where we left off and will pick up later on.

the plans for this build are:
4" suspension lift (using YJ springs)
front axle moving forward about 4-5" aprox
custom swing shackle reversal
D30 narrow track (74 CJ donor) with some sort of posi (have to see what is around in the pile)
Custom front bumper w/ tow points and winch
looking to put 33" swampers at the least.
Custom rear bumper (when we get to the point of modding the back for the springs.
changing the grill to the 9 slot that it is supposed to have (good thing I had one laying in the yard:redneck: )

then the rest will be figured out when we get to it..

as you all know, these things are NEVER finished!

thanks for looking at it, and I will try to keep up some progress pictures.... it is just so hard sometimes to stop, go get camera and shoot.. you just get into a groove sometimes


Stay Tuned:awesomework:
 
Wow you got some nice pic's to tell the story so far. I look forward to continuing the prodject.:awesomework:
 
You springing over or staying SUA? My dad got the 4" he needed in his flatty with an SOA. (I'll post pics the next time he digs it out of the shop, hasn't run for a year or three, new carb ready to fix that)
 
we are doing it a SUA with 4" YJ springs...

we were looking at doing a SOA, but since we had the springs already, we decided to keep it under for now.
 
we are doing it a SUA with 4" YJ springs...

we were looking at doing a SOA, but since we had the springs already, we decided to keep it under for now.

Just remember, those little jeeps are top heavy bastards to begin with and when you go to do spring over they get very very very top heavy and like to tip over very very easily

Just my 2 cents

Looks good so far though keep up the good work!
 
Just remember, those little jeeps are top heavy bastards to begin with and when you go to do spring over they get very very very top heavy and like to tip over very very easily

Just my 2 cents

Looks good so far though keep up the good work!

The difference in COG having 4" of lift with an SOA vs SUA is? The thing's still the same height.
 
we are installing a cj front 30 in it for now... 44 later when he can get the extra cash.

this will give him a little wider stance, and we are placing spacers in the back to match the widths a bit better.

Just got the new frame rails welded on today... but I got called into work and I will have to shoot some pics later and post em..
 
The difference in COG having 4" of lift with an SOA vs SUA is? The thing's still the same height.


When you put the springs on top of the axels they get a let more leverage for compression so when corning in its just that much easier for them to start tipping over:;
 
OK a little more done on the project.

I didn't get a lot of pics this time ( I wanted to get things done )

But there will be more pics taken soon.

This pic is of the front spring brackets I made for the shackle reversal
bracket-1.jpg

bracket-2.jpg


Of course I got the 16 or so inches of the frame welded back on with some new steel. (no moulten globs of some farmer's cold welds)
I will get more pics of all that up later.

and since I got this tacked up on both sides we had to see how the spring was going to appear, so we could get an idea on about how it is going to sit.

yes the mount is different than the one shown in the pic above (the extra ears were cut off) these were used to make sure the unit was kept square when it was welded together. these parts will be added to the frame above the hangers for added strength ( more to come on that this weekend )

spring-1.jpg


Granted it is just being held there.. but it is just a mock up.:D
and I still have to add some bracing on the frame around where the rear shackle mount will be on the frame.

the plan is, this weekend it will be ready to support it's own weight with the front axle in there this weekend.

of course I still have the bumper to make and the back half of the thing to do.
this will be started after we can make it move.
 
well, time to do an update, it has been a while and we have done some more work to the little guy.

first off when I left tha last post I had fabbed up some front spring mounts for the shackle reversal. Now they are welded on and the new frame section above the them is plated on both sides.:awesomework:
 

Attachments

  • springmount1.jpg
    springmount1.jpg
    20.2 KB · Views: 159
  • framebrace1.jpg
    framebrace1.jpg
    19 KB · Views: 163
now after taking off all the crappy welded (if you want to call it that) so-called repair patches that someone did, we found of course a not so desireable frame underneath:mad:
 

Attachments

  • hamburger1.jpg
    hamburger1.jpg
    29.2 KB · Views: 155
The frame will be plated and repaired this week, just have to cut out the shape of the plating to take care of it.

we also got the steering box mounted (well sitting there) and low and behold now there doesn't have to be a notch in the grill for the steering shaft to reach the box.:cheer:
If you look at the first posts the pics show someone's crappy solution to the problem they caused.

I will slao be adding a steering box brace to the oposite frame rail before the winch gets installed.
 

Attachments

  • steering1.jpg
    steering1.jpg
    27.9 KB · Views: 154
  • steering2.jpg
    steering2.jpg
    22.1 KB · Views: 155
sorry for all the seperate posts.. I just wanted the pics to be with their descriptions, and I didn't want to wait to upload them to my website while they are doing maint. on it.


so..... back to the story... I have started the bumper, at least the lower part of it. Welded it on, and cut and angled the outers about 3.5 inches back. I just have to finish adding the upper section, cut out for the tow points that will be added, notch and plate for the fairleads, and add the lights to the bumper.
 

Attachments

  • bumper1.jpg
    bumper1.jpg
    30.2 KB · Views: 160
  • bumperstartgrill1.jpg
    bumperstartgrill1.jpg
    33.7 KB · Views: 160
and yes... the ends will be closed, but not til after the hole is cut and plated for the fairleads, this way I can blow out any material left inside the square tube.

we have it mocked up right now with the spring hangers 'C' clamped to the frame rails so we can get it sitting just right. Currently there is very little weight on the frame rails (engine is lifted off the frame) so the hangers don't show how they will actually sit.

we lefted the rear up so we could get an idea of how it will sit... it is looking to be about 7 inches higher than it was sitting with the flat weak old springs. It is looking pretty sweet!!

there will be reinforcing plates on each side of the frame around the mounting areas.

I still have to fab up some new engine mounts, so we have been tossing around the ideas of tossing in a V8, since I have some laying around and one is already mated to a granny low 4 speed and an adapter for the xfer case...hmmm gets one to thinking...

but, we are not done yet.... so there is still pleanty of time


and the last picture..well... ummm... all I can say is he was so excited on how it is progressing he had to 'hump' it!!:haha:
 

Attachments

  • tempmount1.jpg
    tempmount1.jpg
    32.8 KB · Views: 156
  • tempmount2.jpg
    tempmount2.jpg
    26.3 KB · Views: 156
  • hump1.jpg
    hump1.jpg
    19.4 KB · Views: 153
That looks to be how mine is set-up acctually, the whole plating up front for the springs and the steering box is exactly the same, so are those shackles!

Very good work looks great!
 
thanks for all the kind words guys...

the front spring mounts I copied from my RE on my 79. I liked how they sat and allowed for the extra length of the springs.

more to come since we will be at it again this weekend.:D
 
Last edited:
more updates on the progress...

well this weekend we got the engine mounts made up and welded on... man what an improvement over the crappy setup that was on it before. Now the engine is held there nice and solid. (top pictures)

so I did some more work on the front bumper, getting close to being finished on it. We still have to add the lights and the tow points, then I can close up the ends.

We mocked up the winch to see how it will all sit, and get a better idea of how it is all looking so far.

I can't wait to get the front done so we can start the back and see how it is going to do on the ramp.
 

Attachments

  • mount1.jpg
    mount1.jpg
    21.3 KB · Views: 113
  • mount2.jpg
    mount2.jpg
    17.9 KB · Views: 116
  • bumper1.jpg
    bumper1.jpg
    36.5 KB · Views: 114
  • bumper2.jpg
    bumper2.jpg
    30.3 KB · Views: 111
  • bumper3.jpg
    bumper3.jpg
    35.3 KB · Views: 112
and the last pic of the bumper and winch mock up.. could only upload the 5 pics...

maybe I should just stop being lazy and host them myself LOL:redneck:
 

Attachments

  • bumper4.jpg
    bumper4.jpg
    29.5 KB · Views: 111
Last edited:
Top