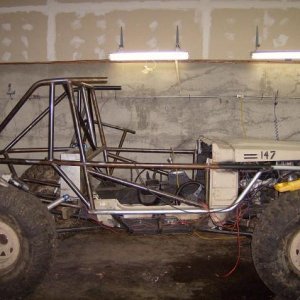
90's throw back....Manche build

Hardline Crawlers - Rock Bouncer Builds, Tech & Off-Road Trail Talk

Help Support Hardline Crawlers:

Re: Re: 90's throw back....Manche build

The Luke said:
Yea, but do the windshield wipers work? Hmmm?
Yep, as well as washer fluid pump!

Sent from my SM-G950U using Tapatalk
 
Re: Re: 90's throw back....Manche build

Forbanger said:
molaugh I'm not sure if I get inspired, or aggravated watching this build!!!
Thanks, I hope
jpony645 said:
The damn wiring is almost as beautiful as the metal work. >:( :****:
Thank you
Stretch said:
Yep...glad I popped back in to check out this thread. Carry on :woot:
Hang around stretch... hoping to get real fun soon...

Sent from my SM-G950U using Tapatalk
 
Tidying up a few things, getting closer to cranking.

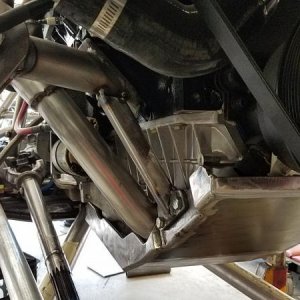
Putting some fire sleeve over pump line to orbital, and fire sleeve and reflective insulator over fuel line (to prevent vapor lock) around the engine.

You can also see the boots over the plugs and 1400° wire covering entire length of plug wires.

ccb782353278c6b39c79e7b2266a6e6a.jpg


b5fbd60c252a50acbff925a769a73d4b.jpg


b58e3362790c7f5a02b57656b077ca43.jpg


Leak testing the radiator and reservoirs, couple small pinholes to weld over.


96d56da99f5bf814be2e2ebbcc64e4e9.jpg


Using the Bomber alternator relocation bracket for LS motors; it requires some clearancing of the back of the alternator. This bracket remains from the buggy, but I was using the premier power welder alternator then, the two on the left are stock cs130's (90 amp) thatt I pulled out of my core pile from work, the last on right is a Powermaster 140 amp; now have two spares in the camp box, as well as new spare Psc N-pump (and pulley), spare water pump (already tapped for AN fittings at heater ports, temp sender, and welded fitting for upper port), spare pillow block, spare idler, belt, driveshaft, spare low pinion Currie 9+ dropout third member 5.43 and spooled, 35 spline 300m stub shaft, and of course tires...

e29258668f3ca7679191a91ac4e073ef.jpg


No pic, but I've also completed crankcase ventilation- both clean and dirty side- in the 3 sides and down fashion and vented to atmosphere.... therefore much less oil can get to the top of the valve covers or intake, in case of a rollover.

Matt


Sent from my SM-G950U using Tapatalk
 
Oh, and the brakes are bled and leak free!

Sent from my SM-G950U using Tapatalk
 
More marks off the list...


Pillow block done, @tomwoodsdriveshafts cycled and clearing. No clearancing necessary on any 1350 yokes [emoji106].

5a1ba5854bd80b7c33ad0aa01f4ce004.jpg


b1c1262e6651d0eeefc9405f4e042875.jpg


More fire sleeving and heat shielding completed. Most of this shielding was repurposed... robbed off a super duty I just scrapped.

f3097985f4a957f12a9f2e180d8e44b6.jpg


7d5c266169010b2417b0143b34aae433.jpg


Crankcase ventilation hung and routed under the bridge, hidden by the reservoirs as well. Also notice the tubing for washer fluid...[emoji108]

New Powermaster 140 alternator and belt installed.


f7a5bd975e31c75711904dbf56e635fd.jpg


Matt


Note: 3/8 rubber fuel line makes an excellent abrasion resistant cover for 3/8 hardline...


Sent from my SM-G950U using Tapatalk
 
Looks good. Is there a slip in the driveshafts in front and behind the pillow block bearing? Just the set screw in the bearing keeps the driveshafts from all moving forward?
 
mcutler said:
More marks off the list...


f3097985f4a957f12a9f2e180d8e44b6.jpg


Sent from my SM-G950U using Tapatalk


This build still has me mesmerized, but still trying to get a grasp on how you will keep your foot from melting in your shoe. I know it will be spectacular whatever you do, just asking. :dunno:


ADMINISTRATOR
 
Re: Re: 90's throw back....Manche build

fabricator1 said:
Looks good. Is there a slip in the driveshafts in front and behind the pillow block bearing? Just the set screw in the bearing keeps the driveshafts from all moving forward?
Yes, slips on both ends. I've ran this exact setup for years in two previous rigs. Zero issues. Always carried a spare pillow block that I've never used. Never loosened a set screw. Key is good operating angles with sufficient spline engagement and frequent greasing, so that everything cycles correctly.

I know there is a place for the double ended yoke bearings and they serve many people well. But I design around these parameters so that I won't need it.

The mega hi 9 certainly helps out with the angles.
CHASMAN9 said:
This build still has me mesmerized, but still trying to get a grasp on how you will keep your foot from melting in your shoe. I know it will be spectacular whatever you do, just asking. :dunno:


ADMINISTRATOR
Fingers crossed; I'm hoping that the forward headers will be less heat concentrated there than traditional units. I've also got some more heat shielding robbed from said truck above that should aid. It's really hard to explain in type, without anyone personally seeing this space; pictures don't translate well in this tight area. I will have an inch or more of air gap on that outside tube - which will be wrapped, and have a secondary shield that clamps to the tube with its own air gap. Then if necessary, I still have that snazzy NASCAR interior heat pad that will take care of the rest of the heat transfer... I think...

That said, the heater will have no need to blow on our feet... it will mainly serve as a defroster.

Windshields and winter wheeling bring the suck without defrost...

Thanks guys!

Sent from my SM-G950U using Tapatalk
 
So is the pillow block bolts welded in from the back side of the plate?

Maybe I missed it but what are the plans for the windshield? will it be OEM glass? if so will it be detachable?
 
Re: Re: 90's throw back....Manche build

twostep said:
So is the pillow block bolts welded in from the back side of the plate?

Maybe I missed it but what are the plans for the windshield? will it be OEM glass? if so will it be detachable?
Yes. It's 2" .120 rectangle tubing I cut down to a channel, welded from the bottom, then plated with .120. Can easily lift the block off the studs for service.

Factory glass, but using the later Cherokee with the rubber molding attached to the glass, rather than that crap aluminum trim. Standard urethane installation. I was a glass installer 20 years ago, and still have great relations with that employer; I can buy this glass for less than a c-note, installed at my shop.

Thought about speedglass, but with wipers, I was afraid it would eventually scratch beyond visibility. At this price I can buy these, I'll just use glass.

Sent from my SM-G950U using Tapatalk
 
Re: Re: 90's throw back....Manche build

mcutler said:
Yes, slips on both ends. I've ran this exact setup for years in two previous rigs. Zero issues. Always carried a spare pillow block that I've never used. Never loosened a set screw. Key is good operating angles with sufficient spline engagement and frequent greasing, so that everything cycles correctly.

I know there is a place for the double ended yoke bearings and they serve many people well. But I design around these parameters so that I won't need it.

The mega hi 9 certainly helps out with the angles. Fingers crossed; I'm hoping that the forward headers will be less heat concentrated there than traditional units. I've also got some more heat shielding robbed from said truck above that should aid. It's really hard to explain in type, without anyone personally seeing this space; pictures don't translate well in this tight area. I will have an inch or more of air gap on that outside tube - which will be wrapped, and have a secondary shield that clamps to the tube with its own air gap. Then if necessary, I still have that snazzy NASCAR interior heat pad that will take care of the rest of the heat transfer... I think...

That said, the heater will have no need to blow on our feet... it will mainly serve as a defroster.

Windshields and winter wheeling bring the suck without defrost...

Thanks guys!

Sent from my SM-G950U using Tapatalk


Have you ever used Lizardskin heat and sound proofing? I have in a different buggy and it made a big difference in my opinion. If the NASCAR stuff doesn't work completely, slap some of this on and see. :dunno:


ADMINISTRATOR
 
Re: Re: Re: 90's throw back....Manche build

CHASMAN9 said:
Have you ever used Lizardskin heat and sound proofing? I have in a different buggy and it made a big difference in my opinion. If the NASCAR stuff doesn't work completely, slap some of this on and see. :dunno:


ADMINISTRATOR
Thanks. It will be an adventure to see what's going to be enough... or not...

Thanks for the tip.

Sent from my SM-G950U using Tapatalk
 
Re: Re: 90's throw back....Manche build

yeager_0339 said:
This has got to be one of the best build threads on here!
Thanks Yeager

Sent from my SM-G950U using Tapatalk
 
Big hurdle on my list, because I think they are such a pain.... seats and harnesses are tabbed out, and ready to final weld!

Let the fun begin... time to panel the interior[emoji28]


9313842b4cb787c3c9319bcaf89dd771.jpg


e78dd51b4ae8f1a7e4a5466a08772c2d.jpg


5cfd374374b896aca94eea4e587bd712.jpg


Matt

Sent from my SM-G950U using Tapatalk
 
Re: Re: 90's throw back....Manche build

bjeep said:
Looking good. The dipstick will be hard to pull once the panels are in...... :rolf:
Yep, trans and oil dipstick. There will be a be a quick removable panel on both sides for access to those and spark plugs.

Every panel will be removable except rear center in front of fuel cell; too difficult to get out, due to having the heater and fire suppression mounted and plumbed from there.

Sent from my SM-G950U using Tapatalk
 
Re: Re: 90's throw back....Manche build

fabricator1 said:
I think we are all expecting lots of fancy bead rolling :tc

Maybe a bead or two...

Rear wall is "cased" out, templates are made, ready for the panels.

ebb49b3a1ea6e33c7579397fe8027ef4.jpg


e3939010435df7061ef970c5ccd5b524.jpg


73f1137e653f4def21deabd13b5d3647.jpg


Matt

Sent from my SM-G950U using Tapatalk
 
Re: Re: 90's throw back....Manche build

5BrothersFabrication said:
So is the cab permanently affixed to the chassis now? I think you could still skin a Luv on there... :stir:
Lol, yes, it has been all along, since the first day it was sat on the subframe. But I've got another complete parts truck with panels that are straighter than these for the next time it needs a new skin.


If rather use the Subaru brat, or Volkswagen thing....

Sent from my SM-G950U using Tapatalk
 
Re: Re: 90's throw back....Manche build

mcutler said:
Lol, yes, it has been all along, since the first day it was sat on the subframe. But I've got another complete parts truck with panels that are straighter than these for the next time it needs a new skin.


If rather use the Subaru brat, or Volkswagen thing....

Sent from my SM-G950U using Tapatalk
A VW thing would be awesome. :dblthumb:
 
So you welded the cab onto the frame, then you chopped the top to finish weld the cage right? Did you have to brace the cab/top any when you cut off the top to finish weld?
 
Re: Re: 90's throw back....Manche build

AllGoNoShow said:
So you welded the cab onto the frame, then you chopped the top to finish weld the cage right? Did you have to brace the cab/top any when you cut off the top to finish weld?
No. Had tubes going through the wiper cowl, and welded there and on A-pillar, which kept the lower half of the cab stable. No springing of the cab when I cut it away. Door margins are the same as before.

Sent from my SM-G950U using Tapatalk
 
5BrothersFabrication said:
So is the cab permanently affixed to the chassis now? I think you could still skin a Luv on there... :stir:

Do you know how far west a man would need to go to find a LUV body that would show this chassis the respect it would deserve :dunno:
 
Back
Top