Guys,
It's been a while I've wanted to buy or build me a buggy. A project has been now ongoing for the past 6 months. Not really fresh news, but I didn't really advertise it a lot. I wanted to have it in the garage (which is the case since last weekend) before posting a thread.
The first step for me was to buy an old built CJ, with a good parts list. Gave a good price for it. It wasn't my dream buggy but I could quickly give it a makeover and enjoy it for a few years. Problem is, the more I looked into it, the more I realized it needed extensive work. And when I found out the chassis was starting to stress crack in the back, the decision to strip it and transfer all the parts into a new chassis was taken.
I spent a lot of time trying to define a list of features I wanted it to have, and in the end, 5 axis stood out :
- Capable (I like it when the vehicle isn't the limiting factor)
- Comfortable (I hate being beat by a vehicle)
- Strong (I like to send it :smoke")
- Reliable (I hate breakage)
- Easy to maintain/repair (I'm aware that Beatdowns and Reliable aren't necessarily compatible, so when I need to work on it I don't want to fight it like so many of the buggies I've seen where it seems maintenance was never taken into account)
In the end I wanted a buggy with a chassis and suspension made to soak up the big stuff, unbreakable axles and room to bring a bunch of stuff comfortably (tools, spares, cooler, heated seats, tunes, …). Basically, a hybrid between an Ultra4, Rockbouncer and Trail Rig.
The name is : French Tickler.
For the heavy lifting I called in Tim from Bent Fabrications. He's a legend in my book and I've looked up to him for a long time now. Going all the way back to the bright years of the PBB and the Conquistador build. Being able to have him build me a roller was a dream and I can only recommend him if you want something done. He's the man!
Tim also took care of setting up the suspension (links + shocks). The chassis is based of his production 2" Ultra4 & SCORE legal. Some custom touches were added at my request (leg room, hydroboost, rear tubes and trailing arms).
He also took care of installing the fuel cell, drivetrain, exhaust and helped me BIG TIME by setting up the front axle.
I try to use as many parts as possible from the Jeep (cause budget), but everything that is new comes from BustedKnuckle Offroad, ran by my friend Jake Burkey. Don't hesitate to call him, he knows his stuff and will do you right.
Specs :
Chassis : Bent Fab Evo3R
Engine : stock 5.3 Vortec (about 600 internet hp)
Trans : PTC TH400 with RMVB and a 2000rpm converter. Bellhousing is cracked so I might weld it or install an Ultrabell soon.
Transfert : 3.0 Atlas2
Front axle : 14 bolt custom with Mark Williams spool, 4340 40sp shafts and RCV Big Bells. 05+ F250/350 outers.
Rear axle : 14 bolt, shaved, Detroit locker and 300M 35sp Black Mamba shafts
1410 rear driveshaft, 1410/1350 front shaft
Tires/wheels : TBD, 42" or more.
Suspension : Coilcarriers + Triple Bypass Radflo on Riot Trailing Arms + PAC Racing SwayBar
Steering : PSC with XR ram and 1 piece shaft
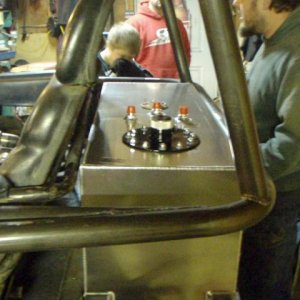
Misc : Heated seats, Hydroboost, Griffin FRONT Rad, GoatBuilt Fuel cell with stock Silverado pump, Winters shifter, Moroso Accusump, Autometer gauges, etc…
I set up an aggressive deadline to have it running in April 2019 for the U4 race @ AOP. Teardown and paint during winter 2019, so I can ride it in 2019 and do any modification without grinding through new color.
If everything goes according to plan (hahahahahahahahahahaha, right !) the goal is to go spectate at KOH 2020 with it.
Some pics :

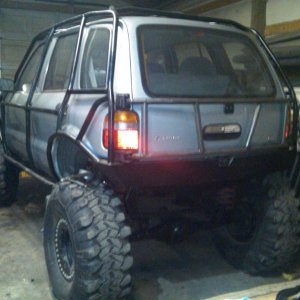
The original Jeep

Chassis at Bent Fabrications

SwayBar detail

TIG welding of the Trailing Arms

Big joints

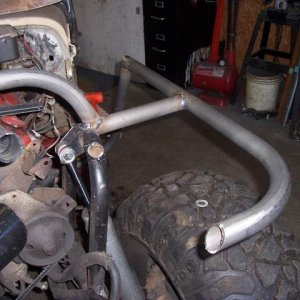
Building the front axle

Lots of turning angle

First time out

Home after a painful unloading process
There we go, all caught up.
No big shop, everything is done in my single car garage with basic tools. I'm far from being a master fabricator and looking at my MIG welds next to Tim's is painful but I'm here to learn and improve myself. The goal is to be functional, not pretty. So don't expect a fancy dash or crazy tin work, this is not happening. Just trying to keep it clean and simple. I'll try to update often.
It's been a while I've wanted to buy or build me a buggy. A project has been now ongoing for the past 6 months. Not really fresh news, but I didn't really advertise it a lot. I wanted to have it in the garage (which is the case since last weekend) before posting a thread.
The first step for me was to buy an old built CJ, with a good parts list. Gave a good price for it. It wasn't my dream buggy but I could quickly give it a makeover and enjoy it for a few years. Problem is, the more I looked into it, the more I realized it needed extensive work. And when I found out the chassis was starting to stress crack in the back, the decision to strip it and transfer all the parts into a new chassis was taken.
I spent a lot of time trying to define a list of features I wanted it to have, and in the end, 5 axis stood out :
- Capable (I like it when the vehicle isn't the limiting factor)
- Comfortable (I hate being beat by a vehicle)
- Strong (I like to send it :smoke
- Reliable (I hate breakage)
- Easy to maintain/repair (I'm aware that Beatdowns and Reliable aren't necessarily compatible, so when I need to work on it I don't want to fight it like so many of the buggies I've seen where it seems maintenance was never taken into account)
In the end I wanted a buggy with a chassis and suspension made to soak up the big stuff, unbreakable axles and room to bring a bunch of stuff comfortably (tools, spares, cooler, heated seats, tunes, …). Basically, a hybrid between an Ultra4, Rockbouncer and Trail Rig.
The name is : French Tickler.
For the heavy lifting I called in Tim from Bent Fabrications. He's a legend in my book and I've looked up to him for a long time now. Going all the way back to the bright years of the PBB and the Conquistador build. Being able to have him build me a roller was a dream and I can only recommend him if you want something done. He's the man!
Tim also took care of setting up the suspension (links + shocks). The chassis is based of his production 2" Ultra4 & SCORE legal. Some custom touches were added at my request (leg room, hydroboost, rear tubes and trailing arms).
He also took care of installing the fuel cell, drivetrain, exhaust and helped me BIG TIME by setting up the front axle.
I try to use as many parts as possible from the Jeep (cause budget), but everything that is new comes from BustedKnuckle Offroad, ran by my friend Jake Burkey. Don't hesitate to call him, he knows his stuff and will do you right.
Specs :
Chassis : Bent Fab Evo3R
Engine : stock 5.3 Vortec (about 600 internet hp)
Trans : PTC TH400 with RMVB and a 2000rpm converter. Bellhousing is cracked so I might weld it or install an Ultrabell soon.
Transfert : 3.0 Atlas2
Front axle : 14 bolt custom with Mark Williams spool, 4340 40sp shafts and RCV Big Bells. 05+ F250/350 outers.
Rear axle : 14 bolt, shaved, Detroit locker and 300M 35sp Black Mamba shafts
1410 rear driveshaft, 1410/1350 front shaft
Tires/wheels : TBD, 42" or more.
Suspension : Coilcarriers + Triple Bypass Radflo on Riot Trailing Arms + PAC Racing SwayBar
Steering : PSC with XR ram and 1 piece shaft
Misc : Heated seats, Hydroboost, Griffin FRONT Rad, GoatBuilt Fuel cell with stock Silverado pump, Winters shifter, Moroso Accusump, Autometer gauges, etc…
I set up an aggressive deadline to have it running in April 2019 for the U4 race @ AOP. Teardown and paint during winter 2019, so I can ride it in 2019 and do any modification without grinding through new color.
If everything goes according to plan (hahahahahahahahahahaha, right !) the goal is to go spectate at KOH 2020 with it.
Some pics :
The original Jeep
Chassis at Bent Fabrications
SwayBar detail
TIG welding of the Trailing Arms
Big joints
Building the front axle
Lots of turning angle
First time out
Home after a painful unloading process
There we go, all caught up.
No big shop, everything is done in my single car garage with basic tools. I'm far from being a master fabricator and looking at my MIG welds next to Tim's is painful but I'm here to learn and improve myself. The goal is to be functional, not pretty. So don't expect a fancy dash or crazy tin work, this is not happening. Just trying to keep it clean and simple. I'll try to update often.

 .
.


![IMG_3444[1].JPG](http://attachments.www.hardlinecrawlers.com/xfmg/thumbnail/4/4876-1476baa6459fafd7dfd43a035d947fc8.jpg?1625928490)