• Help Support Hardline Crawlers :

Full Hydro On The Cheap...

dirtygoat

Well-Known Member
Joined
Oct 5, 2007
Messages
5,183
Location
Elk Plain
I posted this tech thread on another board to help out a few members... You have to sign up over there to view it... I figured I would post it up here, so those that have asked me about it would have the info...

I don't claim to be any type of expert, but I have been running a pieced together set up on mine and have helped set up others as well as helped install a full PSC kit...


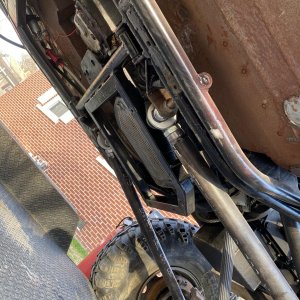
The system that I'm running is a Char-Lynn 241-1004-001 valve... A forklift steering shaft that is splined to connect to the valve... a 2x8 single ended ram... All running off a stock "can of ham" Chevy steering pump... My hoses are from Williams Oil Filter in Tacoma, Wa... I haven't added a reservoir or cooler yet, but will be doing that soon... This has been on my rig for over a year and I've had no problems... It squeals sometimes, but I can turn 44 TSLs with a welded d60 on the rocks with one finger...

The next several posts will go over part numbers, online references, how my system is set up and some pics to stare at...


EDIT::: I cooked my power steering pump this last weekend... I still didn't have a cooler or res installed... It was pure laziness on my part, the system was working fine so why **** with it...:looser:

I have the cooler and res and will be installing it with the new pump... Also, gonna look into running hydraulic fluid instead of atf... Should be able to handle more heat and wont have the foaming issues that atf has...
 
Last edited:
Orbital Valves...

The orbital valve is going to take the place of your OE steering box... The most common is a Char-Lynn... There are others like Danfoss and such, but I've found that the Char-Lynn valves are easier to research...

The main thing you need to worry about is displacement and open center...

They should all have I.D. plates on them... On the Char-Lynn valves there will be a 10 digit number, something like xxx-xxxx-xxx... That is what you'll need to find out what the specs are for the valve...

Mine is a Char-Lynn 241-1004-001, open center, non load reactive, 7.3 c.i. displacement... Has 4 fitting ports...


241 = product line id number

1004 = product id number

00 = relief valve pressure code (none)

1 = engineering change code


It gives me around 3.5 turns lock to lock...


Open center...


This is important because it allows fluid to pass threw the valve when you're not turning... A closed center will build up pressure and lock up... I had a buddy that tried one and it would lock up the steering about 30 yards down his road...


Non-load reacting...


This means the valve will not return to center like normal steering will... You also don't have any "feel" in the steering wheel...

Where as, a load-reacting valve will return to center and does give the driver some "feel" at the steering wheel... I have no experience with load-reacting valves...


Displacement...


This is how many cubic inches the valve handles... Less means a slower turning system, more means a faster turning system... Most set ups I have seen run between 6.5 and 9.5... Keep in mind the faster the system, the more you're asking from your steering pump...


Ports...


There are valves with a power beyond port(5 port valve)... I've heard that you can use it for rear steer, but that's something I have never dabbled in...

On the four port valves you have a R,L,P,T...

R, is for right turning... This goes to your ram pushing fluid in the cylinder causing the shaft to push or pull in a single ended set up... In a double ended set up it will fill one side of the cylinder causing that side to go out and the other to come in...

L, is for left truning... Works the same as above...

P, comes from the pressure out on your steering pump...

T, goes back to the tank...


Here's an example of the I.D. plate on a Char-Lynn, my valve and forklift steering shaft...


orbital.jpg


orbital2.jpg
 
Last edited:
Rams...

There's three ways you can go... Single ended(non balanced), double ended(balanced) and double single ended(balanced)...

On a full size axle, you'll need a ram with 8" of throw... Something like a Toyota axle needs 6"... And I believe a Rockwell needs 10"...

The cylinder size is relative to the shaft(bore) size... The bigger the cylinder, the more fluid it take to perform... This is based on the size of the shaft as well... If you have a large cylinder and a small shaft, it will take more fluid to fill the cylinder when the shaft is going out...

Larger rams can also give more force for larger tires... There's all kinds of opinions when it come to what size is ideal... As others with experience comment, I'll add info to update this...


Single ended...

This is the easiest system to set up... It's basically installed like a hydro assist... You mount the cylinder to the axle housing and the shaft to the tie rod...

It's un-balanced because it takes more fluid to push than it does to pull... You end up with a little more turns lock to lock in one direction... Being non-balanced you also have to slightly correct your steering at the steering wheel when driving in a straight line... At first I noticed this, but now it doesn't even come to mind when driving...

A benefit to the single ended set up other than the ease of installing is, it is usually cheaper and has less parts to buy... If you already have hydro assist, in most cases you can add a valve and hoses, lose the drag link and be done...


Double Ended...

This takes a bit more work, but will give you a balanced system... The cylinder takes the same amount of fluid to go either direction... The down side to this is you have to build a mount that the cylinder bolts to on the axle housing... Then you build two short tie rods, one coming off each end and connecting to each knuckle...

With this, you no longer have a need for the traditional tie rod... There are more parts and costs to running this type of system...

It can also be difficult to set up with a rig still running leafs up front if you want high-steer...


Double Single Ended...

Basically two single ended rams mounted to the axle pointing in opposite directions each attached to a knuckle and running together... A lot more involved... I've seen it done, but don't have much info on it...


Here's a single ended set up on a buddies rig that is mounted to the axle and knuckle...

singleendedattachedtoknuckle.jpg


Here's my single ended attached to the axle and tie rod...

1106091650.jpg


1106091836.jpg


1106092322.jpg


1106092323.jpg
 
Last edited:
Hoses...

There's two ways to go about this... Field fittings or crimp fittings...

I prefer the field fittings, these are rebuild able and can be repaired on the trail...


Field Fittings...

"Hydraulic field attachable fittings consist of two pieces: the insert and the socket, or collar. The insert has machined threads along the outer diameter, which engage the socket during assembly. The socket has deep-tapped inner threads, which allow the hose cover to expand so that sharp lead threads can cut a spiral path into the hose jacket. Following the lead threads are spaced blunt threads that fill with the outer rubber cover of the hose during assembly."


Crimp On Fittings...

The crimp on fittings are one piece and need a special crimping tool or you can have them made at a number of places...

The PSC kit I installed came with field fittings... I like the idea of carrying a length of hose and extra fittings just in case... The guys I wheel with are following suit so we all have the same parts and are familiar with each others set up...

I used a hydraulic braided hose for the R,L and P ports on the valve and a typical return line hose for the T port back to the pump...

The ports on the valve and ram are a pipe thread... I went to Williams Oil Filter and brought my valve and ram with me... They found the adapters with pipe thread on one end and machined thread that matched the fittings on the other end...
I used a pipe thread to push on barbed type for the return hose...

There's also an adapter that does on the pressure out on the pump to change it to the hydraulic hose thread...

(I'll get some sizes and part numbers, I don't remember them off the top of my head)


Here's a field fitting... -6 fitting and 3/8" braided hose... You screw the middle piece(collar) on to the hose, then screw the top piece(insert) into the collar... I put the hose in a vice and screw on the collar which has reverse threads, then move the collar into the vice and screw on the insert(normal threads)...


0423111216.jpg


0423111216a.jpg
 
Last edited:
Pumps...

The most common pump is a "P" style saginaw pump... This is what most of our rigs are running from the factory...

Most of our trucks have the "can of ham" style that has the pump mounted in the tank... Some of the 1 tons have a round "p" style that has an external reservoir...

Either of these can be used with success...

Most of these pumps are rated at 2.4 to 3.5 (gpm) flow and 1100-1450 psi pressure...

The aftermarket pumps run at the higher end of the flow and pressure of the stock pumps... Some have different pulleys and ports for performance and ease of hooking up... But, this thread is about doing it on the cheap...

I went to the parts store and got a replacement stock pump for my '79 K5 with a lifetime warranty... It seems to work just fine...

You can bump up the flow doing the "Redneck" upgrade... I haven't done this but I heard it helps...

You can also add more fluid capacity by adding a radiator hose to the top of the pump and and the neck and cap to the top of the hose... It's been covered all over this site...


Here's a typical Chevy small block "P" style pump...


steeringpump.jpg
 
Last edited:
Plumbing...

This is pretty simple...

On a system without a cooler or a reservoir you will have a hose running from the pressure out on the pump to the "P" on the valve... Then a hose running from each of the "R" and "L" to the two ports on the ram... I had mine on backward at first and it would steer opposite of what I did at the steering wheel... Switched them around and all was good... Then a return hose running from the "T" on the valve back to the pump...

On a system with a cooler and/or reservoir you will run the last hose from the "T" on the valve to cooler then reservoir then pump... (I'll double check this, it's been a while)


Here's the hoses running to the valve... You can see the 3 field fittings and the barbed return...

0125101426.jpg


Here's the hoses running to the ram...

0125101428a.jpg


Here's the back of the pump...

0125101428.jpg
 
Last edited:
Sourcing Parts...

There's a lot of places to source parts from... Ebay, Craigslist, Surplus Center, Trail Gear and so on... The idea is to get your parts for the least amount of money posible...

You can find valves on Ebay pretty often... Most will show pics of the numbers you'll need for researching... This is where I got mine... It came with the steering shaft for just under $100 shipped I believe...

I have seen some good deals on CL... Surplus Center and Trial Gear a bit spendy for my taste...

I came across a forklift salvage place up here and a buddy picked up his valve from them for $100... They also have rams for really cheap as well... Google forklift parts in your area and make some calls... I found this place off of CL... Found another in the San Fran area off CL...

Here's the forklift place in Lakewood, Wa...

http://www.statewideliftruck.com/

I got my ram by trading for a 36" spare that I no longer used... I even got the spare for free... There's some guys getting them from Surplus Center, the pic above where the ram is mounted to the knuckle is a SC ram... But, if you're already running hydro assist, use your existing ram... That's cheap right there... If you need to go bigger, sell off your assist ram and pick up what you need... Again, the forklift place up here sells them for cheap...

As for hoses, find a local place that does custom oil, brake, radiator or hydro stuff... A lot of hotrod guys can point you in the right direction... They always need custom lines... Talk to anyone you know that works with hydraulics, they can usually point you to a shop... Don't be afraid to take your ram and valve in to make sure everything fits...

I've got around $70 into my hoses and fittings...

For you guys up here in the Puget Sound, this place is great for hoses... William's Oil Filter in Tacoma, Wa...

http://www.bing.com/local/details.as...a+wa&FORM=LARE


If you find a good source for hoses in your area, let me know and I'll post a link for everyone...
 
Last edited:
Additional Info...

It took a bit to bleed the system... Get it up on jack stands and start turning the wheel in one direction... You'll need to keep a good eye on how much fluid there is, you don't want to run it low at the pump and suck air...

I turned and turned until it finally started turning the wheels, when it got to full lock I cracked open the fitting at the ram for the other side and turned until it was squirting out... Then tightened it back up and kept turning until it hit full lock in the other direction... Again, keep and eye on the fluid level...

I let my oldest boy sit there and turn it lock to lock for a while until I didn't see anymore air bubbles... Adding fluid as needed...

Started it up and cycled it for a bit and set it back on the ground... No problems turning on concrete with hubs locked and a welded diff...


Also, I CAN steer when the engine is off... It's similar to regular power steering when not running, just harded... Easier when the rig is rolling...


I'm using Walmart ATF...


Wouldn't recommend it on the road... I test it out around the neighborhood and it's not scary or acts weird, just would hate to lose fluid for some reason and have no steering... I live a ways out, so it's pretty common to see people driving tractors and such down the street...


IMHO, it's easier and cheaper than cross over with assist... I'm into it for under $200...


No need to brace the frame where the steering box is, nothing is putting stress on the frame... That saves a lot of money...


This may not be for everyone, some like the customer support of a store bought kit... But, for those of you that like to figure stuff out and make it work, this is probably one of the best upgrades I've done...
 
Last edited:
Links...

Here are some links to some great tech about Hydro Steer...

Anything from Hydro Assist to Full Hydraulic Steering...


Billavista's Full Hydraulic Steering Unit Calculator
http://www.pirate4x4.com/tech/billavista/PR-Hydro_Steering/Steering.html


Billavista's Full Hydro Bible
Part 1
http://www.pirate4x4.com/tech/billavista/PR-Hydro_Steering/index1.html
Part 2
http://www.pirate4x4.com/tech/billavista/PR-Hydro_Steering/index2.html
Part 3
http://www.pirate4x4.com/tech/billavista/PR-Hydro_Steering/index3.html


West Texas Offroad GM Pump Upgrade
http://westtexasoffroad.homestead.com/powersteering.html


AZ Rockcrawler's Full Hydro Single Ended Ram Build
http://azrockcrawler.com/_images/tech/2003/4-03hydrosteering/4-03fullhydro.html

AZ Rockcrawler's Full Hydro Double Ended Ram Build
http://azrockcrawler.com/_images/tech/2005/9-20-05hydrosteering/fullhydrosteering.html


Here are some links to research orbital valves...

Char-Lynn series 2 (291-xxxx)(293-xxxx)
http://192.77.147.11/pdf/info/06-323.pdf


Char-Lynn series 110,230 and 450 (261-xxxx)(263-xxxx)
http://www.vickers.sh.cn/pdfs/06-321.pdf


Eaton page with a lot of pdf info as well as part numbers and exploded schematics for teardown...
http://hydraulics.eaton.com/products/steer_main.htm


If you come across links that have good info, let me know and I'll add them...
__________________
 
Last edited:
I will continue posting the pics and info on the set-up Donnie and I did on his Blazer a few weeks ago... He ran it at Naches over the 4th of July weekend with out issues... It may take a few days before I have it all posted...
 
Last edited:
Donnie's Blazer Set-up...

All the fitting that are needed... These are field fitting that you can rebuild on the trail... The 90* fitting goes on the back of the power steering pump... The brass barbed fitting is for the low pressure return line... The fitting to the left of that is the coupler that mates the hose fitting to the pump... The brass colored 90* fittings go on the ram...


262224_163223420410861_100001696113317_378146_6313493_n.jpg


Here's the part number for the hose fittings...

264900_163224453744091_100001696113317_378151_3358769_n.jpg


Here's the braided hose...

264393_163228943743642_100001696113317_378165_8190682_n.jpg
 
Use a cut off wheel to make a clean cut...

251113_163235620409641_100001696113317_378199_1448349_n.jpg


Female part reverse threads on...

254172_163240977075772_100001696113317_378213_4232083_n.jpg


Male part threads normal...

254075_163235160409687_100001696113317_378197_1923097_n.jpg


Finished fitting...

253998_163241470409056_100001696113317_378217_916937_n.jpg


Finished 90* fitting...

254115_163241013742435_100001696113317_378214_4608416_n.jpg


Full Hydro hose ready to be installed...

264032_163242130408990_100001696113317_378226_5074611_n.jpg
 
Danfoss orbital... Open center, nonload reacting, 7.5 cu in of displacement...

253749_163226020410601_100001696113317_378160_4772084_n.jpg


2x8 single ended ram...

259994_163224387077431_100001696113317_378150_5784992_n.jpg


12 spline forklift steering shaft... We welded the coupler from the Chevy column to the end of it...

262182_163226263743910_100001696113317_378161_7506324_n.jpg
 
Last edited:
Here's the orbital mount welded to the frame... we used a 3/8th thick piece of plate... Cut a 2" hole with a hole saw on the drill press with plenty of cutting oil for the shaft... Make sure to take measuements to get the center of the forklift shaft lined up with the stock column...

260320_163227727077097_100001696113317_378162_6588019_n.jpg


Used 1" plate to build the tabs to mount the ram... One on the tierod and one on the axle tube... Turn the wheels full lock, pull the ram all the way out and tack weld the tabs... Cycled it left and right by hand to make sure everything clears... Then burn it in...

261265_163230213743515_100001696113317_378166_2170567_n.jpg
 
Last edited:
Orbital getting mounted...

262365_163228363743700_100001696113317_378164_6921708_n.jpg


Ram mounted...

254082_163238370409366_100001696113317_378208_1312821_n.jpg


Hoses hooked up... The front and back on the right go the the ram... The front on the left goes to the pressure out on the pump and the back left goes to the return line on the pump...

259885_163241520409051_100001696113317_378218_74955_n.jpg
 
Last edited:
I'll get some pics of the cooler and res when I'm putting them in...

There's another system on a buddies rig that I'll try and get pics from with a double ended ram...
 
I just heard that Williams is charging double what I paid for fittings and hoses when I built my full hydro...

Here is a link to the reusable hose fitting sold at O'Rielly... This will give everyone a starting point for sourcing out the plumbing parts online...

http://www.oreillyauto.com/site/c/detail/GAT8/G271700606.oap?ck=Search_N1960_-1_2985&pt=N1960&ppt=C0142

I'll try and find links to the other parts and post them as well...

Mike or Kev... I can't reply to the tech thread since it was moved... I was wanting to post up some other info and pics...
 
I'll try and find links to the other parts and post them as well...

Mike or Kev... I can't reply to the tech thread since it was moved... I was wanting to post up some other info and pics...

Sorry Luey! Looks like Mike got it handled though...:awesomework:
Great write up---Keep it up Man!!!:beer::beer:
 
Top