• Help Support Hardline Crawlers :

New front end

Probably, but the emery cloth will give the swirl effect that most definitely "get's the bitches"

So that's what I am doing wrong, :mad:

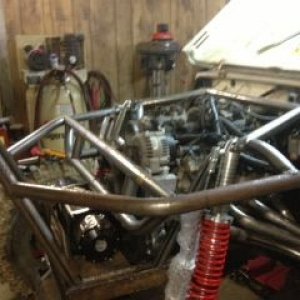
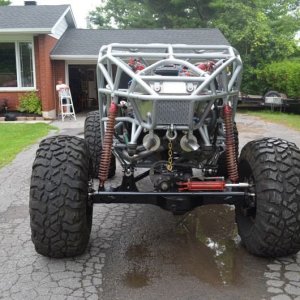
Now I need to rethink mine. Actually very cool and awesome stuff. Building is half the fun, and after it's done, look out!:awesomework:
 
Nothing wrong with back yard machine work. Shiiiiiiit I would have mounted it on a front axle then put the rig in gear.............Go to town with a die grinder.:redneck:

Angle grinder :awsomework:
 
Brake lathes do not like taking .080 off at a time, especially the the bar mounted upside down so the bolts are taking the force.

cleaning them up with a sander disc is what you are seeing in the pictures. Kind of like the non directional finish on rotor turns, Only with a 50 grit sander disc.
 
So I got a chance to work on for a couple of hours yesterday.

I knew I wanted 7.25" off of the tube, so measure 3 times and cut once.

View attachment 17606

next I cut off the tube as close to the knuckle as I could.

View attachment 17607

Then I made a couple of cuts through the tube to relieve stress.

View attachment 17608

Then I took a angle grinder and started grinding the end. I did it in the center and stayed away from the knuckle, grinding at an angle so as not to take material away that I needed. This also gives you a slight undercut when the old tube comes out. That gives you a bit more weld for strength.

When I thought I was most of the way through the factory weld, I stopped and using a drift and hammer tried moving the tube in the knuckle. After a couple of times I could see the part line and could drive it out from there.

View attachment 17609

View attachment 17610
 

Attachments

  • dana 60 020.jpg
    dana 60 020.jpg
    105 KB · Views: 208
  • dana 60 021.jpg
    dana 60 021.jpg
    105.1 KB · Views: 210
  • dana 60 022.jpg
    dana 60 022.jpg
    105.5 KB · Views: 205
  • dana 60 023.jpg
    dana 60 023.jpg
    89.8 KB · Views: 217
  • dana 60 027.jpg
    dana 60 027.jpg
    89.3 KB · Views: 203
cut off tube section and the pieces that were driven out of the inner "c"

View attachment 17611

I cleaned up the tube and the inner part of the "c" before putting it back on.

View attachment 17612

I tapped the "C" back on a little bit and then compared the caster angle to the other side. I knew the pinion angle would be close at the factory settings and as I was just changing one side, I matched the angle from the old side to the new side to make sure they are the same.


View attachment 17613

View attachment 17614

I then finished driving the "C" back on and after double checking the angle one more time I welded it back together.

View attachment 17615

Now the housing is ready for cleanup and putting back together.
 

Attachments

  • dana 60 029.jpg
    dana 60 029.jpg
    124.5 KB · Views: 207
  • dana 60 030.jpg
    dana 60 030.jpg
    109.6 KB · Views: 199
  • dana 60 032.jpg
    dana 60 032.jpg
    86.8 KB · Views: 199
  • dana 60 033.jpg
    dana 60 033.jpg
    99.8 KB · Views: 212
  • dana 60 034.jpg
    dana 60 034.jpg
    98.3 KB · Views: 196
I won't get into setting up the gears. There are plenty of writeups on that already.

But a few things I have found from experience.

This style of pinion nut is NOT FOR SETUP! it is a one time only use and if you use it to setup your new gears, you will destroy the threads on the pinion.

View attachment 18325

And when you do install it for the finished gears, you had better locktite it, because even though it is a interference fit, it will back off.

View attachment 18326

ARB does a very good job on relief notching so you can get the side bearings back off to adjust bearing preload.

View attachment 18327

Ring gear bolts should always be cleaned of oil and locktite put on before install

View attachment 18328

And do not cut the zip ties holding the ARB untill you have most of the ring gear bolts started.

View attachment 18329
 

Attachments

  • dana 60 038.jpg
    dana 60 038.jpg
    93.6 KB · Views: 138
  • dana 60 039.jpg
    dana 60 039.jpg
    74 KB · Views: 130
  • dana 60 041.jpg
    dana 60 041.jpg
    137.9 KB · Views: 133
  • dana 60 042.jpg
    dana 60 042.jpg
    138.7 KB · Views: 132
  • dana 60 044.jpg
    dana 60 044.jpg
    115.6 KB · Views: 130
Also for those of you new to Dana axles, they are marked on the bearing caps and housing at the factory.

there is a letter stamped on the cap and matching on the housing. The letter can be right side up, upside down, or sideways, and the housing is stamped the same way.

If the letter is sideways on the upper side of the cap, it will be sideways above the centerline on the housing also. so match the letters and you are set.

View attachment 18330

Checking the brake brackets... (Blackbirds custom trucks)

View attachment 18331

Installing the Longfield axles

View attachment 18332

They are a very tight fit. clearance is a must.

View attachment 18333

View attachment 18334
 

Attachments

  • dana 60 045.jpg
    dana 60 045.jpg
    133.7 KB · Views: 129
  • dana 60 049.jpg
    dana 60 049.jpg
    112.4 KB · Views: 118
  • dana 60 050.jpg
    dana 60 050.jpg
    102.7 KB · Views: 122
  • dana 60 051.jpg
    dana 60 051.jpg
    92.5 KB · Views: 129
  • dana 60 052.jpg
    dana 60 052.jpg
    86.5 KB · Views: 119

Attachments

  • dana 60 070.jpg
    dana 60 070.jpg
    81.2 KB · Views: 124
  • dana 60 069.jpg
    dana 60 069.jpg
    97.2 KB · Views: 113
  • dana 60 071.jpg
    dana 60 071.jpg
    109.5 KB · Views: 121
  • dana 60 073.jpg
    dana 60 073.jpg
    105.7 KB · Views: 111
  • dana 60 076.jpg
    dana 60 076.jpg
    124.6 KB · Views: 115

Attachments

  • dana 60 074.jpg
    dana 60 074.jpg
    103 KB · Views: 144
  • dana 60 080.jpg
    dana 60 080.jpg
    100.4 KB · Views: 141
  • dana 60 082.jpg
    dana 60 082.jpg
    127.2 KB · Views: 135
  • dana 60 084.jpg
    dana 60 084.jpg
    120.1 KB · Views: 137
  • dana 60 087.jpg
    dana 60 087.jpg
    107.6 KB · Views: 146

Attachments

  • dana 60 089.jpg
    dana 60 089.jpg
    103 KB · Views: 150
  • dana 60 090.jpg
    dana 60 090.jpg
    125.7 KB · Views: 137
  • dana 60 091.jpg
    dana 60 091.jpg
    124.3 KB · Views: 135
  • dana 60 096.jpg
    dana 60 096.jpg
    137.5 KB · Views: 152
  • dana 60 099.jpg
    dana 60 099.jpg
    108.6 KB · Views: 141
I'm doing 3-link home work for my rig and I'm wondering how things turned out for you? How do you like the ballistic shocks, how well has the square tubing turned out for you?

Thanks shawnb
 

Latest posts

Top