You are using an out of date browser. It may not display this or other websites correctly.
You should upgrade or use an alternative browser.
You should upgrade or use an alternative browser.
mopar buggy project
- Thread starter moparmagician
- Start date
moparmagician
Well-Known Member
Ya know, enough is enough. My dual t case adapter is nice, a very nice piece, but it took them over a month to get it to me, and then the input shaft I ordered and paid for, still isn't here. It wasn't in the box, when I called about it, they said they would call me and let me know where it's at, that was a week ago. I ordered the stuff the day after Christmas, and still don't have it all. I'm one of those types, ya know if you are having problems or having difficulty getting parts, just say so, it's no big deal, but  don't promise me it will be there tuesday and then a couple of weeks later, still nothing...................
don't promise me it will be there tuesday and then a couple of weeks later, still nothing...................no excuses
Well-Known Member
hey Marty you getting in flooring done on this yet ??? :fawkdancesmiley:
moparmagician
Well-Known Member
Ok, just how much did you get done this weekend stan? I actually accomplished a lot. I got the drivers side floor cut out and fitted. Made a mount for my hi lift jack. Wired my rear flood lights. Got a vent line ran on the fuel tank. And fabed up my shifter linkage, I got the 205 case all done as far as shifting it goes. I am in need of the lever that goes on the 203 to finish that but a buddy has one he is getting me. And in the last pic, I removed the protective film from my dash panel. I think it looks pretty nice. I may learn to hate it when the sun hits it just right. Oh, I also made a crossmember to support the rear 205 transfer case, I don't like the idea of all that weight just hanging out there in the breeze.
Attachments


Last edited:
moparmagician
Well-Known Member
The rest of the pics, I am happy with the shifter, it might not look quite as professional as some purchased piece, but an afternoon and some parts beats $300 in my book. And it actually works quite well. I also modified the shift rod on the 205 so it will do front wheel drive, rear wheel drive, hi or low, and 4 hi, 4 low.
Attachments


Last edited:
zukkev
Cornfuzzled yet again...
Lookin good...:awesomework:
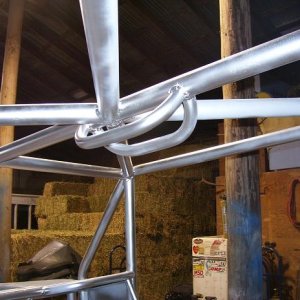
Don't take this the wrong way, but on your rear t-case mount, it looks like you've got two mounting points(one on either side of case) to support it; Don't do it...Had a buddy that thought he'd 'secure/support' by fabbing up a similar mounting setup, and ended up breaking the tail end of his tranny(twice)! Reason turned out to be his rear case mount-the fix was to fab a crossmember that has one central mount for the case, to allow for the natural movement of the drivetrain.With the rear case mounted 'solid', and you accelerate, the engine will 'torque' in its mounts, but the t-case won't move; Something's got to give, and the weakest link was the rear snout of the trans in his case.....took two broken transmissions before he figured out what the cause was; He redesigned the rear case crossmember to have one central mount, and wallah, no more broken trannies!!!hope this info is helpful!!
Don't take this the wrong way, but on your rear t-case mount, it looks like you've got two mounting points(one on either side of case) to support it; Don't do it...Had a buddy that thought he'd 'secure/support' by fabbing up a similar mounting setup, and ended up breaking the tail end of his tranny(twice)! Reason turned out to be his rear case mount-the fix was to fab a crossmember that has one central mount for the case, to allow for the natural movement of the drivetrain.With the rear case mounted 'solid', and you accelerate, the engine will 'torque' in its mounts, but the t-case won't move; Something's got to give, and the weakest link was the rear snout of the trans in his case.....took two broken transmissions before he figured out what the cause was; He redesigned the rear case crossmember to have one central mount, and wallah, no more broken trannies!!!hope this info is helpful!!
moparmagician
Well-Known Member
Point taken, and thank you. Maybe a better idea of making a single mount that will attach to the rear output shaft housing bolts. The mounts shown are insulated with pretty soft rubber bushings, not urethane, so it does have some flex, but your point is taken, and I should have known better. In my drag racing experience, if you run solid motor mounts, you need to run a flexible trans mount, it amazing how much things like transmissions flex, and if something doesn't give, snap, it breaks. Redesign and fab that up tomorrow night. All constructive critism is appreciated.
moparmagician
Well-Known Member
Ok, I'm tired, but after reading another post, "solid motor and tranny mounts" by Stan, noexcuses, it makes sense. I also did some digging in my old mopar chassis bible. The trans and transfer case mounts are to support weight only, the engine mounts are to control torque. If you mount the t cases solid enough, I beleive it's mainly chassis twist that breaks things. So I will be changing my game plan tomorrow for sure.
zukkev
Cornfuzzled yet again...
Keep up the good work, lookin forward to the 'finished' product---I'm tired too, knockin off.......
moparmagician
Well-Known Member
My input shaft from NW fab finally showed up today. Wow. So I assembled the NP205 tonight. It's been a while since I've been in one of those, takes a little time, but it's together and ready to permanantly mount up in the buggy.
moparmagician
Well-Known Member
Finally the NP205 is together and installed. I made a mount with advise from Zukkev for the transfer case, with a single mounting point, not double. It probably didn't need one, but I didn't like the idea of all that weight hanging on the adapter. It's urethane bushed on the bottom with rubber on the top where it mounts to a cross member, so some cushion and flexing allowed. Hopefully I won't experience any broken adapters or transmission cases. I also installed a smitty built inclinometer on the dash. More of a trinket than anything. It was an item on our show trailer I run for the company I work for, and since smitty went belly up, I asked for it, and they gave it to me, so free is a good price. Now it's time for suspension and axles. I have to step up and get the ARB and spool, then 5.38's for both axles. It's only money right? The show season has started for me, in medford this weekend, so not too many more free weekends to work on it from here till the end of summer. So lots of after work hours. I must say, it's a blast though.
Attachments


moparmagician
Well-Known Member
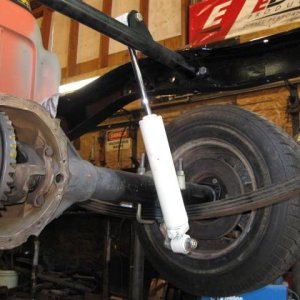
first off, I apologize for the crumby pictures, I forgot my camera at work. So these are from my phone. I got all the vent lines hooked up. I got a cool little overflow tank off ebay for $15 and ran the transmission, and T case vents up to it. It has a sight tube on the side and then an overflow tube with a check valve. All the vent lines do a 360 around the cases, so nothing should actually get to the tank, but if it does, it has to fill up before any mess starts. I also have the front axle in position, I thought the 4 link front suspension just went out the window, but with help from Stan, (noexcuses) I think we got it figured out.
Attachments


Last edited:
moparmagician
Well-Known Member
Looking good!
What did you do to the end of the D60? it doesn't quite look like you welded the inner C to the end of the tube but it looks like something is welded?
I haven't touched the D60, must be a allusion, it's all welded from the factory. I just got done taking the knuckles off, and haven't cleaned it up much yet. That is yet to come, clean, paint, brackets, 4 link, ARB, gears, money money money.................
Last edited:
moparmagician
Well-Known Member
Oh by the way, it's got 4" of clearance between the frame and pumpkin. I was hopeing for more, but that's what I got.
MIG'DHORSE
Well-Known Member
love that chassis:awesomework:
tlcruiser66
Well-Known Member
Loving the old school look you're going with here.
Can't wait to see it done.
Can't wait to see it done.
Not Jobless
Mr Funbags
Loving the old school look you're going with here.
What makes a tube chassis buggy look old school?
moparmagician
Well-Known Member
I thought maybe he was talking about me being old, not my buggy!
BrokeYota22
Well-Known Member
Looks nice! keep up the good work, it almost makes me want to go full buggy.