FullMetalFabworks
Member
- Joined
- Jan 24, 2013
- Messages
- 20
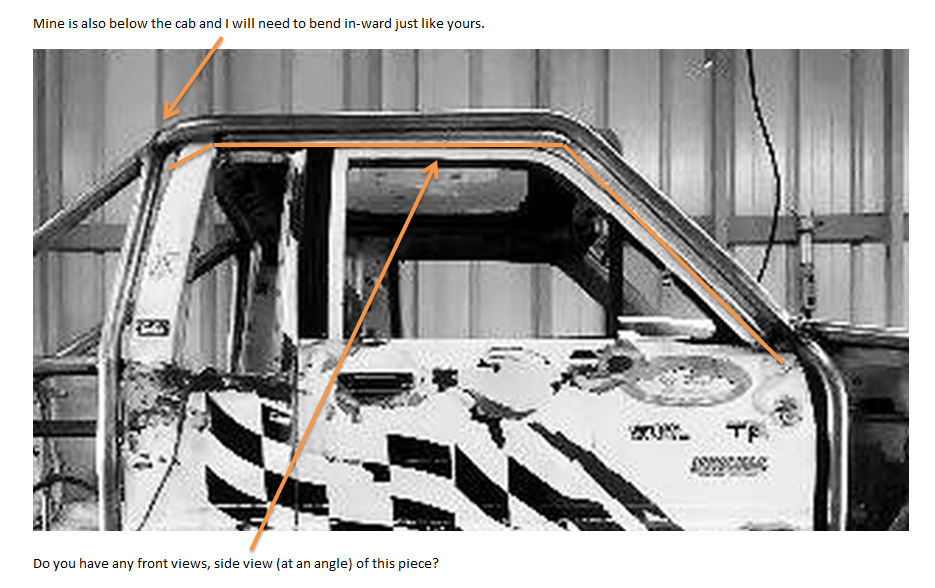
MtnGoat said:Rokcrler,
See my questions below in the picture. Can you send me the bendtech file for that piece? I would like to benchmark it against what I come up with...this concept (wrap around the back) is the same situation I am facing with mine. Having that piece to load and take measurements against mine would help "Big Time"..

Heres a handy formula and just some general tips for tube bending that help me, especially with clocked tubes with multiple bends like the one that turns in behind the cab:
- Center Line Radius (CLR) X Degree of Bend (DOB) X 0.017453 = Amount of Tubing Used to Make a Bend ( from tangent (start of bend ) to the second tangent (end of bend) )
- For tube with clocked bends, It's easiest to just think of the tube as a circle and since we know a circle has 360 degrees, and we remember awesome formulas from high school like C= (pi)(D), then we know that for a 1.75" tube the circumference = 5.495 ( or 3.14x1.75), so if you have a perfect circle around there tube that is perpindicular ( I have various size tube transfers made for this, but you can just cut a square piece of cardboard and use it as a tube wrapper and get the same effect) 1" around the tube = 65.51 degrees of rotation, 2.75= 180 degrees of rotation, etc
- If you have a tube that has more than a single bend in it, I never start bending anything without first making a "timing" line the entire length of the tube (use a piece of angle iron and a sharpie to make it), then make sure it is lined up with some point on your die (I like mark the center of my follow die with a center punch), that way you have a reference point and if you're bending on the same plane/ without any clocking it, the timing line should line up with the same point on the follow die
- if you go through and do test 90s for all your dies, and each material you will bend with it ( HREW, DOM, 4130, etc all will have different rates of spring back, as will different wall thicknesses in the same material), and get your start of bend offset down it really takes the guess work out of tube bending.