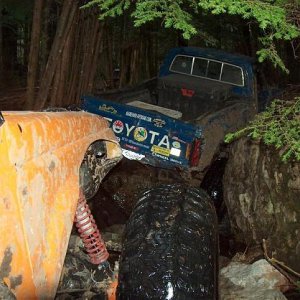
• Help Support Hardline Crawlers :

Dad's stang...

So it was another good productive day. And a big thanks to my best friend kyle for coming out and lending a hand taking care of a bunch of small odds/ends--thanks bud..

So I continued to cut away at the floor to where I got rid of the natsy nasty.. But here is the floor with 99% of the material removed that is going to be.

dad74.jpg


dad75.jpg


dad76.jpg


dad77.jpg
 
Here is the new floor pan. Its a bit different than whats on the car in 2 places. There is a panel for the firewall that overlaps the floor pan and on the far left front corner the pan reverses how its spot welded on the rocker. This was not a big deal but made it a bit trickier.

dad78.jpg


I had kyle pull the rear driveshaft so I could replace the rear u-joint. I am amazed at how tiny they are (seen bigger joints on steering shafts,lol).

dad79.jpg


New u-joint in and kyle threw the driveshaft back in.

dad80.jpg
 
Here is the floor all prepped and ready for the new pan.

dad81.jpg


It took some time but I got the new pan trimmed to where I wanted along with all the holes drilled for all the plug welds to the frame support assembly and the rocker. I ended up going with about 1/8-3/16" overlap on the panel.

dad82.jpg
 
Kyle washed the wheels and painted them up for me. My dad is going to love them white walls (yuk,lol)..

dad83.jpg
 
So its time to make some smoke.... I started by welding the plug welds as I worked it into the postion then fully welded all the way around it. Once that was done I also fully welded the bottom side--lots of smoke,lol..

But here is how it turned out. The was my very first floor pan I have ever done and I think I did a pretty decent job. If anything its really strong and thats the main thing.

dad84.jpg


dad85.jpg


dad86.jpg


Once done I painted the underside and then undercoated it for full protection.

dad87.jpg


dad88.jpg
 
dad75.jpg

Yabadaba-doooooo!!!!!:haha::redneck:
dad84.jpg

Turned out really good IMHO :awesomework::cool:....aren't ya glad ya decided to go the extra little bit and replace???:D
 
Gawd you are getting slow Mike :haha:eek:ld fart .Remember you gotta give your Dad 110%:D
Just giving ya **** you and Don got your priorities right, family first :awesomework:
 
So I have been putting in late nights to try and make one last hard push on this thing.

One thing I told my dad I wanted to do was the engine bay(looks just AWFULL) and redo the wiring in crashfab form.

Here is the whole wiring mess--dang old cars were so simple.

dad89.jpg


Here is the engine bay with all removed items than I plan on removing(shock towers, cross supports, brake master,battery tray and brake lines). The shock towers were a pain due to the bolts spinning and I had to cut the brake lines to get them off the ends(rust).

dad90.jpg


dad91.jpg
 
So I am just busting along. One thing I do know is the fact I won't be happy with how the engine bay will turn out. Many know of how I am a perfectionist but this time I have to limit myself. The one and only way for me to get what I would like to do would mean more than we have time for. So I am just shooting for it to look allot better.

So I have been working away and removing rust and some paint/goop. But its coming along.

dad92.jpg


dad93.jpg


Here is the lip that I spent some time on. I totaly removed all the VERY hard body seam sealer because I was very certain there was some rust there. And yup there was. So what I did just cut the lip down to where all 3 sections (Cowl cover,lower cowl and firewall) were even and I could get into the seam and kill what rust I could.

dad94.jpg


dad95.jpg


At that point once I kill what rust I can I will rebuild a water troft so the water runs down the cowl and not over and into the seam. I figure thats going to be my best option.
 
So this was where things for me went south and the first time I got rather upset over the prodject. As I was working at the cowl area I took my blow gun and started blowing the crap that was down in the cowl and thats when I saw a bunch of rusted metal chucks. So I got under the dash and pulled the heater box out.

dad96.jpg


And thats where I got upset. Those who are familure with this body style know what I mean.

dad97.jpg


The rise(I have heard it refered to as a hat) that keeps the water from running into the heater case was gone. I took a close look at the cowl body itself under the dash and that seems pretty solid and no small rust holes. At this point I looked over at the passenger fresh air vent and noticed there was sealer up around it and the hat looked like it was new(or done before my dad got the car). Thats when I got the idea to made a new one and just glue it in like the drivers side.

So I called my dad and told him what I had found(upset of course over it) and just talking to him helped me calm down. We both came to the conclusion that we are sticking to the plan of trying to get it done and not doing a full restore. At this time I told him of my plan to make a new one and he was pretty thilled at this. So I got off the phone and started reading on the net. Thats when I found they have replacement hats(ventr repair kits) and just had to tell him about it--he again was thrilled.

So I am back in the game and moving forward.
 
So when I got the heater box out I noticed alot of just rust(not deep) all over and looked like most of it came from the seam that I had worked on in the engine bay. So I got on my back with wire wheel in hand and made allot of brown clouds. So now its ready to also be sealed when I do the floor.

dad98.jpg


One of the pressed in hinge mounts had pulled thru for the hood. So I had to rework the metal to where the insert was back into place. A couple others had also spun so I decided to go ahead and tack all of them in.

dad99.jpg


Here is the worse part of the engine bay---the battery tray and the fenderwell around where it sits.

dad100.jpg


So tonight I got all the rusted areas wire wheeled and then rust killer on those areas. At that point I went and scrubbed down the whole engine bay and washed it down--last big step before ready to paint.

dad101.jpg


dad102.jpg


And here is the bad spot. I took and removed all of the ruff edges and then hit it hard with rust killer. The new battery tray will help give it the support it needs.

dad103.jpg
 
Ok still working thru things. I got the engine bay all whiped down and prepped and masked off. I didn't make accordinly to the factory lines of the engine bay but was pretty close. I also chose to remove the hood latch assembly and paint the front of the core support. I figured it would look cleaner once the car in painted and the new front items are installed.

dad104.jpg
 
I was going thru items that wse have removed to date and figured since I am getting closer it was time to get the hood hinges ready. We got new ones without springs.

dad105.jpg


Now I was figuring these would be a complete bear to remove off the old ones and put onto the new ones and figured I would need to make a tool to aid in it. Well I sat back and an idea popped into my head and it turned out to be a golden idea.

So what I did was use a punch firmly placed in the vice. I took the hinge and slid the one side of the hingle/spring down over the punch to grab the one side of the spring. I took a rachet strap from the post in my shop and to the other side of the spring and racheted it down.

dad106.jpg


dad107.jpg


It worked like a champ. To release the pressure on the spring I just released the rachet strap while holding the free length of strap to calm the recoil.

dad108.jpg


Cleaned the springs and did the same thing to install the springs on the new hinges.

dad109.jpg


And I thought I was going to beat myself up doing them..
 
Top