• Help Support Hardline Crawlers :

Dad's stang...

I did one light coat on the seam area at the cowl and then sealed the seam up. In the areas with bad rust that I killed (battery area and above the steering column) I did multiple coats over a period of a number of hours. But I just got done doing a final coat on the whole thing. Don has the cross supports and shock towers and he is going to sand blast them and I will get them painted tommorow night. But I am not totaly happy with how it turned out but I was expecting that due to not totaly stripping the whole area. But it does look a TON better.

dad110.jpg


dad111.jpg


dad112.jpg
 
You gonna patch panel the battery tray area?

No. Its still very sturdy and the new battery tray will help stiffin it up. The only way to do it will require more than what we have time for at this point. But it can eaily be repaired down the road when time is more available.
 
my doors are pretty much done, but cannot do any more sanding until the paint in the engine bay dries, don't want to get dust stuck in there... so Thursday I will swing out there one more time and finish the doors and the passenger door jamb then we should be ready to head out to my friends for paint
 
Ok put another good amount of time into it. I figured since I had the heater box sitting there I needed to get it done up.

Both the doors inside the case were stuck in place and the frest air door at the passengers foot was also stuck in place.


So I tore it apart.

dad113.jpg


I cleaned the heater core and flushed it out.

Man it was a mess inside. Granted not all of it was from the heater assembly itself but it was pretty rusty inside.

dad114.jpg


So it took some work and PB blaster. I had to have allot of patience to finally free up the stuck doors but I was able to do so. All the metal parts got coated with naval jelly to help kill the rust then all metal parts inside got painted to help keep anything from flaking off.

dad115.jpg


I fully assembled the case and chose to just paint the whole assembly. The composit part of the case had rust stains in it and I felt it would look better all one color.

dad116.jpg


dad117.jpg
 
Don got the parts I needed blasted so I prepped them and threw some paint down.

I got the cross supports installed and sealed at the pinch seam

dad118.jpg


I got the shock towers installed with new bolts(old ones dead) and got the shocks installed allong with a couple items in the engine bay.

dad119.jpg


I think it turned out pretty decent..
 
At this point I don't want to do anything more in the engine bay till I can have a few days for the paint to harden. The paint for the interior showed up at my dads and will have it tonight so in the mean time I went back to the passenger seat adjusters.

As you can see they are in poor shape. One stud is broken and 2 others are bent--odd and they barely move.

dad120.jpg


This is where I learned a few things. The studs are pressed into place on the rail (square hole). So I started by cutting the stuff flush with the square portion of the stud.

dad121.jpg


Once cut I ground the square area down to very near the rail and then pounded them out--pretty simple really.

Now both stud tops act as stoppers so once those are removed you can move the slider beyond its limit and seperate it. There are 2 roller balls and 4 nylon sliders.

dad122.jpg


I cleaned the rails of the sticky goo from many years and polished the areas where the balls ride. I greased the ball areas and reassembled the slider assembly. At this point I use long bolts and tack welded them to the slider and wala they are in great shape again.

dad123.jpg


And painted up and ready

dad124.jpg
 
So I have been doing one thing for the last 2 days on the car.

I did some research and asked around and ended up deciding to go with an Eastwood product "Rust encapsulator" and had my dad order a gallon of the stuff. So it finally arrived and I was ready and waiting. So for the last 2 nights I spent painting the floor from front/rear with 2 coats and I went up the firewall under the dash to the cowl/firewall seam and farther under that where I could get the paint. So now that my brain is shot from fumes(lol) I sit here eating crayons(jusy kidding). But I am pretty happy with how it turned out. Also I knew of 2 tiny pinholes but found a couple more thanks to the paint and got those areas sealed up nicely/protected.

And dave came out to look at the car for possable exhaust--thanks dave :awesomework:

dad125.jpg


dad126.jpg


dad127.jpg


dad128.jpg


dad129.jpg


dad130.jpg


dad131.jpg
 
Ok I got the caps that bolt to the floor cleaned, painted and then installed and another coat along with the rubber floor plugs.

dad132.jpg
 
So the good news is the Don's buddy will be ready in just over a week--time to shift up a gear...

So its time to start putting some things back onto the car. I went and cleaned up the hood release/latch assembly and gave it a coat of pant and then threw it on with the horns.

dad133.jpg


The radiator also went back in.

dad134.jpg
 
When I removed the front brake hard lines each one was pretty toast at the brake hose fitting due to having to use vise grips to remove them. They were also kinda pitted from rust so I needed to build new ones.

The drivers side. I chose to copy the origional one.

dad135.jpg


The passenger side I chose to do different than the stock one as I thought there were unneeded bends in it.

dad136.jpg
 
I finally rebuilt the carb so now thats ready.

dad137.jpg


I hated the fuel line from the fuel pump and it too had some rust pitting in it but more than anything it was bent this way and that way.So I made a new one.

dad138.jpg


I also made a new line for the vacuum advance.

dad139.jpg
 
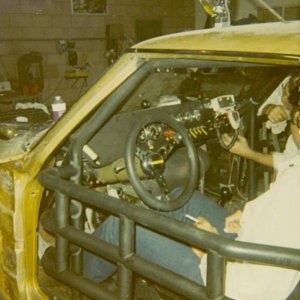
So since the coating I put on the floor was now hard I went back into there. Near the beggining of the thread I showed a picture of the fuse panel that was dead. Along with that I had some other issues I needed to resolve and the best way to get them resolved was pull the cluster. OMG that was not an easy task since there are no main connectors on these instead you have 11 individual connectors and like 8 bulb connectors. But I did manage to get it out and took good notes for when it goes back in.

dad140.jpg


So I had 3 issues that I knew of at hand to take care of. The first was the washer pump. The car from the factory has a washerpump but it was not wired like so and had wires just ran to it and not using any of the factory pass thru connectors. I got the wiper switch undone from the dash and found this.

dad141.jpg


I dug out my multimeter and one of the books my dad gave me(I am spoiled with the wiring schematics I use daily at work compared to this old stuff). Well my hunch was correct on where I "thought" the washer feed wend thru the firewall. There are 2 main passthru's and one double wire passthru and the washer feed went thru there.

dad142.jpg


The stotchlock had damaged the wire so I nipped it and replaced that section of wire along with the trerminal in the switch connector.

And here is the dead fuel block---I threw that damn thing away.

dad143.jpg


I went and installed the blade style fuse panels I use on my custom wire jobs for my customers. The car also had nothing I could find in the way of power feeds for the stereo and instead somebody had ran a hot wire from the battery. So I went and ran 2 new circuits at the new fuse box for the stereo.

dad144.jpg


I still have to make a bracket so it can mount under the dash on the lip of the dash.
 
Top