You are using an out of date browser. It may not display this or other websites correctly.
You should upgrade or use an alternative browser.
You should upgrade or use an alternative browser.
Flatlands #1
- Thread starter FlatlandFSJ
- Start date
Help Support Hardline Crawlers:
FlatlandFSJ
Well-Known Member
The-Boss said:Looking great. All the hand made custom stuff makes it better than ever. Looking forward to riding with this thing.
Appreciate it thumb.gif
zeke392 said:looking good, lots of nice work Dillon
Thanks man ;D
1tonyj
Well-Known Member

FlatlandFSJ
Well-Known Member
Not a whole lot of photo worthy progress in the last week, been getting a head start on clean up and weld prep.
Managed to get a few of the uppers boxed in

Steering res tucked away up front.


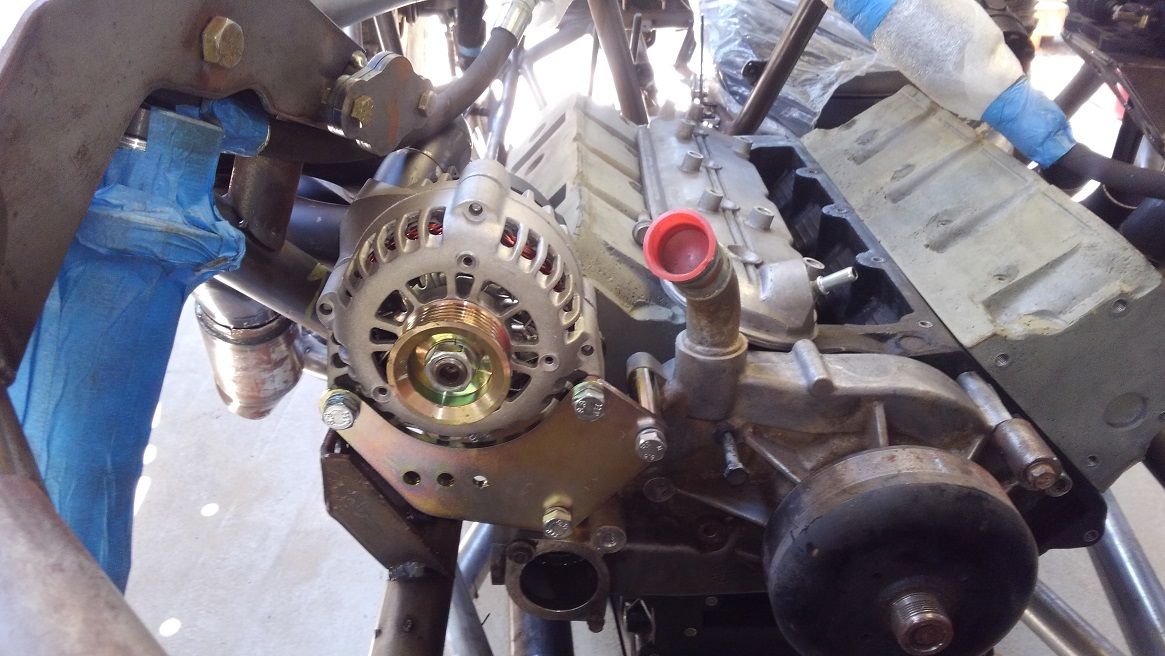
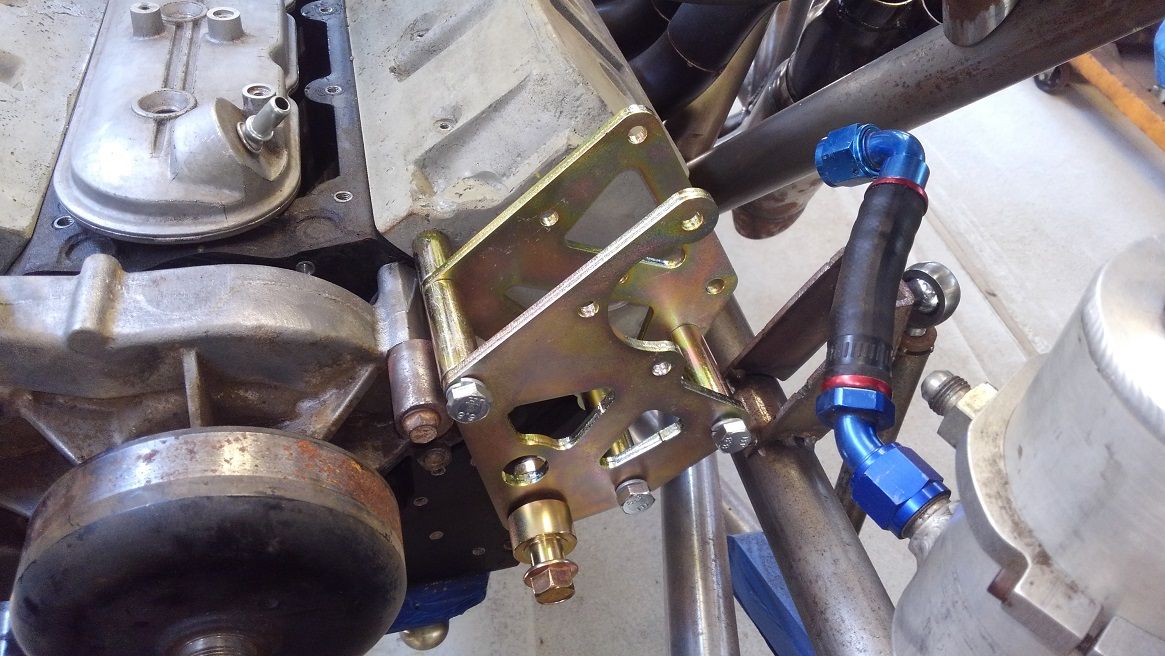
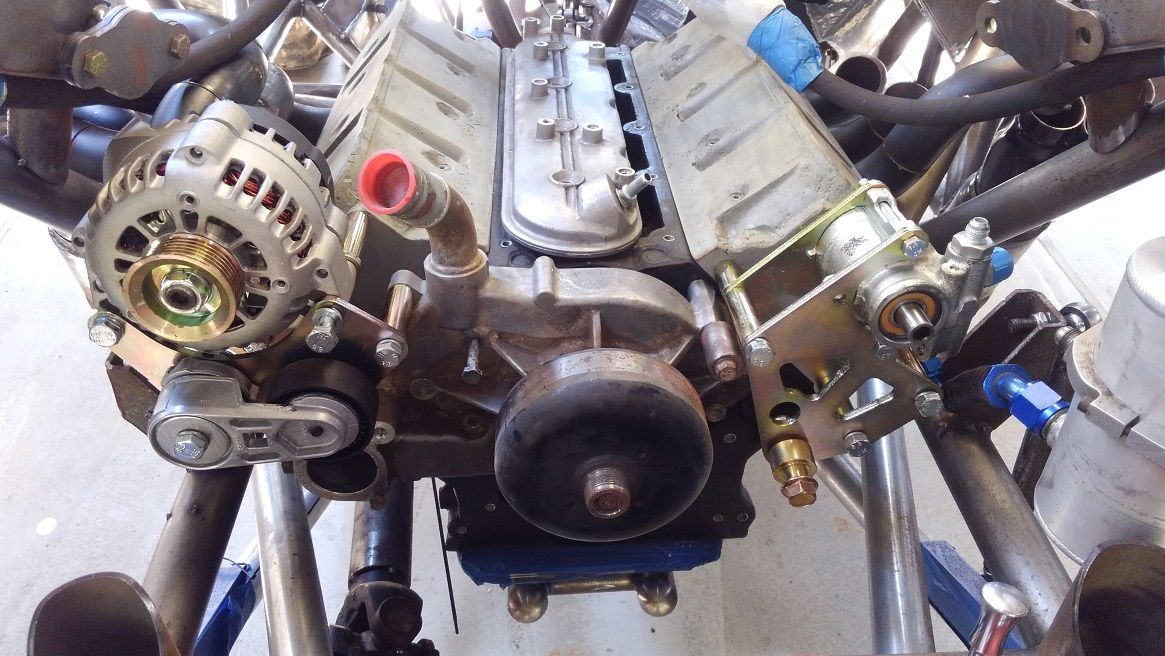
Waiting on a few brackets from goatbuilt for the alt and steering pump. Ray should be dropping them off tomorrow so I can get started on packing out the area in front of the motor.
Managed to get a few of the uppers boxed in
Steering res tucked away up front.
Waiting on a few brackets from goatbuilt for the alt and steering pump. Ray should be dropping them off tomorrow so I can get started on packing out the area in front of the motor.
1tonyj
Well-Known Member
1tonyj
Well-Known Member

1tonyj
Well-Known Member
6.2L with cam and some headwork...should be more than plenty for this little buggy. Hate to throw out assumed HP numbers but expecting it to be a lil north of 500.
P
If its free, its P
Nice work, very cool build and great pics ! Love when guys post packaging and bracket fab stuff. Always neat to see others solutions !
1tonyj
Well-Known Member
Yeah Barton it's a truck motor.
Thxs P !
Thxs P !
FlatlandFSJ
Well-Known Member
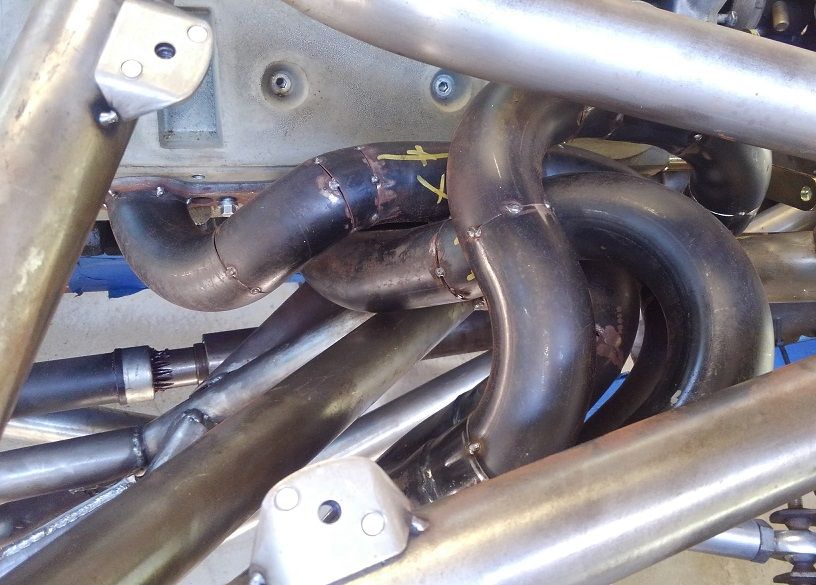
Rolled it out into the new section of the shop to have a look. Still just chipping away at little ****, getting closer to blowing it apart.


smbroady82
Well-Known Member
looks fast! think Ray will be able to handle it?!? 8)
1tonyj
Well-Known Member
smbroady82 said:looks fast! think Ray will be able to handle it?!? 8)
Ha!.....we damn sure gonna find out :driving:
1tonyj
Well-Known Member
ToyotaTom said:So much awesome!
Thxs Tom!
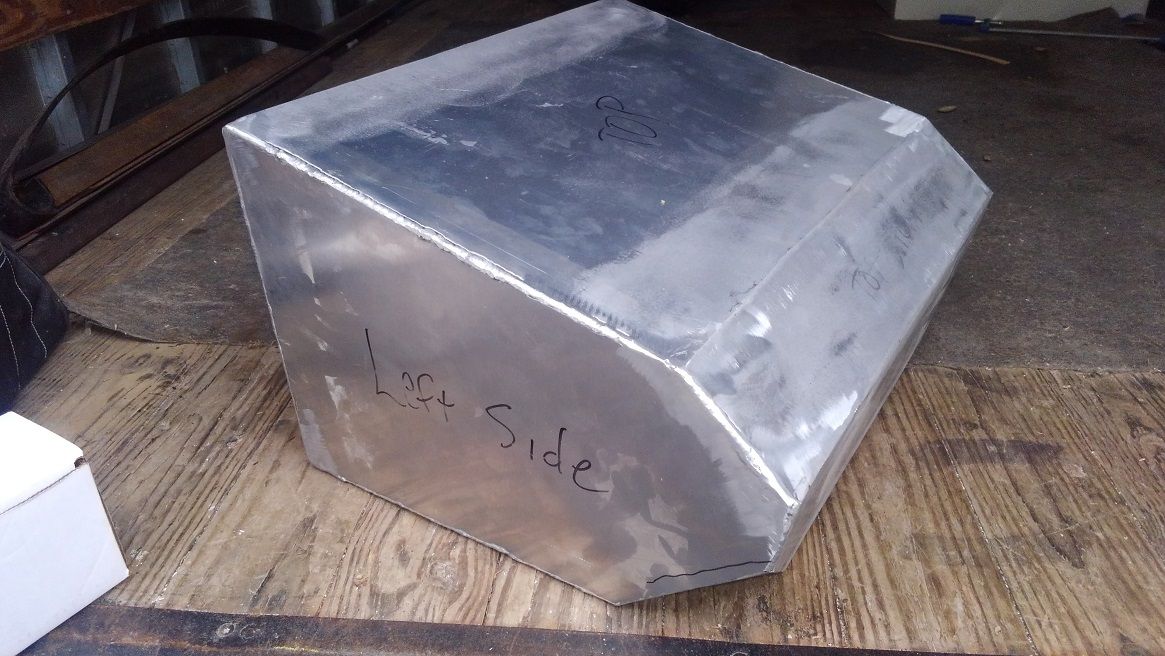
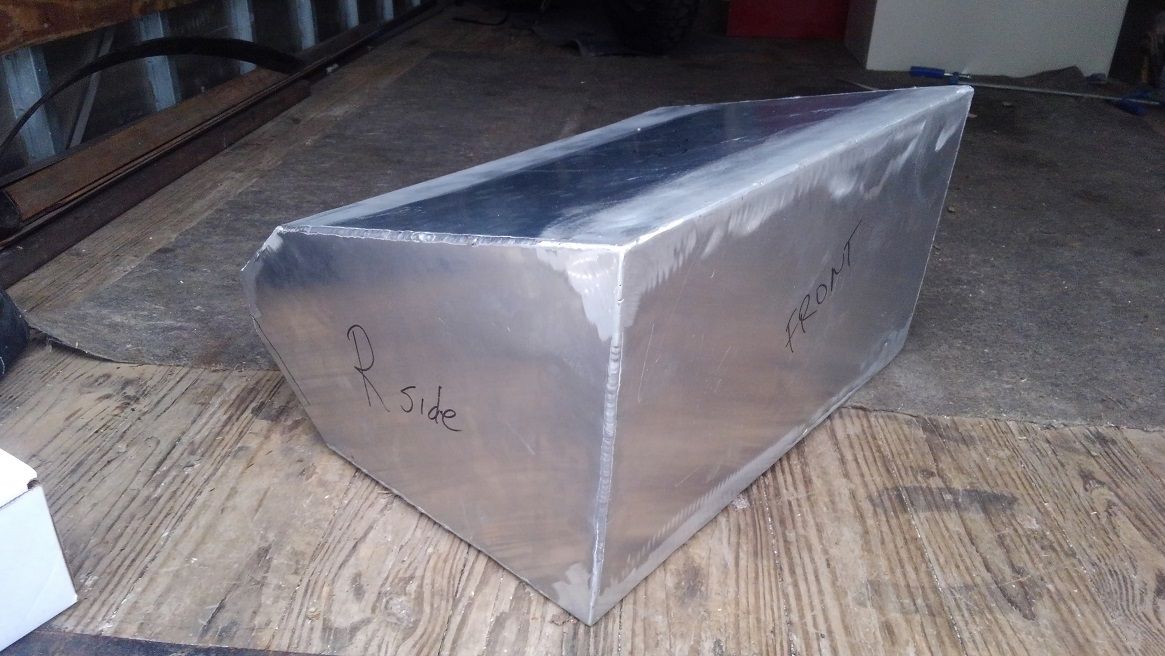
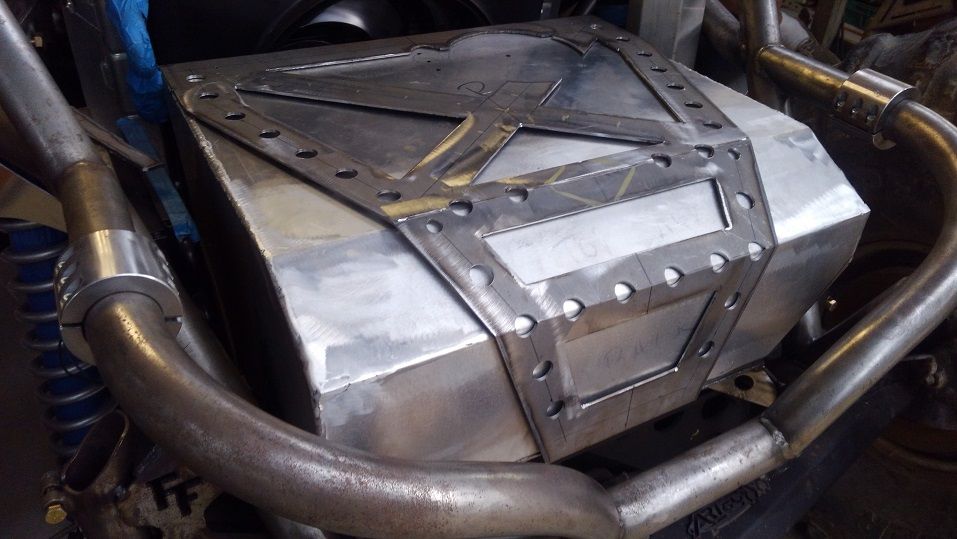
First stage of the fuel cell coming together
Attachments
AllGoNoShow
Well-Known Member
- Joined
- Aug 15, 2011
- Messages
- 551
- Reaction score
- 3
Really cool looking chassis. Thanks for posting.
FlatlandFSJ
Well-Known Member
Re: Re: Flatlands #1
Thanks man. Trying to help contribute a lil tech.AllGoNoShow said:Really cool looking chassis. Thanks for posting.
FlatlandFSJ
Well-Known Member
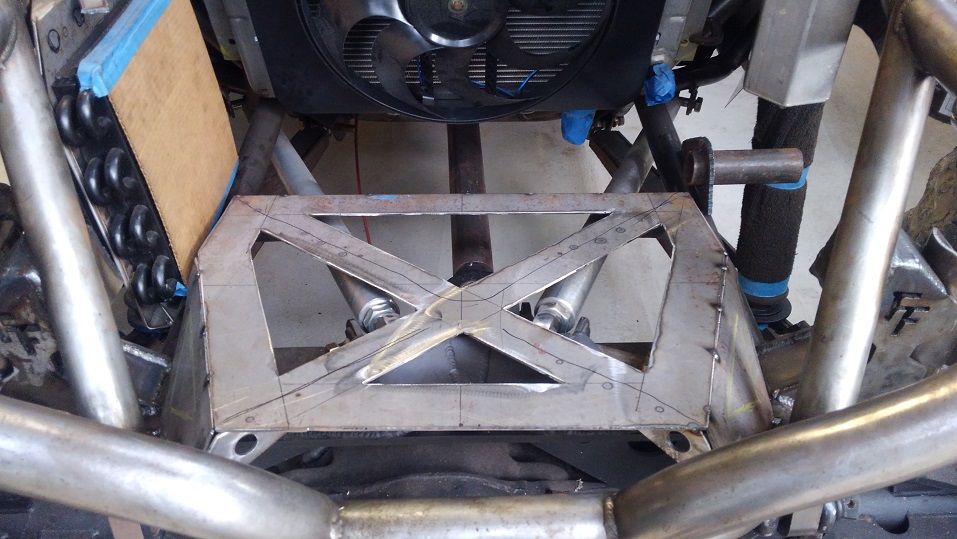
With Ray's choice of whoopow, it was decided to put some steel around the midshaft and carrier bearing. Instead of depending on the aluminum floor to contain it in the event of a failure.
Same story... cardboard first

Chop chop, even though this is buried under the floor, I figured I'd try making it fancy with some cut outs. Also allows access to the ubolt nuts from the top side without removing it.

Ties in at 4 points, the 4th is below the trans pan on the main cross member for the links.

Couple overlay plates for the front uppers, little bit of fine tuning and they will get glued on.


Same story... cardboard first
Chop chop, even though this is buried under the floor, I figured I'd try making it fancy with some cut outs. Also allows access to the ubolt nuts from the top side without removing it.
Ties in at 4 points, the 4th is below the trans pan on the main cross member for the links.
Couple overlay plates for the front uppers, little bit of fine tuning and they will get glued on.
FlatlandFSJ
Well-Known Member
Started the aluminum stuff late last week. Still alot of work to go in the dash and plenty of fitting left to do in the skins, but it's taking shape slowly.
Start of the floors, the firewall will be built off these as well.


These panels will be separate from the firewall. I'm hoping to create a decent air gap between them to help keep the lil "mufflers" from cooking the insides.

At it again with the cardboard..

Chopped out the very rough skins, most of this stuff is still at it's rough cut stage.


First cut on the dash

Bent the dash around and got the filler panels cut and taped up for now. As well as the center section.


Start of the floors, the firewall will be built off these as well.
These panels will be separate from the firewall. I'm hoping to create a decent air gap between them to help keep the lil "mufflers" from cooking the insides.
At it again with the cardboard..
Chopped out the very rough skins, most of this stuff is still at it's rough cut stage.
First cut on the dash
Bent the dash around and got the filler panels cut and taped up for now. As well as the center section.
FlatlandFSJ
Well-Known Member
Had to take a break from the alum for a while. Decided to knock out the tie ins on the high steer arms.


I'm sure someone will be wondering why not just double sheer it in the stock location.
Ray's 60 has the short branik arms, so even though I'm pretty picky when it comes to ackerman, the little bit of extra angle wouldn't hurt, even if I end up grinding some stuff to clear.
I'm sure someone will be wondering why not just double sheer it in the stock location.
Ray's 60 has the short branik arms, so even though I'm pretty picky when it comes to ackerman, the little bit of extra angle wouldn't hurt, even if I end up grinding some stuff to clear.
FlatlandFSJ
Well-Known Member
By the way....I use the term "muffler" lightly....should quiet it down nicely....lol

1tonyj
Well-Known Member
Dillion started working on mounting the tank. Initial thought was to use weld on pucks...but after some discussion it was decided to mount the tank fully supported from the bottom with a tank "strap" that covers the entire tank.
Attachments
MihlfeldL2005
Well-Known Member
- Joined
- May 2, 2014
- Messages
- 192
- Reaction score
- 0
Out of curiosity, did you add internal baffles in the tank at all? Or will it be getting foam?
1tonyj
Well-Known Member
MihlfeldL2005 said:Out of curiosity, did you add internal baffles in the tank at all? Or will it be getting foam?
The tank is not fully done yet ….but no foam and yes to baffles.
FlatlandFSJ
Well-Known Member
LightBnDr said:HOLY COW! That's awesome. I think that was a smart move.
Only, just doesn't seem like much attention to detail in that tank strap? Haha
That thing is sweet
Yea, I've never been the biggest fan of the puck mounted gas tanks, lotta weight bouncing around on them things.
FlatlandFSJ
Well-Known Member
Annnnnnnd... we're back.
Been working on it and a few other rigs. As well as buying tools and getting my 3 phase set up for a few toys.
I think we left off at gas tank stuff..
Template stuff


Couple of gussets on the bottom of the tank mount.

Hold downs for the tank strap

Don't mind my junk welds

So this lil thing serves a couple purposes, it holds the front edge of the tank and also mounts the lower part of the heatshield/air deflector for the fan.


Upper mount is built into the tank strap.

More updates coming...takes a bit to figure out the order of everything
Been working on it and a few other rigs. As well as buying tools and getting my 3 phase set up for a few toys.
I think we left off at gas tank stuff..
Template stuff
Couple of gussets on the bottom of the tank mount.
Hold downs for the tank strap
Don't mind my junk welds
So this lil thing serves a couple purposes, it holds the front edge of the tank and also mounts the lower part of the heatshield/air deflector for the fan.
Upper mount is built into the tank strap.
More updates coming...takes a bit to figure out the order of everything
Latest posts
-
-

-
-
-
-
-
-

-
-
-
For Sale First Generation 4Runner Rock Crawler for sale or trade
- Latest: FirstGenFunRunner
-
-
-
Withdrawn First Generation 4Runner Rock Crawler for sale or trade
- Latest: FirstGenFunRunner
-


