• Help Support Hardline Crawlers :

Mounting IFS Steering Box...

84Toyota4x4

Well-Known Member
Joined
Aug 4, 2006
Messages
2,960
Location
Monroe
Ok, so tonight I pulled my stock SA steering box off my truck to mock up the IFS box and try and figure out what the hell I'm trying to do.

Reading through Marlins install, he says:
[FONT=Verdana, Arial, Helvetica, sans-serif]Place steering box on frame rail and slide forward until it contacts body mount. Rotate the steering box back so that the steering shaft going up to the steering wheel is nearly straight. Check to make sure the pitman arm will not contact the frame as it turns left and right.[/FONT]
[FONT=Verdana, Arial, Helvetica, sans-serif]
So, I couldn't find my C clamps, so I just used one of the bolt holes for the stock box mount to hold the box to the frame since I'm just trying to figure out the angle they're talking about.

When they say the shaft going up to the steering wheel is nearly straight, I assume they mean so the joint at the box is straight? Meaning they want the sector shaft of the box slanted forward?

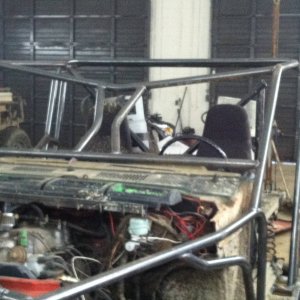
Here is how I have the box sitting now. I assume the sector shaft needs to be less vertical? By keeping it vertical like this, I can move it forward another 1.5" or so, but if I slant it forward to straighten out the steering shaft to the wheel, I cant push it much more forward at all until I cut out the core support, which I'm not in the position to do right now unfortunately...

Advice?

~T.J.

EDIT: I guess I'm saying that I know I should mount it so the lower two bolt holes are more or less level (like in the chopped pic with the yellow lines, bolt holes aligned with center of frame). What I'm asking, is if I HAVE to mount it like that, or can I leave it the way it is sitting now so I can cram it forward without having to cut the core support? Is there a horrible reason why I shouldn't?
[/FONT]
 
Last edited:
you will not be happy with only 4 inches of uptravel

tilt it. cut things to make it fit.

purely opinion.

WAIT!

big old "d'oh!" here...

Pitmancomparision.jpg

Billet pitman arms vs stock arm. Bpa-001 is the part # of the flat pitman, Bpa-225 is the part # of the 3/4 less drop than stock pitman.

just get the flat pitman arm, and you dont need to tilt it.
 
Last edited:
I guess thats a good point I hadn't thought of. My springs now are SUPER stiff and have basically no flex, but that will change soon enough, so I guess it would be better to get it out of the way now. Guess I'm gonna be cutting it out somehow after all...

~T.J.
 
Ah-ha! I was wondering why someone would want something like that. Never really put two and two together until now...

So if I order a flat pitman arm, I can run it vertical and cram it forward so I don't have to cut, right?

So it really boils down to if I want to cut it, or pay for a new arm. Hmm...

~T.J.
 
Yes!! what Paulie said, make sure you plate the frame or you will have problems if you don't.
 
I already have the braces and everything, I'm just trying to figure out the angle for the box and how I'm gonna do it.

I'm thinking I might just mount it the way I have it, but shoved forward for now, then get the arm a little later. I kinda worked myself into a a spot where I'm forced to half ass some stuff, and I don't really like it.

Originally, this started out as just cleaning up the drivers side rotor because it had grease and gear oil all over it. Next thing I knew, I was rebuilding the whole front axle, all new brakes, installing my hysteer thats been sitting around forever, etc.

Problem is, I'm working outside a barn with no provisions for power for welding or anything, I'm also not equipped where I'm at to cut that core support out. As it is, I'm gonna have to bolt it all together with the plates and everything, then drive it to a friends house so I can change it around and weld it. If I had a torch I would just cut that core support out so I can mount it "right", but since I don't, I cant get in there to cut anything out for it to fit that way. So, I'm forced to mount it the way it is, but forward, and not have the "right" arm.

Then again, its not going anywhere anytime soon since now the wheels don't fit with the V6 style calipers anyway :rolleyes:

~T.J.
 
Last edited:
Nope. I said OUTSIDE a barn. I'm working outside in the gravel too, just like you. Difference is, I see a welder there in that pic. I cant run one since the power at the barn barely runs an angle grinder with the lights turned on inside the barn. I pop the breaker if the angle grinder gets too bogged down. Also means no air compressor for air tools, electric impacts, nothing. Kinda sucks, but I'm getting by, haha.

~T.J.
 
Well, just as an update, I got it kinda mounted (more like mocked up) tonight where I think I'm gonna run it.

I ended up cutting out the core support as well as part of the body mount to get it where I mostly wanted it. Its pretty far forward, and the steering shaft will be mostly straight as well with the angle I went with.

The only thing I'm a little worried about is how low it sits. I wish I could have gotten it up tighter to the frame for pitman to spring clearance, but I couldn't get it any higher without cutting more than I wanted to out of the body mount because of the angle I wanted it to sit at.

I figure (estimating) I should have about 3" between my drag link and tie rod, which will be plenty if the axle only comes forward another 1.5" or so with new springs. Also, I figure since these springs I have now flex for crap I probably wont have problems with the pitman to spring clearance now, and when I do finally upgrade springs, I plan to build a hanger up front which will drop the springs a little to help with that clearance as well.

I'll try and get pictures tomorrow for opinions.

~T.J.

EDIT: Just realized that all my mocking up and everything is with the truck on jack stands at the frame, so the axle is already at full droop. When I put weight on it Ill get more tie rod to drag link clearance when the shackles lay back a little. However, that means I will have less spring to pitman arm clearance. Crappy.
 
Last edited:
Well I finally got pictures. Heres what I ended up with. As I said, I cut out some of the core support and body mount to get the box pretty far forward. This is probably the only time the body lift has come in handy. I ended up with lots of room between the tie rod and drag link for when the axle gets moved forward (only about 1.5"). Like I also said, the only thing Im a little upset about is how low on center the rear most bolt hole is. However, that can and will be fixed once I weld the plates to the frame.

The plates will stay where they are in the pics, but the holes will be redrilled in the frame to align with the holes in the plates. The holes in the plates are over sized for the frame sleeves, so the plates are sitting where they will stay, but the center of the plate hole isnt lined up with the center of the frame hole. Tracking? Anyway, heres a pic of the box mount so far.

DSC00782.jpg


Areas I cut out of the core support and body mount.

DSC00787.jpg


DSC00788.jpg


Heres a picture showing the space between tie rod and drag link.

DSC00783.jpg


And here are some more misc pictures I snapped while I was under there of the completed (for now), rebuilt axle I thought I would toss in and share.

DSC00784.jpg


DSC00785.jpg


DSC00786.jpg


That pretty much does it for now. Feel free to leave comments or ask questions, although I'm sure its pretty typical stuff most of you have seen before, haha.

~T.J.
 
Last edited:
needs knuckle gussets and upper truss its gonna bend
It needs a lot more than that :fawkdancesmiley:

Actually, some more stuff is in the works, which is why I said it was complete "for now". Im only going to run the knuckle gussets, as the consensus on Pirate that I last read seems to be that the upper truss is pretty much worthless, and more housings get bent installing them (from improper welding technique) than from not having them. Besides, I think they look dumb.

I also plan to do the entire front suspension soon, because as you can see, the leafs on there are lame. They're only 4 leaf packs, thick as hell, stiff as hell, etc. I'm gonna be adding a drop hanger, new springs, shackles, and shocks soon hopefully. When I do that, I will be adding the knuckle ball gussets since they will also be the lower shock mounts. I just didn't cut off the old ones since I thought I was going to be reinstalling my old shocks, until I realized they were garbage.

~T.J.
 
Top