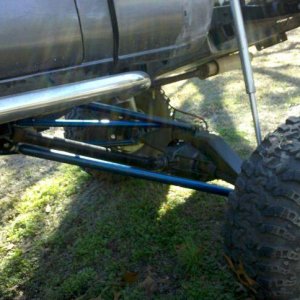
learn from my mistake.the pic of the motor mount in relation to the header,make the bushings solid out of aluminum.mine in the jeep is xactly that way and they melted with in a month of wheeling and driving.!
Thanks for the tip. My old mounts were similar, but never really had an issue...but they werent that close either. I am also thinking about a heat shield right there.
Thought I had the front shocks ready to burnt in where they are now, but after some figuring, looks like I can push the front axle out an inch or two.
Frame side mounts for the front links are in place.
Worked in the shop pretty last night and was able to get the rear ORI mounts figured out and weld washers welded on. I decided to call it quits after that....I will definitely get more done tomorrow. should be a roller soon!
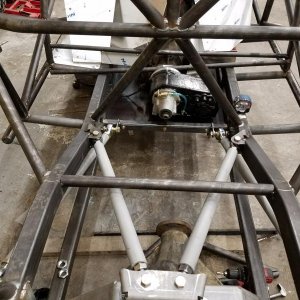
Carrier bearing for the front driveshaft showed up. Badass unit from M&M Fab. The yokes are 1410 and are actually machined to sit a little closer for a smaller setup.
Floor frame work going together and the driver side seat mount done. The floor frame will be removable to pull the trans/tcases
frame support, it is 1.5" tube that is slid into the 1.75 up to the first bend. should be pretty strong!
Seat belt bar
Going to have a little time this weekend to work on it. Still waiting on my links to show up, talked to the builder said they would be shipping tomorrow or monday, since he was picking them up from the heat treater yesterday.
YES SIR! Heading up there in a little while to work tonight...had to go into work for a while today. Going to finish up the passenger seat mount and continue the front section of the floor, not 100% sure how yet.
got the front part of the floor framed out. I am sure this is all over kill, but will make removal pretty simple.
Got some new parts in from the brown Santa a few days early....new cam, line lock to get rid of the cutting brake handles, high amp battery cutoff, starter button, and a formed Y pipe piece.
cam specs. I didnt want something too extreme and wanted more than my LS6 cam, this was recommended by a pretty well know builder out west for a crawler type build. coupled with a new converter, it should work well for what I will be doing.
got a new notcher in the shop and was able to put it work the first night. shock hoop to cowl bar and shock hoop to frame rail. I am not sure I am going to keep the one to the cowl bar in its location. After seeing it in the pics, it looks out of place and I THINK it might work going to where the windshield tubes tie in. The only thing keeping from going there is being able to get the motor out ...I will be looking into it once I get back into town and back on track. I know it will be stronger if they all connect and the looks I am not to worried about, since it will be covered with a skin anyway.
finally able to get back on it after a couple of weeks off for the holidays.
started mocking up the brake pedal and steering column assembly and finally came up with what I find comfortable.....have I ever said having the Torchmate is invaluable???
As you can see, the bracing I had from the shock hoop to the dash bar is gone....ya, it ended up being in the way of the master cylinders, so it is gone. I have some ideas for it and looks like it will be able to meet up at the windshield node, but will end up mounting a little higher on the shock hoop. If that works like I think it will, it will give me a spot to build a tray around the orbital/MC's. Oh and the orbital will actually be turned so the fittings are on their side
Maddy approves of the new triple sticks from JB Fab.
New beef!!
The other 2 links will be here in a couple of days...along with the new Winter's shifter.
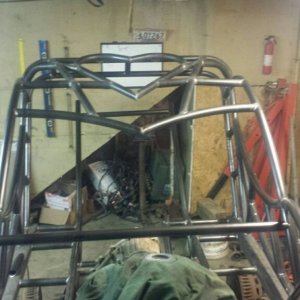
Here she is.....full roller finally! A few specs...about 10" belly and about 71" to the roof at full bump, 115" WB. The measurements will change slightly once the skid material is added and the tires are at trail pressure.. but these are close. Of course ride height will be about 8" higher. The roof could have been a few inches lower, but I wanted plenty of head room, with a helmet and of course I am taller than most!
Nice build thread. I just ordered a set of plans for the same chassis. I just needed a "starting point" since I will need to make it a bit more durable. ( large tubing, dimension changes for the big block etc.. etc.. ) I have been looking at tons of build threads and yours gave me the idea to work off of those plans. Thanks for the info.