You are using an out of date browser. It may not display this or other websites correctly.
You should upgrade or use an alternative browser.
You should upgrade or use an alternative browser.
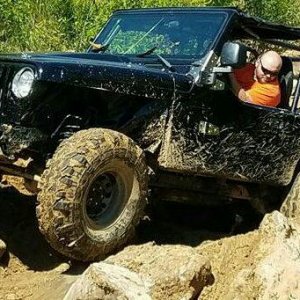
"The mistress"
- Thread starter rockmike
- Start date
mike why did you mount your bushings wrong? I would think that the bottom bushing will wear really fast that way. Its looking cool though!!
On the tranny mount?
Why don't you v notch the top of the rails, bend them up, weld em and plate em?
Agreed,I was giving it the oh **** what do I do now stare last night.Thats pretty much what I was thinkin also.
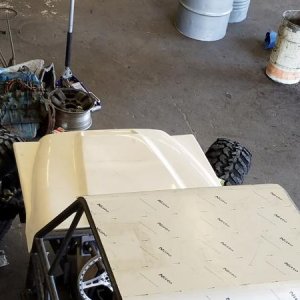
But I think im going to come back and hack it off just in front of the motor mounts and extend the frame and not angle it down but keep it level from that point.That should give me another 2" of up travel.Cause I need to extend the frame some anyway.I want to have the radiator in the front,and Ill extend the hood as much as I need to give me the room.
So bud, what tranny do you think I have there,do you need another pic?
Sounds like a good plan on the rails.
That's definately a Toyo koygo trans. The easy ways to tell are the two plates on the drivers side, and the location of the shifter.
Cool thanks,I wasnt sure what to call it,But I new it was right there close to 4:1:awesomework:
So far its held up real well,Ive should it no mercy.:redneck:
Except for the shifter the housing is broke on it.You know anyone thats got a shifter?Ive looked at the local junk yards.This toyo koygo has a differant base bolt pattern than the similiar trannys Ive found.
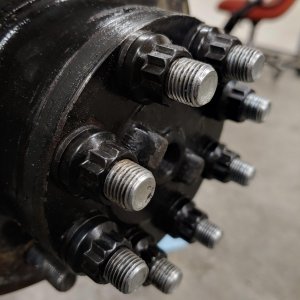
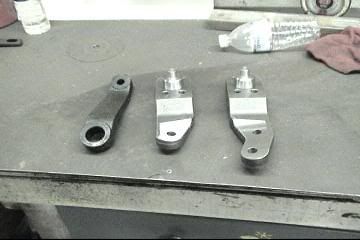
Got the carrier all ready for mounting now.I wanted to have toy flange on the front side and zook flange on the t-case side.
So guess what I did some more machining:cheer:
I hacked off the driveline tube and machined down a shoulder on the piece.
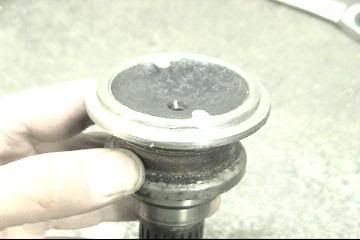
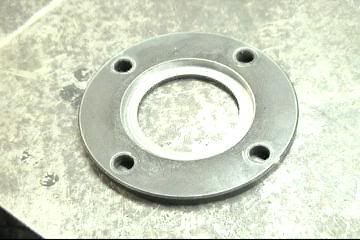
Then I took a zook front output flange.
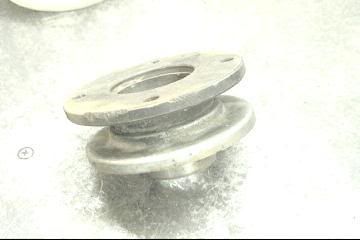
And did this to it :redneck:
now Ive got this carrier all done.
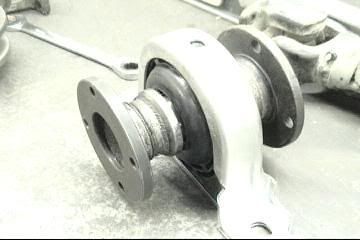
Next Ill have to come up with a front cross member,get this carrier mounted and well be moving on to front suspension.
So guess what I did some more machining:cheer:
I hacked off the driveline tube and machined down a shoulder on the piece.
Then I took a zook front output flange.
And did this to it :redneck:
now Ive got this carrier all done.
Next Ill have to come up with a front cross member,get this carrier mounted and well be moving on to front suspension.
metal fusion ****!!!
Got some welding done,Everything was going great having some fun on my day off working on the zuke.....then carnage!.
but first the ****!!
Flipped the frame so I dont have to weld upside down:awesomework:
needed to do some gringing then carnage.I chowdered the worm drive in my ONLY grinder.:booo:


You would think a Makita would last more than 1 year!!
:booo:
Well cant do much now so I guess Ill go grab a :beer: and watch the super:rb: super bowl
Got some welding done,Everything was going great having some fun on my day off working on the zuke.....then carnage!.
but first the ****!!
Flipped the frame so I dont have to weld upside down:awesomework:
needed to do some gringing then
carnage.I chowdered the worm drive in my ONLY grinder.:booo:
You would think a Makita would last more than 1 year!!
:booo:
Well cant do much now so I guess Ill go grab a :beer: and watch the super:rb: super bowl
LIKES2CRAWL
Active Member
- Joined
- Aug 1, 2006
- Messages
- 41
Looking good Mike, project is coming along nicely.
finally got back to this
Got some more work donr on the frame today.Kinds sucks I had to take a step backwards to move forward but I guess thats what happens when youre flying by the seat of youre pants.Meaning Ive never taken on Project of this size with this much fabrication involved.
It would be safe to say im in over my head on this,but I enjoy a good challenge.
I fixed my grinder and then went ahead and destroyed it again
I saw harbor freight had there grinders on sale for $9.99 so I bought 2 of those thinkin I would use one intill it got hot then switch while the other one cools off.Seemed like good logic:looser:NOT.I lit both of those fawkers on fire the first night.
The next morning (today) I desided I was going to have to pony up the coin and get me a badass grinder cause Ive got an ass load of skinny wheelin and grinding to do.This is what I got.

13 amp 7" Ridgid grinder it comes with a lifetime garantee :awesomework:if i let the magic smoke out of this one I can send it to yakima and have it repaird free of charge :cheer: its kinda heavy and my arms are tired after a full day of cutting and grinding.But it held up great today,better than I
Got some more work donr on the frame today.Kinds sucks I had to take a step backwards to move forward but I guess thats what happens when youre flying by the seat of youre pants.Meaning Ive never taken on Project of this size with this much fabrication involved.
It would be safe to say im in over my head on this,but I enjoy a good challenge.
I fixed my grinder and then went ahead and destroyed it again
I saw harbor freight had there grinders on sale for $9.99 so I bought 2 of those thinkin I would use one intill it got hot then switch while the other one cools off.Seemed like good logic:looser:NOT.I lit both of those fawkers on fire the first night.
The next morning (today) I desided I was going to have to pony up the coin and get me a badass grinder cause Ive got an ass load of skinny wheelin and grinding to do.This is what I got.
13 amp 7" Ridgid grinder it comes with a lifetime garantee :awesomework:if i let the magic smoke out of this one I can send it to yakima and have it repaird free of charge :cheer: its kinda heavy and my arms are tired after a full day of cutting and grinding.But it held up great today,better than I
on to the good stuff
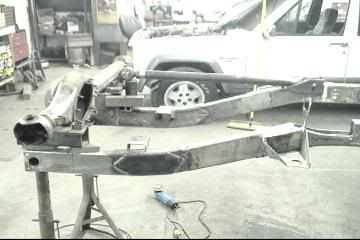
After some more mockup and measuring.I decided I would take fordzuki's advice and just cut and bend the frame to get more uptravel clearance,Thanks man:awesomework:comments and suggestion are very welcome.After all thats why Im doing this thread to get some help from others that have been here and done this.:beer:
So with new grinder in hand i hacked into the zuke frame.
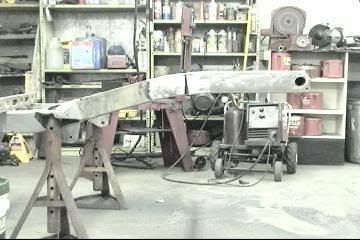
I went ahead and ground the frame smooth both sides (diggin that 7" wheel for that)
.
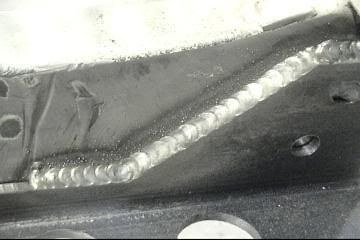
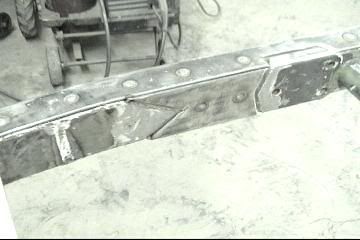
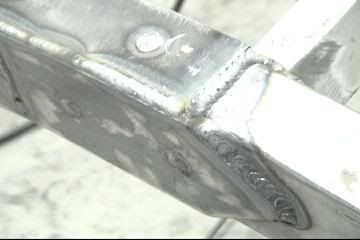
on the pass. side I plated the frame with 3/16" steel on the outside of the frame.The inside was allready plated with 1/4" for reinforcement for the motor mounts.So I just cut a wedge shaped piece to fill that back in somthing like this.
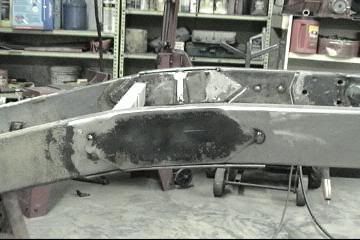

The bottom I plated with 2''x 1/4" to strengthin it.
The drivers side I went off on cause thats where the steering box is going to be mounted.Ive seen to many rigs in the woods with cracked and eavan broken in half frames at the steering box,I dont want be that poor bastard.
So on the outside,top,bottom of the frame from behind the motor mount all the way to the end of the frame.I layed in 1/4" steel,basically boxed over the stock frame.
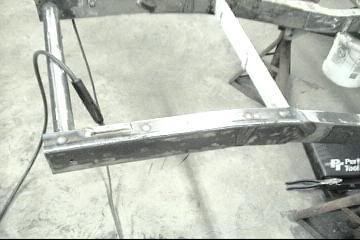
on the inside I made a piece that fits inbetween the motor mount reinforcement I did earlier and the stock steering box reinforcement.
Got some of the welding done much more to do.I think my liner on my wipp is pissed I struggled to get good welds.So I decided to stop untill I can get a new liner.
Had great day of building in the shop today,finally.:awesomework:
After some more mockup and measuring.I decided I would take fordzuki's advice and just cut and bend the frame to get more uptravel clearance,Thanks man:awesomework:comments and suggestion are very welcome.After all thats why Im doing this thread to get some help from others that have been here and done this.:beer:
So with new grinder in hand i hacked into the zuke frame.
I went ahead and ground the frame smooth both sides (diggin that 7" wheel for that)
.
on the pass. side I plated the frame with 3/16" steel on the outside of the frame.The inside was allready plated with 1/4" for reinforcement for the motor mounts.So I just cut a wedge shaped piece to fill that back in somthing like this.
The bottom I plated with 2''x 1/4" to strengthin it.
The drivers side I went off on cause thats where the steering box is going to be mounted.Ive seen to many rigs in the woods with cracked and eavan broken in half frames at the steering box,I dont want be that poor bastard.
So on the outside,top,bottom of the frame from behind the motor mount all the way to the end of the frame.I layed in 1/4" steel,basically boxed over the stock frame.
on the inside I made a piece that fits inbetween the motor mount reinforcement I did earlier and the stock steering box reinforcement.
Got some of the welding done much more to do.I think my liner on my wipp is pissed I struggled to get good welds.So I decided to stop untill I can get a new liner.
Had great day of building in the shop today,finally.:awesomework:
Last edited:
ToyZuki
Well-Known Member
Lookin good man. Cant wait to see it in action.
joeyf
Well-Known Member
frame is looking good:awesomework:
LIKES2CRAWL
Active Member
- Joined
- Aug 1, 2006
- Messages
- 41
*updates?*:fawkdancesmiley:
updates
ok then,I got my high steer kit in.Now I can start mocking up the steering box to see where im going to have issues on thatI fore see pan hard frame mount issues.
I got everything sitting in there ,axles rolled under it at 108 wheelbase.Just trying to think things out.Looking for problems before hand.
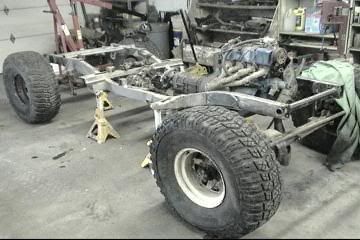
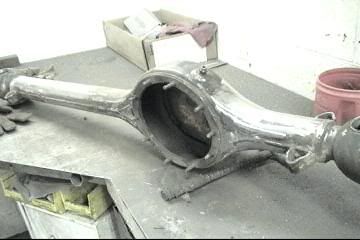
I was planning on runnin the trailgear rock assualt front housing (thats not released yet) But when I look at it closer Ive got issues with that also.
The trail gear housing is 3" wider on the short side so when its centered in there the diff is 1.5" toward the middle.This is going to hose me for up travel,unless I raise the motor some or go with a taller ride heighth.So Ill truss up a differant(straight housing I have) and use it and just run spacers on the front.
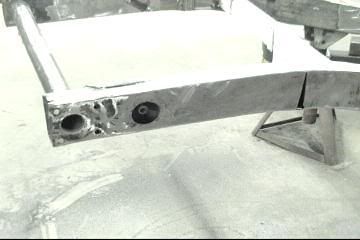
Last night I did the ****y job of removing all the stock bracketmnow Ive got a clean ready to work on housing.It will get knuckel reinforcement kit and truss's top and bottom.
Im heading to the metal store in the morning to get link material and mount building material and full tank of stargon.Hoping for a productive day this sunday.I took sat off and im takin a much needed wheelin trip in my sj410.Then Ill work on this beast sunday.:awesomework:
ok then,I got my high steer kit in.Now I can start mocking up the steering box to see where im going to have issues on that
I fore see pan hard frame mount issues.
I got everything sitting in there ,axles rolled under it at 108 wheelbase.Just trying to think things out.Looking for problems before hand.
I was planning on runnin the trailgear rock assualt front housing (thats not released yet) But when I look at it closer Ive got issues with that also.
The trail gear housing is 3" wider on the short side so when its centered in there the diff is 1.5" toward the middle.This is going to hose me for up travel,unless I raise the motor some or go with a taller ride heighth.So Ill truss up a differant(straight housing I have) and use it and just run spacers on the front.
Last night I did the ****y job of removing all the stock bracketmnow Ive got a clean ready to work on housing.It will get knuckel reinforcement kit and truss's top and bottom.
Im heading to the metal store in the morning to get link material and mount building material and full tank of stargon.Hoping for a productive day this sunday.I took sat off and im takin a much needed wheelin trip in my sj410.Then Ill work on this beast sunday.:awesomework:
LIKES2CRAWL
Active Member
- Joined
- Aug 1, 2006
- Messages
- 41
ok then,I got my high steer kit in.Now I can start mocking up the steering box to see where im going to have issues on that
I got everything sitting in there ,axles rolled under it at 108 wheelbase.Just trying to think things out.Looking for problems before hand.
I was planning on runnin the trailgear rock assualt front housing (thats not released yet) But when I look at it closer Ive got issues with that also.
The trail gear housing is 3" wider on the short side so when its centered in there the diff is 1.5" toward the middle.This is going to hose me for up travel,unless I raise the motor some or go with a taller ride heighth.So Ill truss up a differant(straight housing I have) and use it and just run spacers on the front.
Last night I did the ****y job of removing all the stock bracketmnow Ive got a clean ready to work on housing.It will get knuckel reinforcement kit and truss's top and bottom.
Im heading to the metal store in the morning to get link material and mount building material and full tank of stargon.Hoping for a productive day this sunday.I took sat off and im takin a much needed wheelin trip in my sj410.Then Ill work on this beast sunday.:awesomework:
Looking good Mike, but you should put my 38's on them axles and roll them under there...:redneck:
orangecrush1
Well-Known Member
Hay mike i can see clearly the problem from hear you not thrown enough money at it. I have a money throwing machine if you want to barrow it. It will need to be refilled first:fawkdanchttp://www.nw-wheelers.com/forum/images/smilies/fawkdancesmiley.gifesmiley::fawkdancesmiley:.
Hay mike i can see clearly the problem from hear you not thrown enough money at it. I have a money throwing machine if you want to barrow it. It will need to be refilled first:fawkdanchttp://www.nw-wheelers.com/forum/images/smilies/fawkdancesmiley.gifesmiley::fawkdancesmiley:.
:haha:youre a funny guy bud.I would have to agree.The kids moving back and the IRS have been wallet Vampires.:eeek:I need to go knock off a 7 -ellevan or get a real job that pays more:looser:
wheres the instructions lol
After much head scratching,apropriat amount time standing there of staring at it.I came up with a plan.
My issue is I want a perfectly flat belly skid plate.But I want to use my trail creeper flex joints on both ends of the links.These link ends are huge if I mount them on the bottom of the frame they will hang down around 3 1/2" from the bottom of the frame uke:If I mount them on the inside of the frame it takes up much needed room on the pass.side for the exhaust and 2 -piece front driveline.
So I busted out the skinny wheel and went to hacking:cheer:
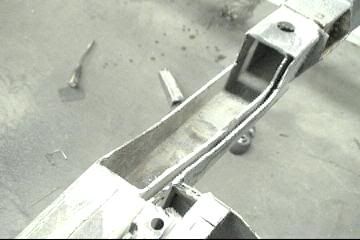
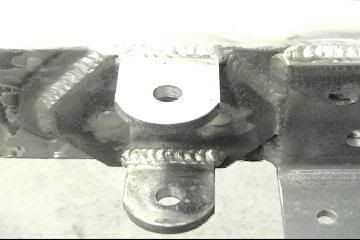
Got me some double wall action in there,this is good Ill take advantage of that and mill some grooves in the bottom of my link mount and weld into that and the outside.
Heres the link mount I made with a 1/4" plate to reinforce that area.Ill build some more to put on the inside of the frame also.

After much head scratching,apropriat amount time standing there of staring at it.I came up with a plan.
My issue is I want a perfectly flat belly skid plate.But I want to use my trail creeper flex joints on both ends of the links.These link ends are huge if I mount them on the bottom of the frame they will hang down around 3 1/2" from the bottom of the frame
uke:If I mount them on the inside of the frame it takes up much needed room on the pass.side for the exhaust and 2 -piece front driveline.So I busted out the skinny wheel and went to hacking:cheer:
Got me some double wall action in there,this is good Ill take advantage of that and mill some grooves in the bottom of my link mount and weld into that and the outside.
Heres the link mount I made with a 1/4" plate to reinforce that area.Ill build some more to put on the inside of the frame also.
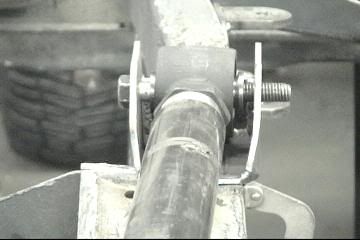
I mocked up the axle at what im thinkin will be about 1/2" or better past full stuff.Ill make enough clearance at this heigth to insure the links wont hit the frame at full real world stuff:awesomework:through the frame up nice and tall and upside down to make it easier to work on,cause im old and creaky.:redneck:
That fawkin pos xj back there belongs to a buddy of mine that Ive been helping get it fixed,been a real time vampire.
I used some pretty big material on these link mounts 3 1/2" x1/4"wall square stock.This is because I want to put some machine washers in the to make sure the link ends dont hit anything under full atriculation.
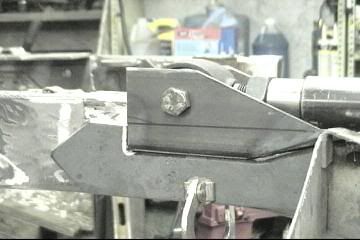
The skid crossmember will butt in right behing this mount,will be about an 1/8" above the link mount so Ill have a smoth trasition from link to skid.:awesomework:
That fawkin pos xj back there belongs to a buddy of mine that Ive been helping get it fixed,been a real time vampire.
I used some pretty big material on these link mounts 3 1/2" x1/4"wall square stock.This is because I want to put some machine washers in the to make sure the link ends dont hit anything under full atriculation.
The skid crossmember will butt in right behing this mount,will be about an 1/8" above the link mount so Ill have a smoth trasition from link to skid.:awesomework: