• Help Support Hardline Crawlers :

Time to play with the big kids.

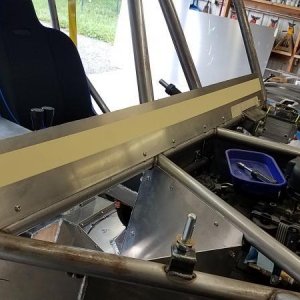
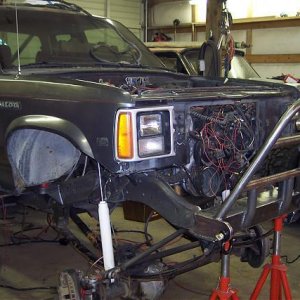
more crappy cell phone shots. :(

my cell phone doesn't like the shop lighting.

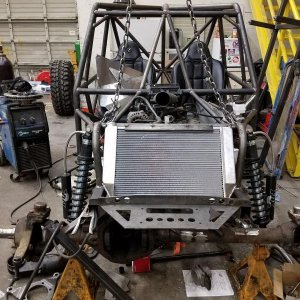
A few pics of the rear diff link/truss welded up. I've got more done than this but I'll wait till I can get some good photo's before I post it up.
 

Attachments

  • Photo0119.jpg
    Photo0119.jpg
    28.6 KB · Views: 454
  • Photo0120.jpg
    Photo0120.jpg
    27.5 KB · Views: 454
  • Photo0121.jpg
    Photo0121.jpg
    30.6 KB · Views: 452
daym those rotors look sik:cool: that being said you got way to much time on your hands:fawkdancesmiley:

on a more serious note this is one sweat fawkin rig:masturbanana[1]:
 
daym those rotors look sik:cool: that being said you got way to much time on your hands:fawkdancesmiley:

on a more serious note this is one sweat fawkin rig:masturbanana[1]:


Time? I just wrote a quick program and went and did something else
:fawkdancesmiley:
 
Time? I just wrote a quick program and went and did something else
:fawkdancesmiley:

sorry for my ignorance, i had no idea you could control a mill with comp programing :rolleyes: i was thinkin man the location of all thoses holes is spot on:haha: i will go crawl back in my hole now:haha:
 
sorry for my ignorance, i had no idea you could control a mill with comp programing :rolleyes: i was thinkin man the location of all thoses holes is spot on:haha: i will go crawl back in my hole now:haha:

You make a program(a correct program!) load it into the machine, Test for accuracy and then let it work while yer doing whatever.
 
You make a program(a correct program!) load it into the machine, Test for accuracy and then let it work while yer doing whatever.

sometimes I'm feeling SASSY and ommit the test part.......LET'ER EAT:redneck::011::011:
 
So I've been slacking on pics...

Been working on some of the time consuming stuff and getting parts machined.

Driver's side header all tacked up, I tried to keep everything tucked in tight, away from the steering pump and keeping as much pedal room as possible. Also tried to keep easy access to the header bolts and spark plugs.
 

Attachments

  • DSCN3111.jpg
    DSCN3111.jpg
    39.8 KB · Views: 351
  • DSCN3112.jpg
    DSCN3112.jpg
    40.2 KB · Views: 711
  • DSCN3113.jpg
    DSCN3113.jpg
    37.5 KB · Views: 361
My friend Colin planned out and tacked up the passenger side, he had a little more fun over there. :awesomework:
 

Attachments

  • DSCN3116.jpg
    DSCN3116.jpg
    45.8 KB · Views: 361
  • DSCN3114.jpg
    DSCN3114.jpg
    30.2 KB · Views: 344
  • DSCN3115.jpg
    DSCN3115.jpg
    40.3 KB · Views: 699
  • DSCN3117.jpg
    DSCN3117.jpg
    41.2 KB · Views: 346
  • DSCN3118.jpg
    DSCN3118.jpg
    33.6 KB · Views: 348
And since the headers were tacked, ready to be welded and the Aluminum for the interior and roof panels showed up, Taran from BCC was kind enough to hook me up with a Tig welder to use.

Been a good 10 years since I used one (on steel, never used one on aluminum), and even then it was for just a very short period of time, so I was definitely a bit rusty. Went and got a quick aluminum tig welding lesson from a buddy today and got things under control for aluminum welding.

Colin and I made some "Art" Saturday night... got enough practice in I decided to tig up my front 2 piece driveshaft steady bearing mount today. Turned out "ok". Still needs a couple small gussets welded in.

I like tig welding, now I'm going to have to buy myself one :eeek:
 

Attachments

  • DSCN3122.jpg
    DSCN3122.jpg
    31.3 KB · Views: 366
  • DSCN3121.jpg
    DSCN3121.jpg
    37.5 KB · Views: 344
  • DSCN3120.jpg
    DSCN3120.jpg
    36 KB · Views: 345
  • DSCN3119.jpg
    DSCN3119.jpg
    38.1 KB · Views: 343
Thank you. I see so many guys build buggys here and take them to the exhaust shop when done to get a hacked on exaust system installed.:booo:

If you can build a cage, why not exhaust? You sir have done it!:cheer:

Those headers look great. Nice job.:awesomework:
 
Is this one of those crazy gate piece's for one of your clients?:redneck:
 

Attachments

  • gate.jpg
    gate.jpg
    31.3 KB · Views: 513
Thank you. I see so many guys build buggys here and take them to the exhaust shop when done to get a hacked on exaust system installed.:booo:

If you can build a cage, why not exhaust? You sir have done it!:cheer:

Those headers look great. Nice job.:awesomework:

Thanks, it took a lot longer than I thought it would to get them all tacked up.
The companies selling the Ubends and stuff sure make a lot of $ selling them...by the time the exhaust is done I'll probably have $4-500 into material (including a magnaflow muffler).
 
Still doing small time consuming stuff that doesn't photograph well. Machined up my brake parts and driveline stuff (still need to put it in), got the crossover tube tacked up, headers are now connected to each other :awesomework:

Interior is slowly coming along. Still learning about this aluminum tig welding stuff.

Found a home for the power steering res, not sure if it'll stay there, a bit closer to the header than I wanted it but, it will be separated from the header by the firewall and I may add a heat shield on the inside.
 

Attachments

  • A.jpg
    A.jpg
    40.2 KB · Views: 438
  • B.jpg
    B.jpg
    33.2 KB · Views: 434
  • C.jpg
    C.jpg
    33.7 KB · Views: 437
  • D.jpg
    D.jpg
    27.5 KB · Views: 435
  • E.jpg
    E.jpg
    35.2 KB · Views: 436
Last edited:
Got a bit farther on the firewall, still need to trim the top and finish off the bottom but it gives me some pretty good visibilty.

Machined my upper links on the weekend at a buddies house so I decided it was a good time to get the truck off the jig table.

The Boss approving and showing me how its down.
 

Attachments

  • mm.jpg
    mm.jpg
    26.3 KB · Views: 278
  • ll.jpg
    ll.jpg
    37.3 KB · Views: 273
  • cc.jpg
    cc.jpg
    34.1 KB · Views: 272
  • bb.jpg
    bb.jpg
    31.9 KB · Views: 273
Since I had my helper out there and it was off the jig table, we decided to assemble some beadlocks and mounted the tires.

We set it at ride hide and rolled a couple tires over. Should look pretty good when she is finished up :awesomework:
 

Attachments

  • DSCN3153.jpg
    DSCN3153.jpg
    45.5 KB · Views: 289
  • gg.jpg
    gg.jpg
    46.6 KB · Views: 273
  • nn.jpg
    nn.jpg
    47 KB · Views: 273
  • jj.jpg
    jj.jpg
    22.8 KB · Views: 271
  • ii.jpg
    ii.jpg
    21.6 KB · Views: 278
Top