• Help Support Hardline Crawlers :

Finally....Da new rig..

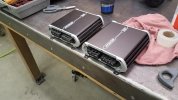
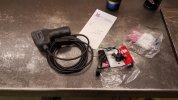
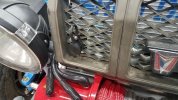
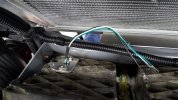
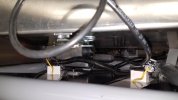
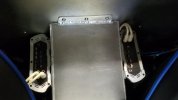
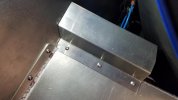
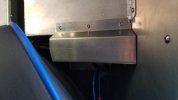
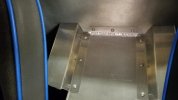
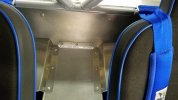
So something I found also on my first run was the sub amp kept shutting down and also seemed to get too hot (not in a restricted space). It was a reman unit from amazon so I went ahead and got the same series but it was a mono specific amp. Took a lil work and the hardest part was pulling the passenger body panel since thats the only way to get to the passenger inner rear sat mount bolt. I had no issues with on my second run...
 

Attachments

  • 20171021_173121.jpg
    20171021_173121.jpg
    74.4 KB · Views: 256
  • 20171021_084923.jpg
    20171021_084923.jpg
    67.1 KB · Views: 259
  • 20171021_091827.jpg
    20171021_091827.jpg
    38.5 KB · Views: 259
  • 20171021_091833.jpg
    20171021_091833.jpg
    57.3 KB · Views: 259
So the last thing I needed to figure out was a damn cup holder. I originally started with making some metal holders but was not happy with how they would mount. I did a bunch of looking online and I found the "ram" system--They were mainly made for bikes and such but I found the parts that would work and ordered a few parts. The hardest part was finding a location that was not only accessible but also out of the way. It took a while to find the happy place for them--and I hope they work out...
 

Attachments

  • 20171021_184120.jpg
    20171021_184120.jpg
    49.6 KB · Views: 267
  • 20171021_184127.jpg
    20171021_184127.jpg
    56.3 KB · Views: 260
  • 20171021_184138.jpg
    20171021_184138.jpg
    62.1 KB · Views: 259
Holy zip ties batman, Good job on securing your lines. I should have bought stock In zip ties prior to your Awesome build. Looks Great Crash!
 
So one thing I really wish I had done during the build was a way to plug in a hand remote. I told myself "I will never need this"... well after some thought and not being able to re spool my rope by myself I came to the conclusion that was a dumb idea. I also like to go out solo and knew it could be very handy to be able to operate the winch's outside the rig. I had a couple buddies who said go wireless--I wanted to keep things as simple as possible..

So I ordered 2 new plugs (WARN 16296 Three Wire Socket Kit ).
 

Attachments

  • 20171109_180741.jpg
    20171109_180741.jpg
    74.3 KB · Views: 195
  • 20171109_180738.jpg
    20171109_180738.jpg
    69.4 KB · Views: 190
So I started with the front plug. I actually found a nice spot for it as the slats in the grill were the perfect size for the plug to go thru. I made a mount that sits on the back side and simply sandwiches against the grill and in a nice easy location.
 

Attachments

  • 20171109_201932.jpg
    20171109_201932.jpg
    80.7 KB · Views: 196
  • 20171109_201938.jpg
    20171109_201938.jpg
    79.7 KB · Views: 190
So the one thing that bummed me out about not doing it from the get go was having a dedicated fused circuit to the plug. So I pulled voltage from the relay power feed and protected it with a fuse able link. I got the plug fully wired and checked it out--that will be nice to have.
 

Attachments

  • 20171110_202153.jpg
    20171110_202153.jpg
    74.7 KB · Views: 200
  • 20171110_202159.jpg
    20171110_202159.jpg
    97.4 KB · Views: 201
So the rear was a lil more work. I pulled the back panel that holds the lamps/lic plate and removed the cover I had made for the solenoid pack.

I made a mount for the plug and tig welded it to the inside of the cover.
 

Attachments

  • 20171111_164419.jpg
    20171111_164419.jpg
    66.1 KB · Views: 187
  • 20171111_165320.jpg
    20171111_165320.jpg
    53.8 KB · Views: 197
There isn't allot of room with the rear panel in place but really isn't too bad plugging the remote in.
 

Attachments

  • 20171111_192816.jpg
    20171111_192816.jpg
    40 KB · Views: 187
So every year we do our annual hangover/snow run. Well I wanted to try and see what I could so about doing a windshield. So since it was kind of an experiment I went down to the hardware store and got as piece of that cheap plexyglass. So after a bunch of templates I came up with a pretty slick setup with a lower lip that kinda wedges the bottom of the windshield against the backbone panel(panel the dash butts up to). And a few zip ties its pretty secure. Now with this cheap stuff I can't town down the road or it will go boom.

So my little girl came with me on the run and it worked awsome. And the rig did perfect...
 

Attachments

  • 20171231_165538.jpg
    20171231_165538.jpg
    65.1 KB · Views: 184
  • 20171231_165545.jpg
    20171231_165545.jpg
    48.1 KB · Views: 180
  • 20171231_165552.jpg
    20171231_165552.jpg
    41.7 KB · Views: 171
  • 20180101_091058.jpg
    20180101_091058.jpg
    73.1 KB · Views: 175
  • 20180101_094425.jpg
    20180101_094425.jpg
    94.3 KB · Views: 172
Few pics out at reiter having fun...
 

Attachments

  • 20180428_155439.jpg
    20180428_155439.jpg
    103.7 KB · Views: 176
  • 20180428_155405.jpg
    20180428_155405.jpg
    116 KB · Views: 172
  • 20180428_121528.jpg
    20180428_121528.jpg
    102.2 KB · Views: 178
  • 20180324_130728.jpg
    20180324_130728.jpg
    107.9 KB · Views: 169
  • 20180324_104446.jpg
    20180324_104446.jpg
    110 KB · Views: 183
So I really contemplated when I built the rig on making covers over the amps since the buttons/knobs will be facing upward and get water/dirt in them. I found nothing really happened out on the trail but towing water was getting on the amps.
 

Attachments

  • 20180401_100231.jpg
    20180401_100231.jpg
    29.1 KB · Views: 169
So started playing with some aluminum and my sheet metal brake. Here is what I came up with and once I built one I was able to make a mirror image of it for the other amp.
 

Attachments

  • 20180430_173215.jpg
    20180430_173215.jpg
    43.1 KB · Views: 179
And they screw right to the speaker box and I added foam to the inside of the covers on the outer edge and the foam sis against the amp so they don't make any noise. I also got some 90 degree rca adapters so they fit under the covers. First trip out and didn't even notice them.
 

Attachments

  • 20180430_173621.jpg
    20180430_173621.jpg
    34.5 KB · Views: 174
  • 20180430_173630.jpg
    20180430_173630.jpg
    25.6 KB · Views: 167
  • 20180430_203053.jpg
    20180430_203053.jpg
    31.3 KB · Views: 180
  • 20180430_203056.jpg
    20180430_203056.jpg
    48.4 KB · Views: 172
<iframe width="560" height="315" src="" frameborder="0" allow="accelerometer; autoplay; clipboard-write; encrypted-media; gyroscope; picture-in-picture" allowfullscreen></iframe>
 
Top