• Help Support Hardline Crawlers :

85 superbobbed 4runner(aka BURNING BENJAMINS)

Chris S

Well-Known Member
Joined
Jan 8, 2013
Messages
185
Location
Hillsboro TN. 37342
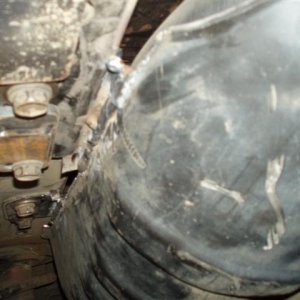
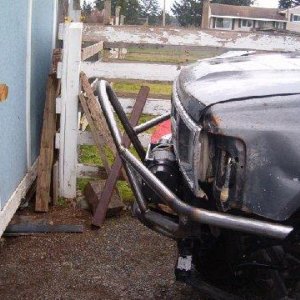
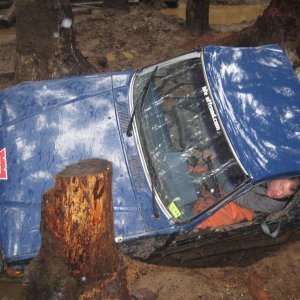
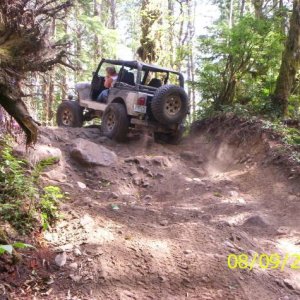
So after having a couple of leaf sprung 4 runners I deciced to try my hand at a linked one. The two I had prior were really to straight to wheel but I did anyway thinking I could just be careful and all would be fine as far as the body goes. As anyone knows who wheels in the southeast over mud covered rocks which are surrounded by trees this is an impossible task that I shortly found out for myself! I know most that have fun in this hobby think sheet metal is over rated and as much as I agree I just can't help myself from polishing turds. My body damage would come from the rear wheels back and was always from sliding into trees so I decided my next build would be minus that section of sheet metal and replaced with tubing. After searching the Internet for bobbed 4runners I found a couple of pics of a really well done one on pirate that gave me inspiration to attempt this!

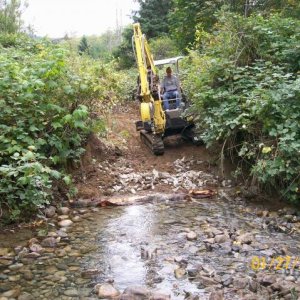
Originally I bought a guys toyota stock pile of parts and his 4 runner 3 years ago which was my first build. I wound up with enough parts to build another truck not counting the truck I bought from him. 1 month after buying this stuff I found another 85 4Runner minus ALL the running gear and drive train for literally scrap price so I hustled 60 miles down the road with a set of axles to bolt under it and winched it on the trailer. It set in the fence row for the next 2 years awaiting my spare parts I scored in my first build. My thought process was to build it on the cheap and sell it to soften the blow of the money's spent on the originally build! As with everything in life things change as did my opinion on what I really wanted in a trail rig so that brings me to this build.

I actually started this last May and have made decent progress to this point which I will bring up to speed over the next couple of weeks. Anyway my build will consist of this parts list:
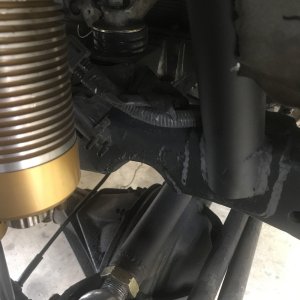
3.4 v6 from tacoma,r150 5 speed transmission from same tacoma, duel gear driven cases upgraded to 23 spline inputs with rcv 300m output shafts
I bought a set of cucv axles so I will need to add a locker to the Dana 60(staying with the 4:56 gears)
4 linked rear
3 linked front
Stretched front and rear to a target wheelbase of 120"(it is a 4 seater)
Bobbed, and exo caged
Ori struts on the corners
And 40-43" stickies of some flavor

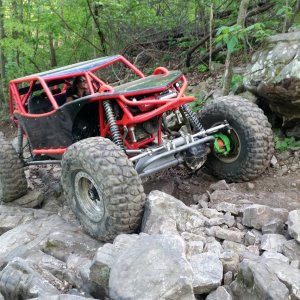
My first build which I sold in December of 13
 

Attachments

  • image.jpg
    image.jpg
    72.5 KB · Views: 1,221
This is the one I found on pirate that I thought was so well done! It is indeed a form of what I hope to end up with ,with exception of being linked on both ends and setting on 1 ton axles. STILL A 4 SEATER!
 

Attachments

  • image.jpg
    image.jpg
    398.5 KB · Views: 177
Last February I found my donor truck on Craigslist that I will be using the engine and transmission out of. This thing lost a fight with a rather large oak tree but it actually did still pull on and off the trailer under its on power!
 

Attachments

  • image.jpg
    image.jpg
    94.1 KB · Views: 1,140
So as stated above I actually started this engine swap last May. I set a goal of having it running by July 1st which I missed by 3 days.i had done countless hours of reading and research on this particular swap but could really only find the 3.0v6 to 3.4 swaps. That swap is covered in depth by many and most of the best tech I found on it was on yotatech forums. If your intrested in doing this swap do yourself a favor and read there tech! ( especially " wiring theory by the Monch") his explanation was most helpful for me even though it was for the 3.0 to 3.4 swap. Most 22re to 3.4 swaps I found would just show the start and the finish which was cool in that it let me know it could be done but wasn't very helpful in letting me know what I should be expecting so for that reason I told myself that I would post up what I learned to potentially help anyone else who is considering this swap if I was actually successful in completing it.
The biggest difference I see in the swap vs the 3.0 swap is fitting the engine between the frame rails and then deciding where to weld your engine mounts in as the 3.0's will directly interchange with the 3.4's in every way except the wiring and battery/air filter location!This is not the case with the 22re's as the mounts are in the wrong spot and to narrow to except the 3.4 even if they were in the right spot! In my case (85' model) the frame width was 3 3/4" narrower than the 01 donor tacoma between the frame rails and it seems like a mile when trying to make everything fit.(BUT IT DOES FIT) with some altering :D
 
So here goes! I placed the engine in the bay to figure out its location. This proved to be quite difficult in that it was merely a headache ball swinging in the engine bay so after sleeping on it a night I devised a low tech plan of c clamping some steel to the top of the frame for the engine mounts to catch on so I could slide the engine fore or aft and left to right to determine where it needed to set.
 

Attachments

  • image.jpg
    image.jpg
    70.9 KB · Views: 1,106
As you can see the mounts are very close to the frame. I put an old radiator I had in it,bolted up the fan,brake booster,master cylinder and anything else I thought could hinder its location! I landed on about 1/2" of clearance between the firewall and crossover pipe! This is closer than I would like but it put a safe distance between the fan and radiator (about 1-1/4")so this is where I decided to place it. The distance between the fire wall and crossover pipe will improve later in that to stuff this engine in this bay you have to either put a body lift on or cut the hood to allow room for the plenum. I chose the body lift because my findings in my last 2 rigs is that it can be be hard enough to see over the hood without having a hood scoop projecting out the top of it!
 

Attachments

  • image.jpg
    image.jpg
    83.1 KB · Views: 132
  • image.jpg
    image.jpg
    75.6 KB · Views: 1,026
  • image.jpg
    image.jpg
    74.1 KB · Views: 149
As for moter mounts my serch led me to chillkat designs website where I found a healty looking set of well made mounts for both the engine side and frame side but I just couldn't pull the trigger on them for the $245 price. Not doubting there well made but I figuered I hat a set bolted to the engine already and a frame side set still in the tacoma that just needed to be cut off and cut/grinded to fit so this is the route I decided to go
 

Attachments

  • image.jpg
    image.jpg
    163.3 KB · Views: 168
I did some measuring on my frame side mounts and added a1/4" more to what I came up with and cut them off the tacoma. Rechecked that engine was still centered between the frame rails and where I wanted it front to back and started grinding them to fit between the engine mounts and frame. Monatanence work but necessary, finally got them to bolt up to the engine and fit nice and tight to the frame rails. At this point I tacked them in place and pulled the engine out to burn them in. I plated the bottom sides of frame mounts since I had cut a lot of the meat off them when shorten them from there original size. The only picture I have of them is a top view that shows one welded on but it does show the original center of the old mounts to the center of the new mounts which is 2 1/2" toward the firewall from the original location.
 

Attachments

  • image.jpg
    image.jpg
    73.7 KB · Views: 139
At this point I put the engine back in(with crossed fingers) hoping that the mounts had not moved when burning them into the frame! Low and behold it fell into place and fit and the engine mounting bolts fell freely through the holes as I hoped they would. Decided at this point to bolt the transmission up to check fitment of it( bell housing to firewall which should have been done prior to burning in the mounts) and it cleared fine but I did run into a little snafus as the engine was cocked slightly to the passenger side! I slept on this and asked a few opinions about it as to do nothing and let the rubber isolaters on the engine mounts absorb it or drill the mounting holes out a little or both, as I was not prepared to take 1 of the mounts back off to move it a 1/16"-1/8" to correct this problem! Call me lazy,half assed or whatever you may but I welded the hell out of those things so I decided that running a drill bit a couple of sizes over through all 4 bolt holes would do for me! Anyway knowing what I know now I would have bolted the transmission to the engine before deciding the engine was square in the bay by mearly measuring from fan blades to radiator face as I did!!
 

Attachments

  • image.jpg
    image.jpg
    76.3 KB · Views: 1,002
  • image.jpg
    image.jpg
    70.7 KB · Views: 978
Another note worthy point about this swap is exhaust manifold clearances. A few I read did a coustom crossover dumping on the drivers side but I chose to let mine dump as designed by toyota on the passenger side. As I understand it from other threads on this when doing the custom crossover you have the luxury of thigting the down pipe to the transmission since you are having to make it custom. This allows it to split the opening between the frame and trans which is just big enough to get the collector through! Most do this as there building a daily driver and have to get the exhaust on the drivers side anyways to clear the gas tank and also the 79-95 manual transmissions have the slave cylinder located on the passenger side which makes it even tighter to get it all packaged since its already tight and a driveshaft has to fit in that space as well! The Tacoma version of the r150 (the one I'm using)has the slave cylinder on the drivers side and since I will be building a custom fuel tank it made since to me to leave it as designed and just deal with the frame clearances! Here's some photos of clearance issues.
 

Attachments

  • image.jpg
    image.jpg
    79.6 KB · Views: 122
  • image.jpg
    image.jpg
    70.1 KB · Views: 130
I could almost get the bottom side of the collector on the studs but even by removing the studs there is clearance issues with the exhaust pipe and frame. I'm gonna plate the outside of the frame anyway to stiffen it so I remedied this problem by notching the inside of the frame a little to make room! I simply marked the location on the frame and removed the trans and engine to have space to work on it. Only have the finished product picture of it but it will give you a visual!
 

Attachments

  • image.jpg
    image.jpg
    71.2 KB · Views: 959
Hoping this would be the last time the engine would be out I throughly washed the engine bay and put several coats of paint on it. Also planned on pm the engine while out! Purchased an aisin timing belt kit from rock auto(big savings over toyota dealer prices for the exact same kit) which includes the belt,tensioner,idler bearing,water pump and gaskets. Also bought the normal tune up parts plugs,wires,thermostat and as you could see in the earlier post the engine was in need of a rear main seal as well as valve cover gaskets so what better time to do all of this while on the stand( minus the rear seal while on stand of course)
 

Attachments

  • image.jpg
    image.jpg
    97.8 KB · Views: 967
  • image.jpg
    image.jpg
    99.1 KB · Views: 135
I did check compression on this engine before removing it from the taco and it was well within factory specs. The truck had close to 190k on the odometer so I felt it was in dire need of some love! I also should note that most agree when doing this swap in a straight axle setup or doing a straight axle setup with this engine that you should source a 2wd t100(I think) oil pan and pick up tube to make it a rear sump as it is a mid to front sump in its current state. I looked locally for the used parts I speak of but got impatient and just ordered the kit from trail gear as I was ready to get on to the next phase of this engine swap,the ole so dreaded wiring side of it!
 
FWIW, I daily drove a supercharged 3.4 SAS Taco for a while. It had an auto and 4.88's on 37 and it would straight up GET and cruise comfortably at 80mph on the interstate no problem.

That being said, either find a used supercharger while the motor is out (i have seen some DEALS on them when I was into taco stuff, but have not looked in a while) or be sure to go with a deeper gear than a 4.88, like Adam said.

Edit- I also ran a T100 oil pan. Check your clearance very well. I still managed to hit mine with the top of the chunk once.

Edit2- I just went back and re-read your first post. Doesn't seem like you will be doing much street driving with stickies. After I quit DD'ing mine, I went with tons/4:10 gears/39.5 iroks. Even with a supercharger, I would have to be in double low (I had dual cases) ANYTIME I was off the pavement. Single low didn't have near enough power. Just some food for thought.
 

Latest posts

Top