• Help Support Hardline Crawlers :

85 superbobbed 4runner(aka BURNING BENJAMINS)

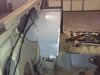
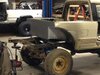
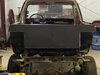
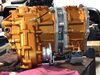
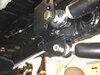
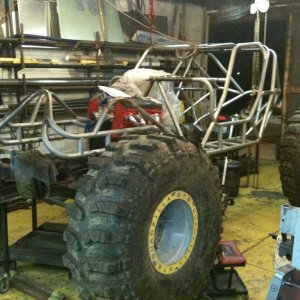
At this point I started putting skin to it using some 24ga. Metal roofing valley metal we had left off a job. If I were buying from scratch I would go thicker on my metal choice but I already had this so it will suffice.( best I remeber it measured within .030" of the factory toy sheet metal) I started in the wheel well with a piece notched 1/2" at my frame upright with 1/2" bent up to weld to frame. I made it plenty wide on the outside and tack welded it around then went back and trimmed to fit after I had it where I wanted.
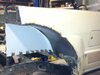
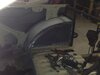
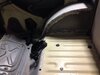
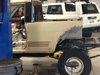
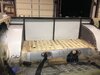
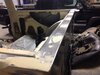
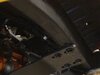
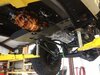
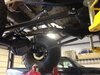
For the inner fender i cut a template of cardboard and transferred it to my sheet metal adding 1/2" to it to bend a 90 out of to attach it to the back side of my frame I built. Once fitment was confirmed I pulled it and drilled random holes in it where it meets the bed to make way for rosette welds since I don't own a spot welder. Now the extra 1/2" comes into play from my first piece. I simply put relieve cuts in it as needed and hammered and dollied it down to my vertical panel I just made. Satisfied with the looks I started welding everything into place. Here are some pics of the passenger side.
 

Attachments

  • image.jpg
    image.jpg
    90.7 KB · Views: 112
  • image.jpg
    image.jpg
    92.6 KB · Views: 107
  • image.jpg
    image.jpg
    80.4 KB · Views: 105
  • image.jpg
    image.jpg
    401.8 KB · Views: 149
The rear skin was by far the easiest. I actually went back and added a piece of angle iron to the inside upper frame to add material for supporting the lip/ seal I would be bending into my rear skin. I made this skin a 1/2" wider and taller than needed so I placed it on the truck,C clamped it in the center and simply traced the body lines. Then removed it ,cut the lines traced and drilled random holes in the center and along the top and bottom to accommodate rosette welds. A spot welder would be so nice for this but I couldn't justify buying one for 30-40 welds.
 

Attachments

  • image.jpg
    image.jpg
    64.7 KB · Views: 293
  • image.jpg
    image.jpg
    72.5 KB · Views: 307
  • image.jpg
    image.jpg
    98.1 KB · Views: 118
After all the welding was completed I went back with a flapper disk on my 4" grinder to smooth it up followed by body filler to work out the imperfections. On the inside instead of the body joint caulk( stuff is too high for my wallet) I used some clear gutter sealer we have been using at work and sealed all my new joints on the inside. We have found from experience of trying to remove end caps and corners on gutters that this particular sealer is tough as hell and stays pliable so at a third of the cost it was an obvious choice for this!
 
Before I started building this in this form I had been gathering parts as I had extra money to build it as a leaf sprung 4Runner. I had bought a 4:7-1 (21 spline)kit from trail gear. Once I decided on going to 1 ton axles and the 3.4 instead of the 22re I had I figured I would upgrade to 23 spline inputs. I called trail gear and they agreed to swap my input out for me since it was new(unused). I also ordered (from them) my Tacoma transmission to gear driven case adaptor,23 spline 2:28 input(for my front case)23 spline doubler adaptor,upgraded(stiffer) detention ball springs for the shift rails,1 bomb proof transfer case mount and there duel case crossmember. At the same time I placed an order from rcv for there chromoly output shaft. While waiting on my parts to get here I tore the cases down and spent several evenings cleaning the 30 years worth of Grease and grime from them. Got them assembled with the new parts a week later and painted them up to look newer!
 

Attachments

  • image.jpg
    image.jpg
    69.1 KB · Views: 265
  • image.jpg
    image.jpg
    89.2 KB · Views: 151
I had a good idea that my crossmember wouldn't hit the factory mount locations but I was shocked to find that once bolted up that it would miss on the side it did. My guess is this transmission is shorter than the w56 or the bell housing mating surface is moved forward compared to the 22re or both! Anyway I cut the inner(passenger) and outer(driver) factory crossmember brackets off with a sawzaw,bolted them to the new crossmember and tacked them in place, marked the new locations for the other bolts on the bottom of the frame and removed the crossmember. I cut small triangles out of the inner frame rails with a cutoff wheel to be able to put nuts inside the frame for the bolts. Welded the nuts in and put the pieces I cut out of the frame back in there place and welded them back in. I have 1 pic that shows the original rearmost hole in the bottom of the frame. If anyone needs a speedometer extension for a duel case toy setup I got one I didn't use!
 

Attachments

  • image.jpg
    image.jpg
    9.6 KB · Views: 630
I got all this work completed somewhere around September'ish of last year which put me in the heart of football season along with some riding on Saturdays. Then followed deer season so very little of my spare time was spent on this truck. My next item to work on when the time presented itself would be the 3 and 4 link setups! I read myself crazy on this at nights last fall only to feel dumber and more confused than I was before reading all the opinions posted on this topic! I finally come to the conclusion after reading the link for dummies or 101 or whatever the thread was labeled on here that on a full bodied rig geometry might just have to take a backseat so to speak to packaging. I decided I would just take the approach of keeping the links as level as possible with the uppers being 70% the length as the lowers and building in upper adjustments as I read.

Anyway I had signed up on Barnes4wd web site for email alerts on bargens and what not back in the fall when trying to decide on who's kit I would use. Sometime in December I received one advertising 20% off so I ordered there 7/8" 3 link kit,7/8" 4 link kit,14 bolt shave diff cover,Dana 60 cover,high steer arms and ARP studs for the high steer arms. I hated to spend the money durning the holidays but 20% savings allowed me to clear the high steer arms and the ARP studs so it was justified in my mind. I also bought local a stick of 2" x.250 wall and a stick of 1 3/4"X 1 1/8" wall Dom for my links.

Another problem I had was I didn't have any rollers to put my one tons on which got remedied sometime in January when I found a deal on here for some 39.5x16" worn irocks on 8 lug beadlocks. I drove on a blistering cold day down to Florance AL. Where Clay Wills on here hooked me up with the rollers.Not having any excuses left (since I had my parts and tires) I jumped in with both feet and got started.

I was planning on moving the front forward 5" to begin with but after setting the axle under the truck with these worn out 40's on it I ended up going close to 7" forward with it. I tried to factor in for the larger tires I would potentially be running by adding 2" to what I was seeing in both firewall clearance and up travel at the wheel wells. I set the lower frame hight at 25" (which puts the transfer skid at 20") by using the same theory of adding 2" to what I was seeing trying to end up with 5" of uptravel on the front. Obviously theses measurements(frame hight) will increase by up to 2" depending on what size tires I end up running.
 

Attachments

  • image.jpg
    image.jpg
    77.3 KB · Views: 553
I decided to put the lower frame mounts inboard a couple of inches in hopes of the tires clearing the lower links at full turn. Hade to put the upper link on the drivers side because of all that's occupying the area where it would be on the passenger side( drive shaft,exhaust) I actually ended up making the the upper and lower bracket one piece by adding 1/4" plate where needed to do so. As far as this 3 link kit from Barnes4wd it worked quite well to be universal as I had to only modify the panhard frame and axle mount slightly and this was only because of placing it on the side I had to(axle mount) and the frame being short in stature from the factory.
 

Attachments

  • image.jpg
    image.jpg
    78.6 KB · Views: 526
  • image.jpg
    image.jpg
    50.2 KB · Views: 533
I cycled this set up before fully welding the axle mounts and it seemed to work well. At this ride hight the upper link tower(axle) will be the most restrictive on uptravel but 5" will be plenty obtainable at the tires as far as its concerned.
 
On the rear I played with where I was gonna locate the axle starting at 126" moving it forwad an inch at a time. I ended up setting it at 120" which is 10" back from factory. This is where it will likely stay unless I have to stretch it minimally to accommodate the struts. I set the lowers(frame mounts)inboard a little to get a little triangulation on them(8-10 degrees) this universal kit worked good on the rear. I did have to clearance the lower axle mounts a little to keep the misalignment spacers in a neutral position but this was only because of my decision to put some triangulation in them.
 

Attachments

  • image.jpg
    image.jpg
    70.4 KB · Views: 549
  • image.jpg
    image.jpg
    79.6 KB · Views: 501
Got it to this point in January of this year. At that time I had pretty well applied all the parts I had bought and stock piled so it was time to spend some more $. Made the decision to sell my current rig to "hopefully" free up enough capital to get this thing finished. I put it online in late February and sold it in less than a week on Craigslist. After getting the cash in hand I ordered a full hydro steering kit from trail gear. While waiting on it I still needed a locker for the front so I put a wanted ad up on here and got a lead on a Yukon Grizzly locker which lead to buying his chromoly axles he was running with it as well. Wasn't really planning on the axles but he put what I felt was a good price on them so why not I guess.
After buying the axles I ended up ordering drive flanges from east coast gear since my 30spline hubs would no longer work and also ordered a Yukon super joint for one of the axles as one of the longfields he was running in them was spent from a missing zerk fitting in one of the caps which meant no grease.
I pulled the axle back out from under the truck and swapped the locker in place of the factor carrier. Also made the hoop for the double ended ram and swapped the steering arms and studs out while having it on the bench. I completed all the welding I had not done on the link brackets and reassembled the axle. Painted it and put it back under the truck.
 

Attachments

  • image.jpg
    image.jpg
    72.8 KB · Views: 484
  • image.jpg
    image.jpg
    54.7 KB · Views: 475
Which leads me to this question. I made the hoop big enough to roll the locker out in the future if need be. Because of ths you can see my steering links are angled back. Also in hind sight I should have rotated the hoop up another inch to keep the steering links level. I have a solution for this other than cutting the hoop off but my question for all that know is should I, or do I need to address this? I feel the angled back side of it is tolerable but nut sure about the angling up pushing somewhat vertical on the steering arms!
 
Top