• Help Support Hardline Crawlers :

YJ 4.3/4L60E conversion

I used stock radiator hoses for a '94 blazer. Trying to curl around the back of the alt is a chore if it isn't preformed.

Oreilly's stocks the fuel lines to hook up to the intake, I just cut them to length and bent them as needed to clear the firewall. They already had the flare and oring on the end.

I used a lokar dipstick also, spendy but very easy to route where you need it. Be sure to use rtv on the end, they don't fit real tight in the tranny.

Have fun.................:awesomework:

I thought about the stock radiator hoses... when I get everything inside, I'll see... The only concern was the distance between them... Where stock distance is (blah, blah, blah) and my distance is (yaddy, yaddy, yaddy)...

I will seriously consider O'Reilly's... We were going to do a run to William's oil something in Tacoma. That's where we were going to get most all needed fittings and hoses.

And yes, friggin' Lokar... more $$, but oh well...
 
You should be ok on the rad hoses, I had to shorten mine a bit b/c my engine is very far forward. The stock hoses are pretty long.

You're right about Williams oil filter Co. They have damn near everything. Jay was having some issues making the end that screws in the manifold when I tried them.

Orielly had compression fittings and lots of fuel line in stock so it worked ok. They also screwed up and gave me a whole spool of FI rubber line when I ordered 6ft. At $7 a foot I figured they'd want it back but they didn't care.
 
They also screwed up and gave me a whole spool of FI rubber line when I ordered 6ft. At $7 a foot I figured they'd want it back but they didn't care.

Sounds like someone has some extra rubber hose for sale, cheap! :redneck:

So during the holidays I had a few things shipped to my buddies house and today I had the chance to see them (and photograph them).

picture.php

3-1/2" x 3-1/2" x 14"

This cooler came from Speedway Motors... I think I'll run this as a tranny cooler and the other cooler that I got; I'll use that for the power steering.

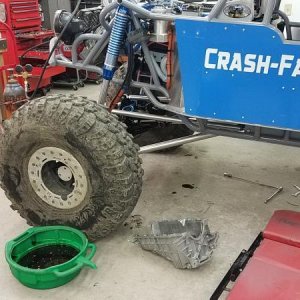
Two stumbling blocks were the timing cover (which was fixed) and a bent flex plate... I went and had the starter and alternator rebuilt at The Rebuilder, in Kent. Scott there does great work and is super fast (and inexpensive!). Today I had the chance to look at and install the new flex plate from B&M.

picture.php


Even that was a job. Not huge, but the engine had to be hoisted back up and taken off the engine stand (4 bolts) we got it and the starter on and proceeded to do something that should have been done on day one... But with the timing bolt off and the flex plate being slightly bent the thought of, and trust from the guy I got the engine from, we didn't make 'checking the compression' a first on the list. Well bad fukking idea!! Bad, bad, bad!! The number #5 cylinder wasn't showing any compression :mad:. We double and triple checked ourselves and then I banged my head against a wall some more. :mad: :mad:

We took off the header, off the plenum and off came the intake manifold. That got us to the head. Pretty easy since everything is right there looking at us.

After having the head off, we diagnosed that is was a bent valve. We checked out the cylinder walls and they looked great. I ran out of money months ago and I did not want to get into the crank,honing, piston rings and crank bearings. So we decided that this was what we needed to take care of.

picture.php

picture.php


picture.php


Well with luck and a smartphone we found two rebuilt, matching (W vin) heads. The guy was rebuilding his engine and found out his problems were greater than mine. So he sold them to me cheap!! And I'm soo glad, because I'm cheap too.

picture.php


They're clean and perfecto! We also thought that if there's problems with the lower end, we can do that after KoH and while it's in the Jeep.

So add in two cylinder heads, 4-5 more gaskets and another day.

This is fun right? :cheer: :cheer:
 
I took a few more pictures during the day...

picture.php


picture.php


Then I took off the bracket for the a/c pump, the other header and head.

picture.php


picture.php


picture.php


and now, look at me... I have a short block.
I didn't get much better pics...

We torqued down the main caps and bearings, got the timing cover on and started putting things back together. Starting with the oil pan... I need those gaskets for the top end so I ended it here for the night.

picture.php


Those crazy gold wings are the motor mounts, upside down. :awesomework:
 
Whud ya do with that 2.5? I wonder if thats the same bell housing as the GM 2.5 or if crysler ****ed that up also...

The 2.5 is a up grade from the GM2.8...:haha::redneck:
 
You have room for that monster sump oil pan? I was lucky to have a 2wd TBI pan just sitting in the shop, much shorter.

I hadn't put that oil pan to much thought. I was offered to buy a $400 pan with baffles and two more additional quarts, but I cannot put that $$ into this. But a run to a junkyard isn't out of the question.:awesomework:

This oil pan is pretty easy to work on, does anyone know if a 2wd Blazer or p/u has an easy-to-remove oil pan? Is a cross-member or anything crazy in the way?


Whud ya do with that 2.5? I wonder if thats the same bell housing as the GM 2.5 or if crysler ****ed that up also...

The 2.5 is a up grade from the GM2.8...:haha::redneck:

I'm selling that 2.5 from the Jeep. I don't know if things mate up, but if you look into it and find out that it does, shoot me a PM and we can talk about a price.
 
I'm selling that 2.5 from the Jeep. I don't know if things mate up, but if you look into it and find out that it does, shoot me a PM and we can talk about a price.

Crash or anybody else happen to know?:eeek:

Hopefully somebody will chime in...:awesomework:
 
So look guys... when I started this project, it was supposed to be an engine conversion, not a engine rebuild thread. I admit, It sucks for a lot of reasons... The obvious being that this is becoming an engine rebuild thread. But ****, everytime I try to take a step forward, I end up 2 steps back. I joked with my buddy that I've never had a chance to completely rebuild an engine. "Oh what fun it would be". Well it's not as fun if your on a budget and time restraints. But 'it is what it is' and eventually this thread will get back on track with the conversion. My Jeep is just sitting there with a worn clutch and I can't move it until I get this done. So it sucks on a lot of accounts...

For those of you still reading along, I did take a few more pictures today. Taking this down and rebuilding it back up in an experience. So here's some pictures of the insides.

This is a cleaned up and ready block
picture.php


And here's the cleaned up head,
You'll notice that the right side, where the exhaust ports are; it's like planed down (smooth & shiny). I'm told that it's not factory that way (I looked at my stock heads). These heads were machined a little bit. Which should equal a slightly higher compression ratio, therefore "more power!"
picture.php


I found this number on the top of the block. Where the gasket goes between the head and the block. I don't know what it is (I tried Google'ing it)
picture.php


Here's the intake. I took these so someone can see what the insides of this looks like.

Here's the lower part, the intake manifold
picture.php


Here's a picture of the bottom of the intake
picture.php


Here's the upside-down part of the plenum
picture.php


and here they are temporarily together so you can see. I think I'm going to pull off all the sensors from the top part and get it hot tanked.
It's going to be the first this you see when you open the hood. So I thought I'd at least make this look good. :rb:
picture.php


Tomorrow I'll try to get more parts put back on and back together. Once this part is done, into the Jeep it goes...
 
So, new rings? rod and crank bearings? Seals?... If you went his far, even on a budget, you might as well go the distance... would suck to up the compression and get it all put back together just to find out you gotta pull it apart again...:booo:

Why not throw a RV cam and new lifters in it? Delta has some decent deals and are local.. (pending on where your at).. Even have a sales rep on this site...:awesomework:
 
Last edited:
Don't feel too bad. When I started my swap I got a running S-10 to pull the TBI 4.3 out of but it turned out that the motor wasn't worth messing with, whole list of issues. Ended up getting a deal on another motor but it put me about 2mos behind.

Looks like somethings been leaking on the DS of the plenum, are you going to change those lines now? The last thing you want is a bunch of fuel dumping in the oil and smoking your new bearings.
 
So, new rings? rod and crank bearings? Seals?... If you went his far, even on a budget, you might as well go the distance... would suck to up the compression and get it all put back together just to find out you gotta pull it apart again...:booo:

Why not throw a RV cam and new lifters in it? Delta has some decent deals and are local.. (pending on where your at).. Even have a sales rep on this site...:awesomework:

I would love to do those things, but I just can't. This was supposed to be going into the Jeep around now (or 4 weeks ago), not buying more. We talked about a cam but it's not necessary. We're looking at necessaries.

The lower end <i>could</i> be done with the motor in the Jeep. It'll suck, but it could be done. If I get blow-by from the rings, I guess I'll smoke a little and know that it's gotta be done. But I just can't dig up that extra cash.


Looks like somethings been leaking on the DS of the plenum, are you going to change those lines now? The last thing you want is a bunch of fuel dumping in the oil and smoking your new bearings.

I'm sorry to hear (but also kinda glad to hear) that I'm not the only one with these problems. I guess it's typical.

Same thing with the money thing. The injectors and tubing all looks really good. Aside from dirty, the hoses are very flexible and seemingly strong. If they were even a little bit brittle, I'd replace them. But the top plenum seems to be the easiest to get to. So I have to stop 'wanting' and just get this in there and see where it goes.

Even a 1/2 powered V6 (which this WON'T be), is a lot more powerful than my little 2.5. (Unless you're interested in buying my 2.5, then I'll tell you the power (1/2 V6 vs strong L4) is about the same. :fawkdancesmiley:
 
I wished I could have gotten more accomplished today...

It's coming together.

picture.php


picture.php


picture.php


Tomorrow I've got to clearance and install the headers, then all the front end stuff.
 
Progress was delayed due to King of the Hammers, some Washington snow and complete and utter laziness. The buddy who was helping me out moved into a shop, so a few weeks of getting that set-up was an actual 'beneficial delay' instead of my procrastination delay.

But here's what I did with it today

picture.php


picture.php


picture.php


Yup, moved it to the shop we're going to do all the work. So I have to move the trailer in front of it, move some stuff around inside the shop; but it's there. It's time to just in with both feet. So pictures of the progress will re-continue.

Notice that it's all stickerless?? So I did do something in the free time :shaking:
 
A few more pictures from today...

picture.php


Just some prepping

picture.php


Eventually it's got to make it inside the shop. I spent some time outside today.

picture.php


Ok, A weird picture from above. It's funny... take out the radiator, shroud and fan, there's enough room for another engine.

I did more after this, I just didn't get anymore pictures. I'm disconnecting the wiring harness now. The battery and one of the compressors are out.
 
Yesterday was an extremely productive day!!

I keep taking days off, cuz I could, but yesterday was awesome!!

Step one for me was to get the Jeep inside the shop. That took airing up the passenger rear and using a come-a-long by way of wall joists. But I did it.

picture.php


picture.php


The I went on to where I left off. Pulling the wiring harness... It may not be noticeable here, but the wiring is out.

picture.php


I pulled the fenders and wheels off to lower it and make it easier to work on.

picture.php


Then was the drivelines, tranny/transfer case mount and the heavy stuff.

picture.php


picture.php


After things were secured, the exhaust was pulled off as well as the transfer case.

picture.php


picture.php


Finally, to the transmission

picture.php


a little shifter removal and it came right out.

picture.php


Here's my smoked Centerforce clutch

picture.php


and we got there!!

2 motor mounts away!!

cherry picker in place

picture.php


and up and put it goes

picture.php


left with a bare cavernous hole... just begging for the Vortec and tranny to be put in.

picture.php


And this is where we left off...

The factory motor mounts need to be cut out and then the motor/tranny/TC need to be mocked up to make sure everything can line up ok. I want to keep the T/C in the same location to avoid having to buy new drivelines. So mocking it up will help us get the new (Advance Adaptors) motor mounts a good location.

Saturday we will get back to it as the rest of this week is booked up.

Not bad so far!! :cheer:
 
Long weekend for me. Even more accomplished... I hope the pictures do it justice.

Factory motor mounts needed to be cut off. Sawsall and grinder got it done!

picture.php


picture.php


picture.php


The we had to mate the transfer case to the transmission. I'm using Advance Adaptors conversion kit (4L60E to NP231).

So the stock studs needed to come off (A/A supplied new ones). That's my son getting involved.

picture.php


picture.php


Prepping in the seal

picture.php


picture.php


picture.php


Then we had to look at the skid plate. We spent a lot of time matching things up, lining things up, just plain looking...

picture.php


picture.php


We had some great ideas...
 
The transmission was in there... I just needed to take a picture to document it.

picture.php


Cutting off the front of the skid plate seemed like a great idea.

picture.php


this allowed us to drill out holes at that main cross plate, and even recess in the heads of the bolts... OMG, this came out more beautiful than I even imagined!

picture.php


And there it is.... Transmission and transfer case are mounted very close to where they were before... Driveline lengths do not have to be changed!!

So again, we looked, thought and dove right in... here it goes...

picture.php


picture.php


up we go...

picture.php


picture.php


picture.php


picture.php


picture.php
 
Top