• Help Support Hardline Crawlers :

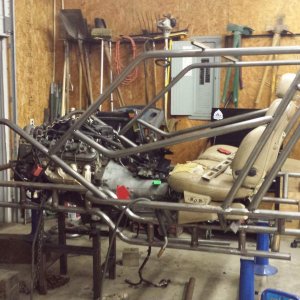
Another lil something.....

I cut the rear air bump cans out. with the shitty welds it was pretty simple :haha:
 

Attachments

  • 20160506_212114.jpg
    20160506_212114.jpg
    54.9 KB · Views: 173
  • 20160506_212123.jpg
    20160506_212123.jpg
    42.7 KB · Views: 170
So I swapped the air bumps front/rear. I also ended up needing to raise the contact tower for the rears.
 

Attachments

  • 20160511_190810.jpg
    20160511_190810.jpg
    51.6 KB · Views: 162
  • 20160511_190816.jpg
    20160511_190816.jpg
    61.2 KB · Views: 167
  • 20160511_190952.jpg
    20160511_190952.jpg
    51.6 KB · Views: 159
And now no rubbing :cheer:
 

Attachments

  • 20160507_094633.jpg
    20160507_094633.jpg
    31.8 KB · Views: 169
  • 20160507_094622.jpg
    20160507_094622.jpg
    35.1 KB · Views: 166
  • 20160507_094321.jpg
    20160507_094321.jpg
    70.1 KB · Views: 166
A little ditch testing :redneck:
 

Attachments

  • 20160507_100829.jpg
    20160507_100829.jpg
    100 KB · Views: 170
  • 20160507_100845.jpg
    20160507_100845.jpg
    88.3 KB · Views: 162
So since I am waiting for the last load of tin I went ahead and made a cover for this.
 

Attachments

  • 20160614_195017.jpg
    20160614_195017.jpg
    41.7 KB · Views: 171
  • 20160614_195311.jpg
    20160614_195311.jpg
    47.8 KB · Views: 157
Something else I found, I was getting drips of power steering fluid and finally found a pinhole at the ram fitting. I suspect it was a simple defect and pulled the ram and had james weld it up for me..
 

Attachments

  • 20160427_212237.jpg
    20160427_212237.jpg
    72.1 KB · Views: 160
Got the second panel done.
 

Attachments

  • 20160629_210954.jpg
    20160629_210954.jpg
    66.6 KB · Views: 108
  • 20160629_210944.jpg
    20160629_210944.jpg
    47.8 KB · Views: 103
  • 20160629_210936.jpg
    20160629_210936.jpg
    49.9 KB · Views: 106
Next started working on the side skins.
 

Attachments

  • 20160704_191214.jpg
    20160704_191214.jpg
    38.4 KB · Views: 164
  • 20160701_163535.jpg
    20160701_163535.jpg
    48.2 KB · Views: 167
  • 20160703_204726.jpg
    20160703_204726.jpg
    53.6 KB · Views: 169
Both skins are done :bbbball:
 

Attachments

  • 20160705_200441.jpg
    20160705_200441.jpg
    50.7 KB · Views: 170
  • 20160705_203308.jpg
    20160705_203308.jpg
    57.2 KB · Views: 168
Next onto the roof.......
 

Attachments

  • 20160719_183905.jpg
    20160719_183905.jpg
    60.2 KB · Views: 166
  • 20160719_183857.jpg
    20160719_183857.jpg
    55.8 KB · Views: 164
  • 20160719_183847.jpg
    20160719_183847.jpg
    57.1 KB · Views: 165
  • 20160712_194913.jpg
    20160712_194913.jpg
    60.5 KB · Views: 173
Matt had requested some grab handles to help getting in/out. I personally love a well place grab handle :bbbball:
 

Attachments

  • 20160723_081954.jpg
    20160723_081954.jpg
    45.3 KB · Views: 168
So I decided to paint the roof panel black. I thought it would change the look and it certainly set it off. :cheer:
 

Attachments

  • 20160723_201559.jpg
    20160723_201559.jpg
    53.9 KB · Views: 159
  • 20160723_200344.jpg
    20160723_200344.jpg
    90 KB · Views: 159
  • 20160723_200422.jpg
    20160723_200422.jpg
    74.4 KB · Views: 162
so apon some testing I found a clearance issue between the front pinion yoke and the oil pan skid.
 

Attachments

  • 20160723_201624.jpg
    20160723_201624.jpg
    68.7 KB · Views: 157
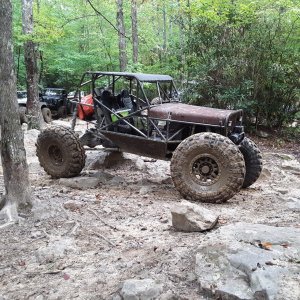
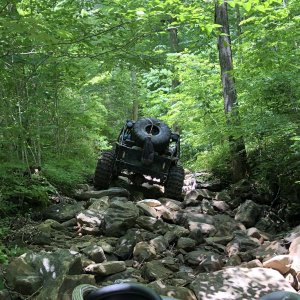
So luckily the skid unbolts and thank goodness I pulled it because guess what--bolts were fawked up and loose at the rear mounting location.

So it wasn't too hard to modify the skid for clearance.

Once done I took it to the same spot and have about 1/4" clearance now.

So the last thing to do is get the shocks and air bumps charged and then its ready.
 

Attachments

  • 20160724_145533.jpg
    20160724_145533.jpg
    48.8 KB · Views: 162
  • 20160724_165226.jpg
    20160724_165226.jpg
    44.9 KB · Views: 157
Top