• Help Support Hardline Crawlers :

Another lil something.....

I got the guages installed into the dash.
 

Attachments

  • 20160407_214504.jpg
    20160407_214504.jpg
    32.8 KB · Views: 111
Next I went ahead and got all the brake hard lines done.
 

Attachments

  • 20160409_151921.jpg
    20160409_151921.jpg
    60 KB · Views: 102
  • 20160409_151911.jpg
    20160409_151911.jpg
    52.1 KB · Views: 98
  • 20160409_151906.jpg
    20160409_151906.jpg
    48.2 KB · Views: 100
  • 20160409_151854.jpg
    20160409_151854.jpg
    54.8 KB · Views: 100
  • 20160409_151844.jpg
    20160409_151844.jpg
    51.4 KB · Views: 96
  • 20160409_151832.jpg
    20160409_151832.jpg
    47 KB · Views: 100
  • 20160409_151816.jpg
    20160409_151816.jpg
    42.8 KB · Views: 104
I got the gauges wired and connectors to ease in any needed tear down. I also had to modify the ecm top bracket to give room for the main power switch.
 

Attachments

  • 20160410_111631.jpg
    20160410_111631.jpg
    56.5 KB · Views: 96
  • 20160410_111640.jpg
    20160410_111640.jpg
    59.3 KB · Views: 105
  • 20160410_111647.jpg
    20160410_111647.jpg
    60.3 KB · Views: 101
One thing I had noticed was the vent on the th400 was gone. It was hard but I was able to see down the hole and found a good portion of the vent still in the trans. Took some work to dig it all out. At this point I had a few choices one being drilling and tapping to 1/8". I chose to take 1/4" hardline and filed it down to a interference fit and worked it into the trans.
 

Attachments

  • 20160410_144308.jpg
    20160410_144308.jpg
    69.9 KB · Views: 100
  • 20160407_214628.jpg
    20160407_214628.jpg
    57.4 KB · Views: 111
Next it was back to more sheetmetal. I got the pieces made for at your feet on both sides. They turned out exactly how I was hoping.
 

Attachments

  • 20160411_220701.jpg
    20160411_220701.jpg
    28.7 KB · Views: 97
  • 20160411_220716.jpg
    20160411_220716.jpg
    46.1 KB · Views: 108
  • 20160411_220731.jpg
    20160411_220731.jpg
    33.9 KB · Views: 93
  • 20160413_215551.jpg
    20160413_215551.jpg
    36.7 KB · Views: 94
  • 20160413_215602.jpg
    20160413_215602.jpg
    38.2 KB · Views: 102
Last thing left was belt mounts. Made the mounts then modified the pieces under the seats.
 

Attachments

  • 20160414_195442.jpg
    20160414_195442.jpg
    48.1 KB · Views: 97
  • 20160413_215609.jpg
    20160413_215609.jpg
    29.5 KB · Views: 95
So that completes the interior sheet metal. My original intention was to also enclose at the front of the trans. I spent a good few hours and could not come up with any good ideas that didn't look like complete ****.
 

Attachments

  • 20160414_204925.jpg
    20160414_204925.jpg
    53.1 KB · Views: 95
  • 20160414_204931.jpg
    20160414_204931.jpg
    47.3 KB · Views: 94
  • 20160414_204942.jpg
    20160414_204942.jpg
    51 KB · Views: 96
  • 20160414_204950.jpg
    20160414_204950.jpg
    51.1 KB · Views: 94
I went ahead and pulled the skid plate to mainly clean all the crap out of it. When I did so I found many of the stainless bolts not even tightened and I found out why. I ended up having to literally break many of them and had to drill a few heads off. I didn't find out why until I went to reinstall it with new metal bolts. Many of the holes did not line up perfect causing the threads to be galled since stainless is soft. I had to had work a bunch of the holes but got everything to go back on right.
 

Attachments

  • 20160415_200151.jpg
    20160415_200151.jpg
    41.3 KB · Views: 100
  • 20160415_194547.jpg
    20160415_194547.jpg
    46.2 KB · Views: 95
  • 20160415_194538.jpg
    20160415_194538.jpg
    35.2 KB · Views: 98
Time to tear down and get the inside painted as best as possible.
 

Attachments

  • 20160416_091748.jpg
    20160416_091748.jpg
    60.8 KB · Views: 99
  • 20160416_091759.jpg
    20160416_091759.jpg
    31.8 KB · Views: 111
Back together and got the arb lines ran and the trans/t-case vents ran to the back of the car.
 

Attachments

  • 20160417_162958.jpg
    20160417_162958.jpg
    54.5 KB · Views: 122
  • 20160417_162953.jpg
    20160417_162953.jpg
    53.2 KB · Views: 123
  • 20160417_162939.jpg
    20160417_162939.jpg
    64 KB · Views: 122
  • 20160417_162933.jpg
    20160417_162933.jpg
    70.5 KB · Views: 123
To put the seats in I had to make bolts that would have stops since I could not access the heads with the seats down in place with the belts.
 

Attachments

  • 20160419_211951.jpg
    20160419_211951.jpg
    57.9 KB · Views: 116
Catch can for the trans is right behind the drivers seat..
 

Attachments

  • 20160419_212001.jpg
    20160419_212001.jpg
    58.6 KB · Views: 123
Some misc pics :bbbball:
 

Attachments

  • 20160419_212007.jpg
    20160419_212007.jpg
    50.9 KB · Views: 121
  • 20160419_212013.jpg
    20160419_212013.jpg
    51.3 KB · Views: 120
So I searched high and low for a plug wire set for the ls motor that were cut to fit since the driver side was no where near in stock form. I found one set (I always prefer to use MSD wires) and got the plug wires all done.
 

Attachments

  • 20160420_201618.jpg
    20160420_201618.jpg
    57.1 KB · Views: 118
  • 20160420_193930.jpg
    20160420_193930.jpg
    59.7 KB · Views: 119
  • 20160420_193919.jpg
    20160420_193919.jpg
    55.7 KB · Views: 130
  • 20160420_193907.jpg
    20160420_193907.jpg
    56 KB · Views: 121
  • 20160420_193900.jpg
    20160420_193900.jpg
    49.1 KB · Views: 118
I was ready to see if it wire fire off. The motor didn't even make a full revolution and it fired right off and ran--after 5 seconds it threw the damn drive belt, :mad:
 

Attachments

  • 20160420_193218.jpg
    20160420_193218.jpg
    55.2 KB · Views: 121
Time to check belt alignment and I have a nice lazer alignment tool for pulleys. I found the alt is about 3/8" off of being in line. One step forward 2 steps back :mad:
 

Attachments

  • 20160420_193306.jpg
    20160420_193306.jpg
    42.9 KB · Views: 121
So I got the alt in alignment and made a new bracket--can ya tell what one is mine :redneck:
 

Attachments

  • 20160421_215257.jpg
    20160421_215257.jpg
    49.1 KB · Views: 113
  • 20160421_214749.jpg
    20160421_214749.jpg
    51.3 KB · Views: 119
So with that I am going to also check the p/s pump alignment and fix the hokey tensioner.

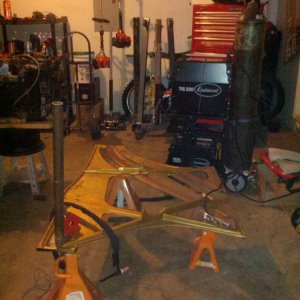
So the layout is the alt was moved over to where the belt tensioner, the p/s pump is where the alt was and the tensioner is where ther p/s pump was. the tensioner was made to have the ribs of the belt ride against the idler. Well the ribs were filed or ground down and when the belt popped off it actually broke the edge off.
 

Attachments

  • 20160421_222423.jpg
    20160421_222423.jpg
    58.1 KB · Views: 113
So I did some digging and found gates make a 3" idler thats made to ride on the back side of the belt. I could not find the info regarding the offset or the hole size of the bearing so I went ahead and grabbed it.

Damn its absolutely perfect. So I have to tweek the p/s pump a tad and get a 1/4" longer belt and that will be done.
 

Attachments

  • 20160421_181152.jpg
    20160421_181152.jpg
    45.4 KB · Views: 114
  • 20160421_181201.jpg
    20160421_181201.jpg
    46.4 KB · Views: 119
  • 20160421_222558.jpg
    20160421_222558.jpg
    58.7 KB · Views: 110
Top