• Help Support Hardline Crawlers :

My long awaited build thread...

Nope, I want to keep my back seat for now...:fawkdancesmiley:

I thought about it and thought, but where do you put your spare then? So I decided to go with a 2 seater and put the cell behind the cage and the spare behind the cell. Got a few idea's that might turn out pretty slick when its all done. :cool:
 
Meh, lets see if I tear a side wall I'll fill it full of plugs and off I go to the trailer...:fawkdancesmiley:

What if you run over something and rip a whole in the tread?? :eeek:

I'm not worried about sidewall's. I have put these IROK's in the crappy area's and I thought for sure they were going to pop but they didn't.
 
So with keeping on the current "jive" I have just been trying to poke along on the small stuff.
Got the orbital mount and steering shaft made up.

joe136.jpg


Got the heater hoses done and joe was able to get the nose supports so I got those on(will adjust them once I put the hood back on)

joe137.jpg


joe138.jpg
 
So I talked with joe and told him I needed the line from the clutch master to the slave. It appears the one he had origionally gotten was 1/4 hardline style. So he stopped by with a totoaly different clutch master (slave end the line pops into the line coming out of the bell housing and on the master side the line is held in with a roll pin). So I opted to swap out to the other master--which took a little modification to make fit but it turned out perfect. I even bled the system and we now have a working clutch.

joe139.jpg
 
So at this point I said what the heck and decided to get some of the brake hardline ran. For now its just ran to roughly where its going to end since I will finish the ends once I get the hardline done on the diffs.

joe140.jpg


joe141.jpg


joe142.jpg


joe143.jpg


joe144.jpg
 
Got the rust cleaned off the rotors and got the "large" calipers mounted along with the new soft line.
joe145.jpg

And got the front ready to measure for a new tie rod
joe146.jpg
 
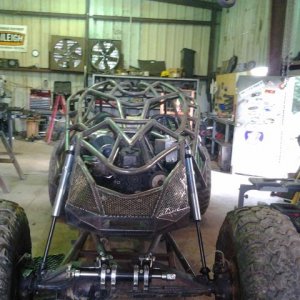
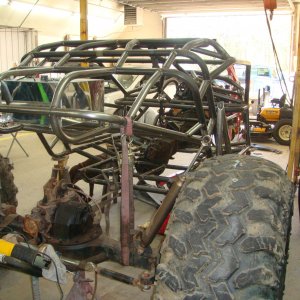
So a lil update(actually from saturday afternoon-sunday morning).
So all was in line to make this thing start and run. I ran the fuel system and made sure there were no leaks. none.
So here came the moment of truth--cranked it over waiting for the loud roar of open exhaust--nothing...


So I quickly checked for spark and injector pulse--neither. So I will say I had a general idea of how this system worked--but not as much as I was about to learn. So I hit up google and did a bunch of reading and the whole cps thing kept popping up.


So I hooked up my meter and low and behold it only had .120 volts a/c and according to what I had read spec is like .5-.8 volts a/c. So here I thought-there is my problem. So I sawpped it out with another one we had. Same problem.


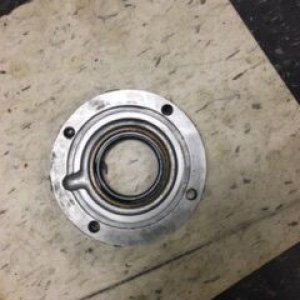
So I dug deeper on my search and found a tsb concurning the distance from the cps to the reluctor on the flywhel and how they had a slotted cps and also info concerning rust on the reluctor. So I made a jumper so I could crank the engine over and polished the reluctor with a wire brush. Ok so I went and slotted the cps little by little with each time getting the voltage to come up to I finally had roughly .6 vokts a/c.

So I hooked everything up thinking I was going to hear that lovely sound. NOPE..

So my next step was to run jumper wires from the cps to the ecm--no change

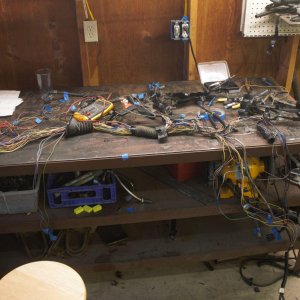
So at this point I started second guessing my wiring job. So I spent some time checking each and every wire/circuit and testing all sensors except temp sensors(which even if they failed you would not loose injector pulse or spark). I didn't find a single problem.

So I call joe and and let him know whats up and I suspect a failed ecm--now granted I suspected it but I could not belive it. Joe said ok and we could get another ecm--but my gut said no--not yet,lol.
Now at this point I am just dazed since the dist output and cps are within spec. So I went and asked for assistance on my forum (something I hate to do).

So john came thru and stated there there were in-deed 2 flywheels --the renix had MANY notchis in it where the HO had very few and yup--the one we have has very few. So as it turns out we have the wrong flywheel..

Now this is the funny part where under normal circumstances you would have thought it fired due to the output voltage of the cps but in fact it has to do with the actual sign wave---something that could have been seen with an osciliscope.

So john has the correct flywheel and joe is going to grab it so I can yard the trans out and fix it up and we can---hear that lovely noise,lol
 
Ok so joe stopped by the shop on friday for a specail delivery. He dropped off another flywheel and just looking at it--it looked like the one from the description of what should be there.

So I went and ripped the trans/t-cases out of the rig.
Here are both flywheels--you can definately tell they are in-deed different. The one with ALOT of notch's for the reluctor is the right one.

joe147.jpg


So once the whole works was thrown back into the rig--guess what--it bloody started. Joe got an interesting voice mail today
 
So I decided to go ahead and dig into the hole in the floor.
So made a few templates and made a few changes along the way--here is the roughed in tub work.

joe148.jpg


And here it is after alot of smoke(what is with the bottom of jeeps liking to catch of fire,lol) and some lovin.

joe149.jpg
 
So now one thing I knew I would have to deal with was the fact that the seat base would no longer easily just bolt back in. I had talked with joe to see if he could find a non adjustable seat base--and he was unable to easily locate one.

So what I did was put the seat in the forward tilt position--and just welded that sucker up so that--it was no longer a tilt forwrd base,lol...

joe150.jpg


So once that was done I took a few measurements and lopped a portion of the seat off(thats right ---a lil sawzall action)...

joe151.jpg


So once a good portion of the base was removed---did a lil more removal to get it just right and went and made a new portion of the base--and it turned out pretty good.


joe152.jpg


joe153.jpg
 
Ok, So :fawkdancesmiley: .....I can't wait to see this thing out on the trails.

Crash, you are good. :awesomework: (like you need any more accolades)
 
Ok so since the new portion of the seat base bolts to the new portion of the floor--I figured I would go ahead and add some strength to the floor besides just the sheet metal. So I went and added flatbar to the underside that went from floor support to floor suport and the seatbelt buckle mount also ties into it. I put some god weight on it and the new portion is stronger than the rest of the floor,lol..

joe154.jpg
 
And here is the finished floor...

joe155.jpg


joe156.jpg


And here you can see how the seat fits on the floor--I sat in it and it doens't move so it should "hopefully" be good to go....

joe157.jpg


So once I got the shifters back in here is how it looks for the first time with both seats bolted in for the first time,lol..

joe158.jpg
 
Top