• Help Support Hardline Crawlers :

My long awaited build thread...

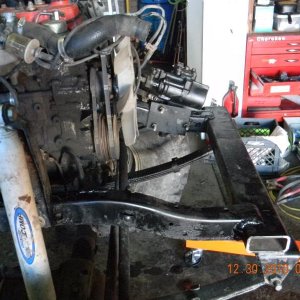
Ok I am still poking my way thru the wiring. My main goal is to retain the wiring structure of the XJ for ease of diagnosing any future component problems. But here is the relays all done except I have to move one terminal into a different cavity.
joe100.jpg

Here is where I put the ignition module and the small fues block. The only thing I changed from the Xj structure was I added fuses and broke the power sources up a little since the XJ used fusable links.
joe101.jpg

I also cut/modified the stock diagnostic ports bracket and mounted it to the battery holder.
joe102.jpg

I mounted the main junction block and started making all the positive cables. Just need to do the negative cables and I can start checking what does/doesn't work

joe103.jpg

joe104.jpg

Looks great Crash! I still couldn't believe how much wiring came out of that harness!
 
I should lock it up--so a meth head doesn't come and steel the chuncks of wire for the copper :D

ya no kidding at my work we keep getting semi trailers in the the 7-way wire was cut at the front and rear of trailer and pulled all the way out... i mean 53ftx7 ha it could add up fast..


nice job very clean
 
nice wiring job,but you are going too cover it when your done right..:awesomework:


Oh ya--thats just the rough in--I am going to add a few more circuits for joe for future uses so he won't have to dig into the harness down the road :;

I have conduit from 1/4" all the way up to over an inch with every size available in between..
 
For future usage's I went ahead and pre-wired wires in the wiring harness so joe won't need to dig into it. All wires go to under the dash for ease of use
joe107.jpg


joe108.jpg


For kicks I thought I would goof around a bit. I had to replace the amber bulbs but looks like all works. I also stole (he he he) jacks winch controler again and checked the winch and yup--that works perfect too..

joe109.jpg
 
I also had to remove the cooling fan to run the wiring from the motor to the controler. But here is how the engine wiring turned out. Its now 98% done(couple small things left)
joe110.jpg


joe111.jpg


joe112.jpg


joe113.jpg
 
So I got the big mess I made cleaned up--and started going thru the boxes that joe brought up for the rig and the brake master fell and landed on my fott. I figured that was a sign,lol. And as stated the brake master bolted right up.

joe115.jpg


I had to do 2 things to make it an easy bolt up. The first one adjust the push rod---that was an easy turn deal. The other was I had to dimple the brake booster to clear the latch rod for the cap on the brake master.

joe116.jpg


As you can see its pretty close and still rubs the booster but its "acceptable".

I also dug out the radiator hoses--had to do a little trimming on them but they went right on..

joe117.jpg


joe118.jpg
 
Top