• Help Support Hardline Crawlers :

The swa-wing

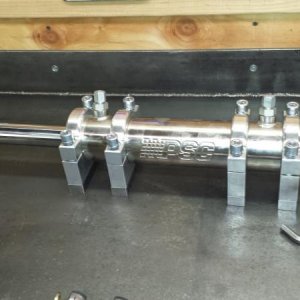
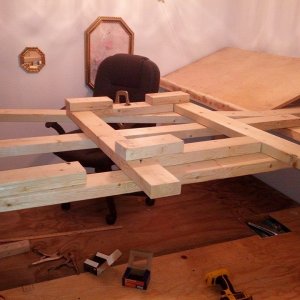
Lookin good Mike! Interesting looking setup you got there, the MOA setup sure gives you a lot of freedom with chassis design.

Not only design but there are certain things (torque twist) that you just don't gotta fight against in the setup.
 
That is just unreal Mike. Your's sure has come a long way in a very short time. :awesomework:
 
That's nice you don't have to deal with any torque twist. Do you gain any other weird handling stuff going to MOA?

You going to do delrin links up front too?
 
That's nice you don't have to deal with any torque twist. Do you gain any other weird handling stuff going to MOA?

You going to do delrin links up front too?


You end up with some clod stall but you get used to it. And I know he has the punk dig so he just works around it.


And yep looking good.:awesomework:
 
So just a little update. My changes have been very slim but there was one change I did want to make. I finally got around to outboarding the rear upper links--it was tight but get them where I wanted.
swa-23.jpg

I also got around to making the delrin lowers for the front--that turned out perfect. Got more testing time on it and I am really liking it.
swa-24.jpg

Only thing left to do this week is get my CVD pin issue figured out, bearing for the knuckles and side panels--then its ready for its first comp of the season.
 
So I ordered flanged bearings for my knuckles to get rid of that annoying slop and also fix my stripped out upper screw. Well being gung ho I went and pulled a dummy move and ordered the wrong ones. I ordered 3x6x3 when I needed bearings for 4mm screws. No big deal as it was like $13.
Well one of those ideas hit me. When I built my steering (Dr. Frank style) I made some brass inserts for the rotation at the arms. Well they lasted short term before they got sloppy from being oblonged and the threads digging into them.
swa-25.jpg

Well here I have these 3mm flanged bearings--why not. Well I started by measuring the OD of the bearing and it was "very" close to 13/16". So I went and drilled the tie rod ends.
swa-26.jpg


Bearings
swa-27.jpg

Now here is where it got tricky. To keep the bearings in place I have to sandwich them with flanges out(flange on top/bottom of the arms) and with the combined thickness of the bearings they did not seat firmly against the foot of the tie rod. This would not give it lots of slop and easily cause the holes in the footings to become oblong. Well to correct this I made some shims and let me tell ya it took some guesswork to figure out how to drill these little things.
swa-28.jpg

To get the right amount of preload against the bearings I used both 4mm or 5mm washers drilled out to the same dia of the bearings. Once I got a couple drilled I would bolt the assy down.
swa-29.jpg

With this I was able to check the preload. Luckily these little washers are not constant and the thickness varies. So with my calipers I was able to get the right thickness's and drill them out.
I was able to get a nice preload against the bearings which gave a nice smooth steering..
swa-30.jpg

I went and ran a few course's with my buddy jim and put the steering to the test--and its still perfectly smooth..
 
So I had a knuckle bolt strip out and pulled it apart and found the pins in my new CVD's like this. It apears they are too soft(ya think). My stock shafts after alot of time look like they did when I pulled the shafts.

swa-31.jpg


So Jim gave me an idea that he had used. Take a 7/64" drill bit and machien it down. Can you tell what pin is the stock one and what ones are the new ones I made?

swa-32.jpg
 
So the fix the for the stipped 3mm knuckle screw was to upgrade to a 4mm and run these bearings that randy(storminator) found. The upgrade actually went pretty good. The hard part was trying to hold the knuckle to drill the top/bottom out. The next part that was time consuming was to get the new 4mm screws JUST the right length for full engagement into the axle tube with no contact with the axle shaft. Also "you must" locktight the screws in. Damn my front has never been so tight EVER..


swa-33.jpg


swa-34.jpg
 
I finally went and got a good quality servo horn. It was a tad longer than the one I was using and I had to do a little tweeking on the draglink but it all clears......


swa-35.jpg


Finally new tires. I figured I would start this season off with some sharp tires.


swa-36.jpg


So my last thing to do for the comp was make side panels to be fully legal on my bodyless body. I wasn't "too" happy with how the turned out. I think if I made them all black they would have looked better. But they will serve there purpose.


swa-37.jpg


swa-38.jpg
 
Just a lil update. Well the rig sat for the week and I threw it on the bench to look it over after its first comp. I knew I had to replace the bent insert for the front wheel but I found once again the knuckle had too much play in them. Well I guess the 2 hard 15ft tubles onto rock were a bit too hard. The second tumble you could hear the "thud" lol..

Well I actually broke the shoulder on one of the bearings and 2 others I must have cushed something inside the bearing.

swa-39.jpg


So I went and replaced all four of them and its back to being tight.
 
So on one of the topics that comes up is the slop in the front axles/side to side in the knuckle. Somebody had mentioned in one of the threads that maybe the stub on the axle needs to be able to float in/out. Well I decided to check how the axle feels rotating it while turning. Well my conclusion was it fent better when the stub is pulled tight outward(stub against the inner bearing on the knuckle. Now allot of talk that pops up regarding this talks about using nylon washers to fix it.

Well I did some looking around the shop and came up with this-- GM OEM fuel o-rings (bigger pressure side). They are the perfect size not only diameter but thickness. These things are also stiffer than a normal rubber o-ring so they actually might work.


swa-40.jpg


Perfect fit--just a tad snug

swa-41.jpg


And I didn't have to put any extra pressure on the hex to get the pin in.

swa-42.jpg


So we will see how this works out..
 
Just a little update. I have just been driving it and having good luck.
Recently I needed to make a couple "small" changes to it and now how my final design down. I changed the curvature above the rear upper links on the chassis and extendend the rear shock mounts 1/8".

swa-43.jpg


So now I can say I am 100% satisfied with it and will continue to run this setup. My boy kyle now has this on his rig also and rookie will be running a swa-wing chassis..


are you going into production yet? how much for a chassis? I am thinking about going to something like this and I dont have the means to make the complete chassis.
 
are you going into production yet? how much for a chassis? I am thinking about going to something like this and I dont have the means to make the complete chassis.

Thats the plan Eric. I have made templates for the lower links to a bully chassis. I also have a bunch of other older chassis I need to get rid of here soon too.
 
Thats the plan Eric. I have made templates for the lower links to a bully chassis. I also have a bunch of other older chassis I need to get rid of here soon too.


sweeet! I will keep an eye out for when you post them.
 
My new wheels finaly arived. Kyle needed new one on his and I wanted to go narrow. So these are my new SLW V2 .7's

swa-44.jpg


I really like how the tire sits now. I didn't trim anything off my 2" dual stage Crawler Innovations foams. They look perfect.


swa-45.jpg


The rig is all ready for the comp


swa-46.jpg
 
Top