• Help Support Hardline Crawlers :

Little Gibby's 45 MB

Getting some of the work getting finished up.
1. Exhaust finished
2. Drivelines installed.
3. Spark plus wires on.
4. Finish painting done.
5. Air cleaner fitted with only very minor clearancing of the hood.
6. Ordered the overflow bottle, still deciding on the wiper fluid reservoir.
7. All fluids filled. had to reseal the rear diff, everything leaked out.
8. Just getting all the little stuff done like new lug nuts, still need to get a dipstick and tube (apparently a dealer item only).

i cannot think of anything left before it goes to James on Wednesday.
 
A few updated courtesy of Rew T customs.

The finished grill with diamond plate and all LED lights.

The new transmission cover and floor plates to cover over all the holes.

The air horns.
 

Attachments

  • grill.jpg
    grill.jpg
    73.5 KB · Views: 470
  • Horn D.jpg
    Horn D.jpg
    70.5 KB · Views: 466
  • Horn P.jpg
    Horn P.jpg
    70.4 KB · Views: 469
  • T-cover.jpg
    T-cover.jpg
    74 KB · Views: 466
Those horns are going to be so full of crap in about 20 minutes of driving... :redneck:
They are going to need some sort of sock cover on them, like you'd use on a K&N Filter.

They probably need to be angle down a little bit too, so that they drain out if water does get in.

This is where James wanted to mount them :)
 

Attachments

  • Horns.jpg
    Horns.jpg
    74.7 KB · Views: 463
James is making some pain staking progress. This part is moving slow, but I love the quality work that he's putting into the detail. He and Crash have a few things in common... LOL

The LED backup lights are installed.
The floor panels are getting finished. When they are all done, he's going to powder coat all of it.
The dipstick was hard to find and still required a little tweaking for it to work with the headers.
 

Attachments

  • DS1.jpg
    DS1.jpg
    79.8 KB · Views: 412
  • BL2.jpg
    BL2.jpg
    79.1 KB · Views: 419
  • BL1.jpg
    BL1.jpg
    74.4 KB · Views: 415
The t-case shifter was cut down so that it would fit between the transmission cover and the seat without interfering with anything.

The pedals were cut and re-cut until they finally sit in a position where you can actually drive.

The air solenoids are installed and mounted. When finished, there will be a horn button that will function with the removable steering wheel which will use the smallest air horn. When the lanyard is pulled, all three horns will blast. This will give the emergency honk of a loud, but legal horn and the fun blast of a locomotive horn when you want to scare the pants off someone.

The wiring for the wiper motors is run through the frame and will still allow the windshield to fold down.

The hidden ignition is installed and wired but I can't show you that...:haha:
 

Attachments

  • Valves.jpg
    Valves.jpg
    70.8 KB · Views: 344
  • wiper wiring.jpg
    wiper wiring.jpg
    63 KB · Views: 341
  • wiper connection.jpg
    wiper connection.jpg
    56.9 KB · Views: 341
  • Pedals finished.jpg
    Pedals finished.jpg
    77.1 KB · Views: 343
  • Front Air.jpg
    Front Air.jpg
    80.2 KB · Views: 344
A few pic updates.

The LED digital gauges are installed. James made a water tight box to protect the electronics.

The solenoids and fuse blocks installed
The relay bank is mounted.
 

Attachments

  • dash box.jpg
    dash box.jpg
    68.1 KB · Views: 296
  • dash back.jpg
    dash back.jpg
    69.2 KB · Views: 285
  • fuse.jpg
    fuse.jpg
    73.4 KB · Views: 292
  • relays.jpg
    relays.jpg
    67.6 KB · Views: 288
A few picture updates.
The air compressors are installed in the old tool storage areas. These were completely rusted away so James to build new ones.
The batteries installed and connected right in front of the air tank and right behind the bench seat.
This is where the airlines come through to the then travel the front. This area was a big whole that had to be cut out to move the seat far enough back.
 

Attachments

  • airline.jpg
    airline.jpg
    76.8 KB · Views: 227
  • batteries.jpg
    batteries.jpg
    57.1 KB · Views: 228
  • aircomp1.jpg
    aircomp1.jpg
    57.3 KB · Views: 234
  • Aircomp.jpg
    Aircomp.jpg
    75.7 KB · Views: 226
It's getting SO close that I can smell it!

James has the Crash syndrome...

The work he is doing is FANTASTIC, it's just taking SOOOOOO long. I'm sure he feels the same way.

It's close enough that it's now licensed and insuranced, just waiting to drive it back and do a little finish work on things like flares, mudflaps, side view mirrors, etc.
 
Last edited:
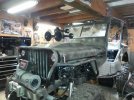
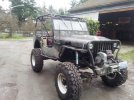
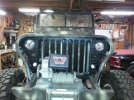
Getting so close. It's now licensed and insured.

A couple of pics as updates.

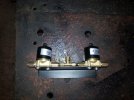
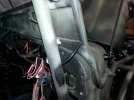
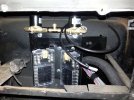
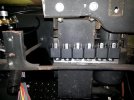
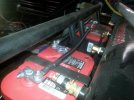
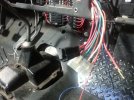
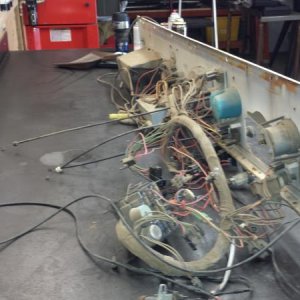
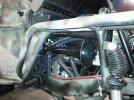
The fuse box is wired, still needs fuses added and all the final testing.

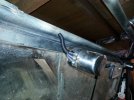
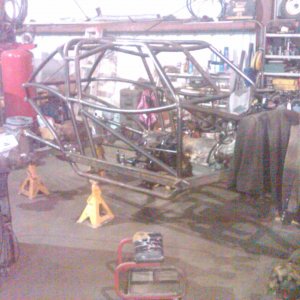
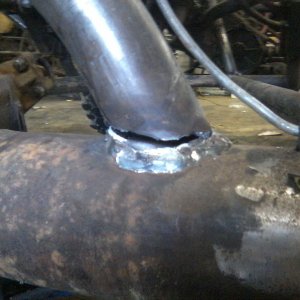
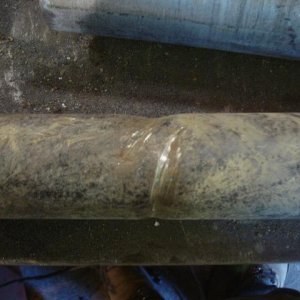
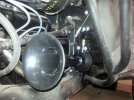
James primed the engine and got it started - for a few seconds, then shut it down to get back at the wiring,

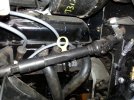
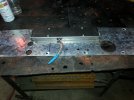
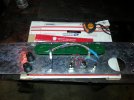
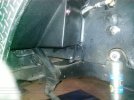
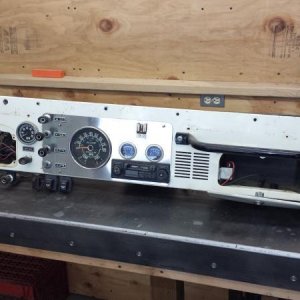
The wiring is finally 95% done. You can see from the pics that this isn't a hack job.

James had to move it to his new show where he would have fewer distractions.

Still on the list to complete.
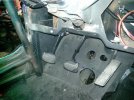
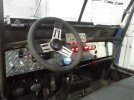
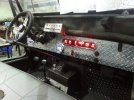
1) Final install of the dash and the switch panel. James wired everything with plugs so that it will be relatively simple to remove the dash with only a few screws and a couple of plugs.
2) Heater Ducting
3) Testing of all the electrical systems.
4) Installation and testing of the remote start system.
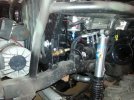
5) Final installation of the transmission cover, connecting the line lock and bleeding the brake system.
6) Installation and testing of the road legal horn. This was a very custom part to make a regular center button horn that would function with a removable steering wheel.
7) Sheet metal work in front of the rear tires to enclose the tub.
8) Install the seat and hook up all the seat harnesses.
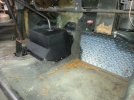
9) Design and complete the rear hatch system to enclose the batteries, air compressors and air system under a locked access panel which will also serve as a base for a tool/storage box.
10) Install the soft top frame and make sure everything fits. Some of the snaps have disappeared with the installation of a new window frame and with some of the other work, so they will need to be replaced.
At that point, it should be ready to DRIVE home.

Things still do do after that.
1) CB antenna
2) Look at flare options for the rear as well as mud flaps.
3) I may still cover the tops of the front tube fenders.
4) I just got in the factory style driver's side mirror, so that has to go on.
5) Find a way to mount a high lift and a spare tire.
6) Get a working, locking gas cap.
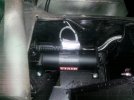
7) Install the hook for winch.
8) Install D-rings or other style anchors front and rear.
9) Fill it with gas and drive it!

Not sure what to do with the MB snorkel cut outs. The intake is already above that level, but the factory snorkel would look cool, but making it functional, might not be worth the time and expense.
 

Attachments

  • front speakers.jpg
    front speakers.jpg
    64.2 KB · Views: 300
  • Dash Plugs.jpg
    Dash Plugs.jpg
    86.4 KB · Views: 299
  • Fuse block.jpg
    Fuse block.jpg
    74.6 KB · Views: 302
  • moving.jpg
    moving.jpg
    73.3 KB · Views: 300
Last edited:
The relay bank is mounted.

If those relays are mounted upside down, you are going to want to either
A) remount them right side up,
or B) drill small relief holes in the bottom (top) of the relay for moisture to escape.
I have seen these fail, even in a 'dry' environment, due to moisture collecting in them over time when mounted upside down, there is no way for moisture to escape, or vent if you will...
 
A couple pics of the dash installed.

That is a working horn button on the removable steering wheel.

Blinkers are working as are the wiper controls. High Beam control is on the floor.

Notice, No ignition switch :awesomework:

Bottom right of the steering wheel is marine radio.

Fully digital instrumentation cluster which includes a GPS based speedometer.

It has an "armed" controller for the winch.

On the panel box on the tube, are all the accessory controls for the electric fan, air compressors, front and rear LED lights,

The round plugs are a 12v power outlet and a USB power outlet.

There's even a check engine light on the dash.

The transmission tunnel is done with line lock installed and the shift boots in place.
 

Attachments

  • Dash1.jpg
    Dash1.jpg
    63.7 KB · Views: 197
  • Dash2.jpg
    Dash2.jpg
    74.5 KB · Views: 195
Last edited:
What's the brand/model of the marine radio? Looking to put tunes in my heep and need marine style because I tend to find water/mud , and alot of the time it ends up inside the cockpit with me :haha:
 
What's the brand/model of the marine radio? Looking to put tunes in my heep and need marine style because I tend to find water/mud , and alot of the time it ends up inside the cockpit with me :haha:

This is the one that I ordered.
Dual MGH30BT Marine Digital Media Plug Radio Receiver with 3" LCD Display and Bluetooth
 
So it RUNS.

This was quite the saga.

The injector system was pumping out HUGE volumes of fuel while trying to fire it up. All the wiring checked out, fuel pressure checked out. Had to borrow an OB1 reader from John Mathews. Of course, John pegged it as soon as I told him the symptoms... the temp sensor wasn't functioning.

So, disconnected the sensor, it fired and ran great. got up to temp, reconnected the sensor. The engine stumbled, trying to figure out what was going on, then stabilized.

Now trying to figure out why it didn't like the sensor.
 

Latest posts

Top