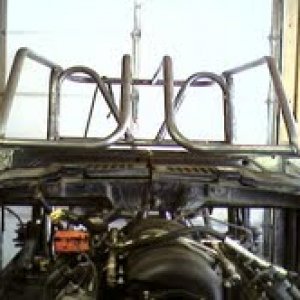
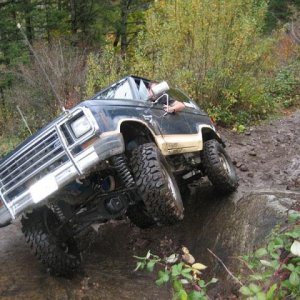
• Help Support Hardline Crawlers :

Dad's stang...

:fawkdancesmiley::fawkdancesmiley::fawkdancesmiley:

Ya I need to give the car a good cleaning when I am done---fooooo shoooo :redneck:

Black doesn't hide much of anything does it...
 
Please dont put stock hubcaps or some homo wire hubcaps on this car...

The build has far to much work, money, and respect in it to do that too it....

If you cant find some sweet 4 lug wheels, get some nice used 5 lug wheels, and a set of 4 to 5 lug adapters ...


Hubcaps is a slap in the face to a beautiful car like this! :awesomework:

Hubcaps are for minivans and commuter cars

I agree--but may have to be for a temp deal till we can find something fitting for the car.... Plus the $$ for the project are getting tight..
 
I have a hard time following this thread... It makes me want to cry...


I'm a grown man, but I can't help but tear up every time I check for updates...
 
I have a hard time following this thread... It makes me want to cry...


I'm a grown man, but I can't help but tear up every time I check for updates...

Try being on this side---doing something, step back and look.... But pretty cool IMO....

What is the lug pattern on the old pony car? I may have a donation.

Its a small 4 lug pattern...
 
I have been spending every second I can out in the shop...

So I found one of the tail lamp connectors bad (center terminal pulled out) so I can't finish the back of the car. But I was able to do the wiring for the speakers and gas tank sensor.

dad389.jpg


dad390.jpg


This is where I diverted from the stock location for the fuel sender. I origionally ran along the front side of the tank. I chose to run it across and down. I felt it would be less intrusive to getting bumped/hit when using the trunk.

dad391.jpg


dad392.jpg
 
One thing that probably hasn't work in, well far before my dad had the car was the E-brake. I figured since early on I replaced the broken pull handle I figured we should probably fix that too. So I had my dad get the main cable. I ended up pounding the roll pin from the pull lever and pulling it out along with the wheel at the base. I did my best to polish/sand the moving areas. the pulley at the base was in poor shape but works and with the little use it will probably see it will be ok.

dad393.jpg


Got the cable in.

dad394.jpg


And I'll be damned--it works now. When I get the car off the ground to undercoat it I will have to actually adjust it--but it works..

dad395.jpg


Now here is one thing I am still fighting. At some point prior to my dad getting the car the tranny was replaced. It has a hurst shifter and I am not sure if thats factory or not. But there is no backup switch anywhere on the trans and I can't find any good info regarding it.

dad396.jpg
 
Well so far there is one thing I have done I was not fully pleased with. I finally got the headdliner done and all the windlace ran where the headdliner is. It just didn't turn out perfect and at the very back concern against the rear window its not tight. Unfortunately between rushing to get the windows in to get it painted and my lack of experiance doing them it just wan't not anything close to perfection. I hope my dad is happy with it(its going to bug me). But it doen't look bad though--just not my liking..

dad397.jpg


dad398.jpg


I got the new sunvisors and rear view mirror installed. Let me tell ya talk about nervous poping holes for them. Luckily I saved the old headliner to help me with the hole locations. But they really turned out perfect.

dad399.jpg


My dad also got a new rear view mirror as the old one was trashed. The mount was also in poor shape but I found another one in the box of parts and after some polish work it too turned out really nice. So I can scrath that stuff off the list as done..

dad400.jpg
 
Ok I got the new package tray cut for the speakers and painted. I really like how it turned out. But damn was it ever tricky to get into place due to the overlap of the rear window seal. But I found if I took paper and stuck it between the tray and the seal I then was able to easily work the tray under the seal then gently pulled the paper out--worked like a charm (still tough though). But I reworked the two mounting clips and its all good.

dad401.jpg


dad402.jpg


I also got the new shield behind the seats trimmed as needed (lower seat back screw holes and seatbelt holes) and got that mounted. So now I can scratch that stuff off the list.

dad403.jpg
 
So I got everything I needed done and went and cleaned and vacumed the floor.

dad404.jpg


Time to lay some rug!!!! So this is where I quit for tonight and will hit it again early in the am..

dad405.jpg
 
:cheer: Ihadagoodidea! Ihadagoodidea! :haha:

Mike, on that headliner thing... one thing I learned installing it into my '66, on the directions that came with the headliner, plus I talked with a couple interior guys, and they all said that if anything, it's ok to end up with it a bit loose, as the material will shrink abit over time...
Yours does look like it got pulled a bit tight in the middle...That's ok, it's waaaay better than it was prior to this whole project!!! :cheer:

Thanks Kev....
 
So got up early this morning and back to it. I started off the morning by getting the rear window felts installed on the rear inner quarter covers. I thought it would be a simple staple them on but of course the holes were in the wrong spots,lol. So it was a matter of drilling new "tiny" holes and then manually stapleing them on. I thought they turned out perfect and nice and tight.

dad406.jpg


dad407.jpg


This is one thing that still confuses me and I gotta figure out for the outer felt for the rear window. You can see the nothed holes for the reatianing clips but I can't quite tell whats supposed to be on the outer edge (closest). It almost looks like a rivat but its not.

dad408.jpg
 
Now things are really starting to take shape...

I started by getting the back half of the carpet roughed in and then get the quarters installed. The quaters overlap the carpet so you gotta make sure its set in place where ya want it. I also had screws that were a tad too long so I had to shorten them up but they fit right in place nicely..

dad409.jpg


Then I got the new seatbelts installed and seat back (seat back overlaps the belts). I had to do a little work to the lower seat where the seat pops into the retainer (was not tight enough tension).

dad410.jpg


I was not sure how the fitment at the seat back to package tray was going to be but it turned out NICE.

dad411.jpg


But once that was done they turned out WONDERFULL. I had to stand back and just look at it. Now the car is looking like something.
 
Top